macOS full height sidebar window
Recently, I wanted a full height sidebar as well as a rich toolbar & titlebar in my macOS app.
For this there’s NavigationSplitView on SwiftUI and NSSplitViewController on AppKit APIs to do it.
In SwiftUI App lifecycle
I quickly experienced the NavigationSplitView in a sample project with WindowGroup and it works like a charm:
In an AppKit App lifecycle
But as soon as I get back to my real project using NSHostingController or even using AppKit and NSSplitViewController (because my app is not fully migrated to SwiftUI app lifecycle). It has a different behavior by default and I can’t understand why in the first place.
I first try to compare window view hierarchy in Xcode:
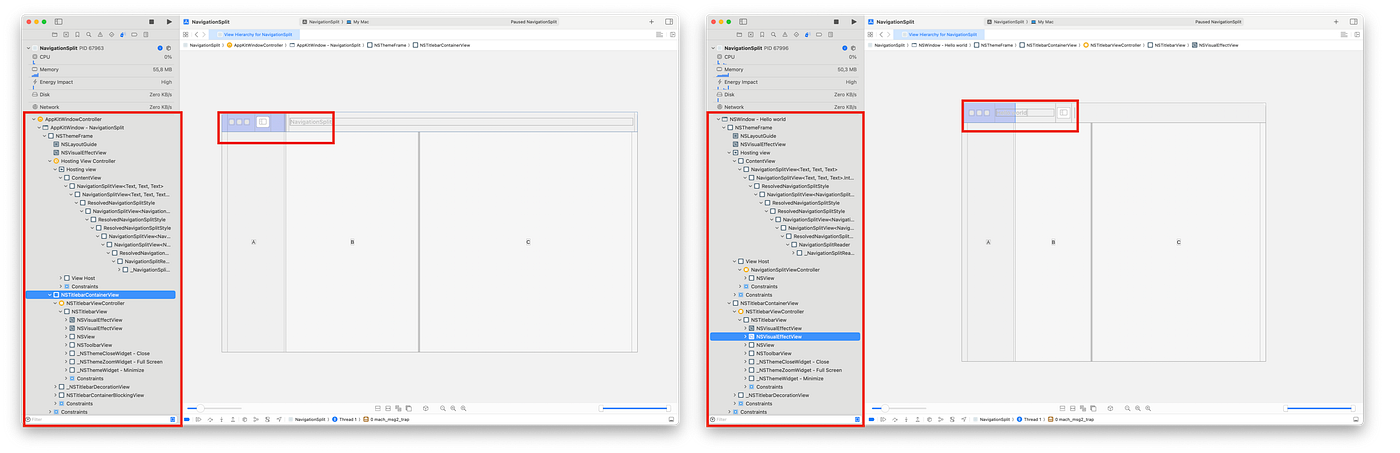
but seems to be almost the same.
After many research I’ve found and watched:
- https://stackoverflow.com/questions/78604429/using-sidebar-button-jump-in-swiftui-navigationsplitview-with-nshostingcontrolle/78615176#78615176
- https://developer.apple.com/videos/play/wwdc2020/10104/
Here’s how to do it if like me your project is not yet converted to a SwiftUI app lifecycle:
// Using SwiftUI.NavigationSplitView with NSHostingView or NSHostingController
// 👀 Look at .fullSizeContentView
let window = NSWindow(contentRect: .init(origin: .zero, size: .init(width: 800, height: 600)), styleMask: [.closable, .miniaturizable, .titled, .resizable, .fullSizeContentView], backing: .buffered, defer: false)
window.contentView = NSHostingView(rootView: ContentView())
window.center()
window.title = "Hello world"
let controller = NSWindowController(window: window)
controller.showWindow(nil)

...
struct ContentView: View {
    var body: some View {
        NavigationSplitView {
            Text("A")
        } content: {
            Text("B")
        } detail: {
            Text("C")
        }
    }
}
// 👀 Using NSSplitViewController
window = NSWindow(
contentRect: NSRect(x: 0, y: 0, width: 800, height: 600),
// 👀 Look at .fullSizeContentView
styleMask: [.titled, .closable, .resizable, .miniaturizable, .fullSizeContentView],
backing: .buffered,
defer: false
)
window.center()
window.title = "Hello world"
window.titlebarAppearsTransparent = true
let toolbar = NSToolbar(identifier: "my-identifier")
toolbar.delegate = self
toolbar.allowsUserCustomization = false
toolbar.displayMode = .iconOnly
self.window?.toolbar = toolbar
// 👀 Look at sidebarWithViewController
let sidebarItem = NSSplitViewItem(sidebarWithViewController: SidebarViewController())
sidebarItem.allowsFullHeightLayout = true
sidebarItem.minimumThickness = 200
sidebarItem.maximumThickness = 300
sidebarItem.canCollapse = true
sidebarItem.isCollapsed = false
splitViewController.addSplitViewItem(sidebarItem)
// 👀 Look at contentListWithViewController
let mainContentItem = NSSplitViewItem(contentListWithViewController: MainContentViewController())
mainContentItem.allowsFullHeightLayout = true
splitViewController.addSplitViewItem(mainContentItem)
let windowController = NSWindowController(window: window)
windowController.contentViewController = splitViewController
windowController.showWindow(nil)
...
private extension NSToolbarItem.Identifier {
static let searchItem: NSToolbarItem.Identifier = NSToolbarItem.Identifier(rawValue: "SearchItem")
}
extension AppDelegate: NSToolbarDelegate {
func toolbarDefaultItemIdentifiers(_ toolbar: NSToolbar) -> [NSToolbarItem.Identifier] {
return [
.toggleSidebar,
// 👀 Look at sidebarTrackingSeparator
.sidebarTrackingSeparator,
.flexibleSpace,
.searchItem
]
}
func toolbarAllowedItemIdentifiers(_ toolbar: NSToolbar) -> [NSToolbarItem.Identifier] {
return toolbarDefaultItemIdentifiers(toolbar)
}
func toolbar(_ toolbar: NSToolbar, itemForItemIdentifier itemIdentifier: NSToolbarItem.Identifier, willBeInsertedIntoToolbar flag: Bool) -> NSToolbarItem? {
var toolbarItem: NSToolbarItem?
switch itemIdentifier {
case .toggleSidebar:
let item = NSToolbarItem(itemIdentifier: .toggleSidebar)
item.image = NSImage(systemSymbolName: "sidebar.left", accessibilityDescription: nil)
toolbarItem = item
case .sidebarTrackingSeparator:
let item = NSToolbarItem(itemIdentifier: .sidebarTrackingSeparator)
toolbarItem = item
case .searchItem:
let searchToolbarItem = NSSearchToolbarItem(itemIdentifier: .searchItem)
searchToolbarItem.searchField = .init()
toolbarItem = searchToolbarItem
default:
toolbarItem = nil
}
toolbarItem?.isBordered = true
return toolbarItem
}
}In case of AppKit with NSSplitViewController, the code is more verbose but key points are using .fullSizeContentView in your window’s styleMask and using sidebarTrackingSeparator. AppKit uses sidebarTrackingSeparator to know where to place the separator inside the title bar and make the full height bar effective.
And voilà, yourNavigationSplitView has the same style and behavior as when you used WindowGroup and full SwiftUI app lifecycle.
Hopes it can help others in the future. I honestly loosed quite a few hours on this :(