How to use the graph API
如何使用图 API
This guide demonstrates the basics of LangGraph's Graph API. It walks through state, as well as composing common graph structures such as sequences, branches, and loops. It also covers LangGraph's control features, including the Send API for map-reduce workflows and the Command API for combining state updates with "hops" across nodes.
本指南演示了 LangGraph 的 Graph API 的基础知识。它遍历状态 ,以及组成常见的图形结构,如序列 、 分支和循环 。它还涵盖了 LangGraph 的控制功能,包括用于映射缩减工作流的 Send API 和用于将状态更新与节点间的“跳”相结合的 Command API。
Setup¶ 设置 
Install langgraph:
安装 langgraph:
Set up LangSmith for better debugging
设置 LangSmith 以便更好地调试
Sign up for LangSmith to quickly spot issues and improve the performance of your LangGraph projects. LangSmith lets you use trace data to debug, test, and monitor your LLM apps built with LangGraph — read more about how to get started in the docs.
注册 LangSmith 以快速发现问题并提高 LangGraph 项目的性能。LangSmith 允许您使用跟踪数据来调试、测试和监控使用 LangGraph 构建的 LLM 应用程序-阅读更多关于如何开始的文档。
Define and update state
定义和更新状态 
Here we show how to define and update state in LangGraph. We will demonstrate:
在这里,我们展示了如何在 LangGraph 中定义和更新状态 。我们将演示:
- How to use state to define a graph's schema
如何使用状态定义图的模式 - How to use reducers to control how state updates are processed.
如何使用 reducer 来控制状态更新的处理方式。
Define state
定义状态 
State in LangGraph can be a TypedDict, Pydantic model, or dataclass. Below we will use TypedDict. See this section for detail on using Pydantic.
LangGraph 中的状态可以是 TypedDict、Pydantic 模型或类。下面我们将使用 TypedDict。有关使用 Pydantic 的详细信息,请参阅本节 。
By default, graphs will have the same input and output schema, and the state determines that schema. See this section for how to define distinct input and output schemas.
默认情况下,图形将具有相同的输入和输出模式,并且状态决定该模式。请参阅本节了解如何定义不同的输入和输出模式。
Let's consider a simple example using messages. This represents a versatile formulation of state for many LLM applications. See our concepts page for more detail.
让我们考虑一个使用消息的简单示例。这代表了许多 LLM 应用程序的通用状态公式。请参阅我们的概念页面了解更多详情。
API Reference: AnyMessage
API 参考:AnyMessage
from langchain_core.messages import AnyMessage
from typing_extensions import TypedDict

class State(TypedDict):
    messages: list[AnyMessage]
    extra_field: int
This state tracks a list of message objects, as well as an extra integer field.
此状态跟踪消息对象列表以及一个额外的整数字段。
Update state
更新状态 
Let's build an example graph with a single node. Our node is just a Python function that reads our graph's state and makes updates to it. The first argument to this function will always be the state:
让我们构建一个具有单个节点的示例图。我们的节点只是一个 Python 函数,它读取我们的图的状态并对其进行更新。这个函数的第一个参数将始终是状态:
API Reference: AIMessage API 参考:AIMessage
from langchain_core.messages import AIMessage

def node(state: State):
    messages = state["messages"]
    new_message = AIMessage("Hello!")
    return {"messages": messages + [new_message], "extra_field": 10}
This node simply appends a message to our message list, and populates an extra field.
该节点只是将消息添加到我们的消息列表中,并填充一个额外的字段。
Important 重要
Nodes should return updates to the state directly, instead of mutating the state.
节点应该直接返回状态的更新,而不是改变状态。
Let's next define a simple graph containing this node. We use StateGraph to define a graph that operates on this state. We then use add_node populate our graph.
接下来,让我们定义一个包含此节点的简单图。我们使用 StateGraph 来定义一个对这个状态进行操作的图。然后我们使用 add_node 填充我们的图。
API Reference: StateGraph
API 参考:StateGraph
from langgraph.graph import StateGraph

builder = StateGraph(State)
builder.add_node(node)
builder.set_entry_point("node")
graph = builder.compile()
LangGraph provides built-in utilities for visualizing your graph. Let's inspect our graph. See this section for detail on visualization.
LangGraph 提供了内置的实用程序来可视化您的图形。让我们看看我们的图表。有关可视化的详细信息,请参阅本节 。
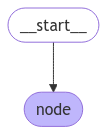
In this case, our graph just executes a single node. Let's proceed with a simple invocation:
在这种情况下,我们的图只执行一个节点。让我们继续一个简单的调用:
API Reference: HumanMessage
API 参考:HumanMessage
from langchain_core.messages import HumanMessage

result = graph.invoke({"messages": [HumanMessage("Hi")]})
result
Note that: 请注意:
- We kicked off invocation by updating a single key of the state.
我们通过更新状态的一个键来启动调用。 - We receive the entire state in the invocation result.
我们在调用结果中接收整个状态。
For convenience, we frequently inspect the content of message objects via pretty-print:
为了方便起见,我们经常通过 pretty-print 检查消息对象的内容:
================================ Human Message ================================
Hi
================================== Ai Message ==================================
Hello!
Process state updates with reducers
使用 reducer 处理状态更新 
Each key in the state can have its own independent reducer function, which controls how updates from nodes are applied. If no reducer function is explicitly specified then it is assumed that all updates to the key should override it.
状态中的每个关键点都可以有自己独立的 reducer 函数,该函数控制如何应用来自节点的更新。如果没有明确指定 reducer 函数,则假定对键的所有更新都应该覆盖它。
For TypedDict state schemas, we can define reducers by annotating the corresponding field of the state with a reducer function.
对于 TypedDict 状态模式,我们可以通过使用 reducer 函数注释状态的相应字段来定义 reducer。
In the earlier example, our node updated the "messages" key in the state by appending a message to it. Below, we add a reducer to this key, such that updates are automatically appended:
在前面的例子中,我们的节点通过向状态中的“messages” 键添加消息来更新它。下面,我们向这个键添加一个 reducer,这样更新就会自动添加:
from typing_extensions import Annotated
def add(left, right):
"""Can also import `add` from the `operator` built-in."""
return left + right
class State(TypedDict):
messages: Annotated[list[AnyMessage], add]
extra_field: int
Now our node can be simplified:
现在我们的节点可以简化:
def node(state: State):
new_message = AIMessage("Hello!")
return {"messages": [new_message], "extra_field": 10}
from langgraph.graph import START
graph = StateGraph(State).add_node(node).add_edge(START, "node").compile()
result = graph.invoke({"messages": [HumanMessage("Hi")]})
for message in result["messages"]:
    message.pretty_print()
================================ Human Message ================================

Hi
================================== Ai Message ==================================

Hello!
MessagesState
MessagesState 状态 
In practice, there are additional considerations for updating lists of messages:
在实践中,更新消息列表还有其他考虑因素:
- We may wish to update an existing message in the state.
我们可能希望更新状态中的现有消息。 - We may want to accept short-hands for message formats, such as OpenAI format.
我们可能希望接受消息格式的简写,例如 OpenAI 格式 。
LangGraph includes a built-in reducer add_messages that handles these considerations:
LangGraph 包含一个内置的 reduceradd_messages,它可以处理这些注意事项:
API Reference: add_messages
API 参考:add_messages
from langgraph.graph.message import add_messages
class State(TypedDict):
messages: Annotated[list[AnyMessage], add_messages]
extra_field: int
def node(state: State):
    new_message = AIMessage("Hello!")
    return {"messages": [new_message], "extra_field": 10}
graph = StateGraph(State).add_node(node).set_entry_point("node").compile()
input_message = {"role": "user", "content": "Hi"}
result = graph.invoke({"messages": [input_message]})
for message in result["messages"]:
message.pretty_print()
================================ Human Message ================================

Hi
================================== Ai Message ==================================

Hello!
This is a versatile representation of state for applications involving chat models. LangGraph includes a pre-built MessagesState for convenience, so that we can have:
这是一种通用的状态表示,适用于涉及聊天模型的应用程序。LangGraph 包括一个预先构建的 MessagesState,以便我们可以:
Define input and output schemas
定义输入和输出模式 
By default, StateGraph operates with a single schema, and all nodes are expected to communicate using that schema. However, it's also possible to define distinct input and output schemas for a graph.
默认情况下,StateGraph 使用单个模式运行,所有节点都应该使用该模式进行通信。 但是,也可以为图定义不同的输入和输出模式。
When distinct schemas are specified, an internal schema will still be used for communication between nodes.
当指定了不同的模式时,节点之间的通信仍将使用内部模式。
The input schema ensures that the provided input matches the expected structure, while the output schema filters the internal data to return only the relevant information according to the defined output schema.
输入模式确保提供的输入与预期的结构相匹配,而输出模式则根据定义的输出模式过滤内部数据,以仅返回相关信息。
Below, we'll see how to define distinct input and output schema.
下面,我们将看到如何定义不同的输入和输出模式。
API Reference: StateGraph | START | END
API 参考:StateGraph|开始|端
from langgraph.graph import StateGraph, START, END
from typing_extensions import TypedDict

# Define the schema for the input
class InputState(TypedDict):
    question: str

# Define the schema for the output
class OutputState(TypedDict):
    answer: str

# Define the overall schema, combining both input and output
class OverallState(InputState, OutputState):
    pass

# Define the node that processes the input and generates an answer
def answer_node(state: InputState):
    # Example answer and an extra key
    return {"answer": "bye", "question": state["question"]}

# Build the graph with input and output schemas specified
builder = StateGraph(OverallState, input_schema=InputState, output_schema=OutputState)
builder.add_node(answer_node)  # Add the answer node
builder.add_edge(START, "answer_node")  # Define the starting edge
builder.add_edge("answer_node", END)  # Define the ending edge
graph = builder.compile()  # Compile the graph

# Invoke the graph with an input and print the result
print(graph.invoke({"question": "hi"}))
Notice that the output of invoke only includes the output schema.
请注意,invoke 的输出仅包括输出模式。
Pass private state between nodes
在节点之间传递私有状态 
In some cases, you may want nodes to exchange information that is crucial for intermediate logic but doesn't need to be part of the main schema of the graph.
在某些情况下,您可能希望节点交换对中间逻辑至关重要的信息,但不需要成为图的主模式的一部分。
This private data is not relevant to the overall input/output of the graph and should only be shared between certain nodes.
这些私有数据与图的整体输入/输出无关,只应在某些节点之间共享。
Below, we'll create an example sequential graph consisting of three nodes (node_1, node_2 and node_3), where private data is passed between the first two steps (node_1 and node_2), while the third step (node_3) only has access to the public overall state.
下面,我们将创建一个由三个节点(node_1,node_2 和 node_3)组成的示例顺序图,其中私有数据在前两个步骤(node_1 和 node_2)之间传递,而第三个步骤(node_3)只能访问公共的整体状态。
API Reference: StateGraph | START | END
API 参考:StateGraph|开始|端
from langgraph.graph import StateGraph, START, END
from typing_extensions import TypedDict

# The overall state of the graph (this is the public state shared across nodes)
class OverallState(TypedDict):
    a: str

# Output from node_1 contains private data that is not part of the overall state
class Node1Output(TypedDict):
    private_data: str

# The private data is only shared between node_1 and node_2
def node_1(state: OverallState) -> Node1Output:
    output = {"private_data": "set by node_1"}
    print(f"Entered node `node_1`:\n\tInput: {state}.\n\tReturned: {output}")
    return output

# Node 2 input only requests the private data available after node_1
class Node2Input(TypedDict):
    private_data: str

def node_2(state: Node2Input) -> OverallState:
    output = {"a": "set by node_2"}
    print(f"Entered node `node_2`:\n\tInput: {state}.\n\tReturned: {output}")
    return output

# Node 3 only has access to the overall state (no access to private data from node_1)
def node_3(state: OverallState) -> OverallState:
    output = {"a": "set by node_3"}
    print(f"Entered node `node_3`:\n\tInput: {state}.\n\tReturned: {output}")
    return output

# Connect nodes in a sequence
# node_2 accepts private data from node_1, whereas
# node_3 does not see the private data.
builder = StateGraph(OverallState).add_sequence([node_1, node_2, node_3])
builder.add_edge(START, "node_1")
graph = builder.compile()

# Invoke the graph with the initial state
response = graph.invoke(
    {
        "a": "set at start",
    }
)

print()
print(f"Output of graph invocation: {response}")
Entered node `node_1`:
    Input: {'a': 'set at start'}.
    Returned: {'private_data': 'set by node_1'}
Entered node `node_2`:
    Input: {'private_data': 'set by node_1'}.
    Returned: {'a': 'set by node_2'}
Entered node `node_3`:
    Input: {'a': 'set by node_2'}.
    Returned: {'a': 'set by node_3'}

Output of graph invocation: {'a': 'set by node_3'}
Use Pydantic models for graph state
对图状态使用 Pydantic 模型 
A StateGraph accepts a state_schema argument on initialization that specifies the "shape" of the state that the nodes in the graph can access and update.
StateGraph 在初始化时接受 state_schema 参数,该参数指定图中的节点可以访问和更新的状态的“形状”。
In our examples, we typically use a python-native TypedDict or dataclass for state_schema, but state_schema can be any type.
在我们的示例中,我们通常使用 Python 原生的 TypedDict 或 dataclass 作为 state_schema,但 state_schema 可以是任何类型 。
Here, we'll see how a Pydantic BaseModel can be used for state_schema to add run-time validation on inputs.
在这里,我们将看到如何将 Pydantic BaseModel 用于 state_schema,以在输入上添加运行时验证。
Known Limitations 已知限制
- Currently, the output of the graph will NOT be an instance of a pydantic model.
目前,图的输出不会是 pydantic 模型的实例。 - Run-time validation only occurs on inputs into nodes, not on the outputs.
运行时验证只发生在节点的输入上,而不是输出上。 - The validation error trace from pydantic does not show which node the error arises in.
pydantic 的验证错误跟踪并没有显示错误发生在哪个节点。 - Pydantic's recursive validation can be slow. For performance-sensitive applications, you may want to consider using a
dataclassinstead.
Pydantic 的递归验证可能很慢。对于对性能敏感的应用程序,您可能需要考虑使用类来代替。
API Reference: StateGraph | START | END
API 参考:StateGraph|开始|端
from langgraph.graph import StateGraph, START, END
from typing_extensions import TypedDict
from pydantic import BaseModel

# The overall state of the graph (this is the public state shared across nodes)
class OverallState(BaseModel):
    a: str

def node(state: OverallState):
    return {"a": "goodbye"}

# Build the state graph
builder = StateGraph(OverallState)
builder.add_node(node)  # node_1 is the first node
builder.add_edge(START, "node")  # Start the graph with node_1
builder.add_edge("node", END)  # End the graph after node_1
graph = builder.compile()

# Test the graph with a valid input
graph.invoke({"a": "hello"})
Invoke the graph with an invalid input
使用无效输入删除图表
try:
    graph.invoke({"a": 123})  # Should be a string
except Exception as e:
    print("An exception was raised because `a` is an integer rather than a string.")
    print(e)
An exception was raised because `a` is an integer rather than a string.
1 validation error for OverallState
a
  Input should be a valid string [type=string_type, input_value=123, input_type=int]
    For further information visit https://errors.pydantic.dev/2.9/v/string_type
See below for additional features of Pydantic model state:
下面是 Pydantic 模型状态的其他特性:
Serialization Behavior 序列化行为
When using Pydantic models as state schemas, it's important to understand how serialization works, especially when: - Passing Pydantic objects as inputs - Receiving outputs from the graph - Working with nested Pydantic models
Let's see these behaviors in action.
from langgraph.graph import StateGraph, START, END
from pydantic import BaseModel

class NestedModel(BaseModel):
    value: str

class ComplexState(BaseModel):
    text: str
    count: int
    nested: NestedModel

def process_node(state: ComplexState):
    # Node receives a validated Pydantic object
    print(f"Input state type: {type(state)}")
    print(f"Nested type: {type(state.nested)}")
    # Return a dictionary update
    return {"text": state.text + " processed", "count": state.count + 1}

# Build the graph
builder = StateGraph(ComplexState)
builder.add_node("process", process_node)
builder.add_edge(START, "process")
builder.add_edge("process", END)
graph = builder.compile()

# Create a Pydantic instance for input
input_state = ComplexState(text="hello", count=0, nested=NestedModel(value="test"))
print(f"Input object type: {type(input_state)}")

# Invoke graph with a Pydantic instance
result = graph.invoke(input_state)
print(f"Output type: {type(result)}")
print(f"Output content: {result}")

# Convert back to Pydantic model if needed
output_model = ComplexState(**result)
print(f"Converted back to Pydantic: {type(output_model)}")
Runtime Type Coercion 强制类型
Pydantic performs runtime type coercion for certain data types. This can be helpful but also lead to unexpected behavior if you're not aware of it.
from langgraph.graph import StateGraph, START, END
from pydantic import BaseModel

class CoercionExample(BaseModel):
    # Pydantic will coerce string numbers to integers
    number: int
    # Pydantic will parse string booleans to bool
    flag: bool

def inspect_node(state: CoercionExample):
    print(f"number: {state.number} (type: {type(state.number)})")
    print(f"flag: {state.flag} (type: {type(state.flag)})")
    return {}

builder = StateGraph(CoercionExample)
builder.add_node("inspect", inspect_node)
builder.add_edge(START, "inspect")
builder.add_edge("inspect", END)
graph = builder.compile()

# Demonstrate coercion with string inputs that will be converted
result = graph.invoke({"number": "42", "flag": "true"})

# This would fail with a validation error
try:
    graph.invoke({"number": "not-a-number", "flag": "true"})
except Exception as e:
    print(f"\nExpected validation error: {e}")
Working with Message Models
使用消息模型
When working with LangChain message types in your state schema, there are important considerations for serialization. You should use AnyMessage (rather than BaseMessage) for proper serialization/deserialization when using message objects over the wire.
from langgraph.graph import StateGraph, START, END
from pydantic import BaseModel
from langchain_core.messages import HumanMessage, AIMessage, AnyMessage
from typing import List

class ChatState(BaseModel):
    messages: List[AnyMessage]
    context: str

def add_message(state: ChatState):
    return {"messages": state.messages + [AIMessage(content="Hello there!")]}

builder = StateGraph(ChatState)
builder.add_node("add_message", add_message)
builder.add_edge(START, "add_message")
builder.add_edge("add_message", END)
graph = builder.compile()

# Create input with a message
initial_state = ChatState(
    messages=[HumanMessage(content="Hi")], context="Customer support chat"
)

result = graph.invoke(initial_state)
print(f"Output: {result}")

# Convert back to Pydantic model to see message types
output_model = ChatState(**result)
for i, msg in enumerate(output_model.messages):
    print(f"Message {i}: {type(msg).__name__} - {msg.content}")
Add runtime configuration
添加运行时配置 
Sometimes you want to be able to configure your graph when calling it. For example, you might want to be able to specify what LLM or system prompt to use at runtime, without polluting the graph state with these parameters.
有时候,你希望在调用图时能够配置它。例如,你可能希望能够指定在运行时使用什么 LLM 或系统提示符,而不会用这些参数污染图的状态 。
To add runtime configuration:
要添加运行时配置,请执行以下操作:
- Specify a schema for your configuration
为您的配置指定架构 - Add the configuration to the function signature for nodes or conditional edges
将配置添加到节点或条件边的函数签名 - Pass the configuration into the graph.
将配置传递到图表中。
See below for a simple example:
下面是一个简单的例子:
API Reference: END | StateGraph | START
API 参考:END|状态图|开始
from langgraph.graph import END, StateGraph, START
from langgraph.runtime import Runtime
from typing_extensions import TypedDict

# 1. Specify config schema
class ContextSchema(TypedDict):
    my_runtime_value: str

# 2. Define a graph that accesses the config in a node
class State(TypedDict):
    my_state_value: str

def node(state: State, runtime: Runtime[ContextSchema]):
    if runtime.context["my_runtime_value"] == "a":
        return {"my_state_value": 1}
    elif runtime.context["my_runtime_value"] == "b":
        return {"my_state_value": 2}
    else:
        raise ValueError("Unknown values.")

builder = StateGraph(State, context_schema=ContextSchema)
builder.add_node(node)
builder.add_edge(START, "node")
builder.add_edge("node", END)

graph = builder.compile()

# 3. Pass in configuration at runtime:
print(graph.invoke({}, context={"my_runtime_value": "a"}))
print(graph.invoke({}, context={"my_runtime_value": "b"}))
Extended example: specifying LLM at runtime
扩展示例:在运行时指定 LLM
Below we demonstrate a practical example in which we configure what LLM to use at runtime. We will use both OpenAI and Anthropic models.
from dataclasses import dataclass

from langchain.chat_models import init_chat_model
from langgraph.graph import MessagesState, END, StateGraph, START
from langgraph.runtime import Runtime
from typing_extensions import TypedDict

@dataclass
class ContextSchema:
    model_provider: str = "anthropic"

MODELS = {
    "anthropic": init_chat_model("anthropic:claude-3-5-haiku-latest"),
    "openai": init_chat_model("openai:gpt-4.1-mini"),
}

def call_model(state: MessagesState, runtime: Runtime[ContextSchema]):
    model = MODELS[runtime.context.model_provider]
    response = model.invoke(state["messages"])
    return {"messages": [response]}

builder = StateGraph(MessagesState, context_schema=ContextSchema)
builder.add_node("model", call_model)
builder.add_edge(START, "model")
builder.add_edge("model", END)

graph = builder.compile()

# Usage
input_message = {"role": "user", "content": "hi"}
# With no configuration, uses default (Anthropic)
response_1 = graph.invoke({"messages": [input_message]})["messages"][-1]
# Or, can set OpenAI
response_2 = graph.invoke({"messages": [input_message]}, context={"model_provider": "openai"})["messages"][-1]

print(response_1.response_metadata["model_name"])
print(response_2.response_metadata["model_name"])
Extended example: specifying model and system message at runtime
扩展示例:在运行时指定模型和系统消息
Below we demonstrate a practical example in which we configure two parameters: the LLM and system message to use at runtime.
from dataclasses import dataclass
from typing import Optional
from langchain.chat_models import init_chat_model
from langchain_core.messages import SystemMessage
from langgraph.graph import END, MessagesState, StateGraph, START
from langgraph.runtime import Runtime
from typing_extensions import TypedDict

@dataclass
class ContextSchema:
    model_provider: str = "anthropic"
    system_message: str | None = None

MODELS = {
    "anthropic": init_chat_model("anthropic:claude-3-5-haiku-latest"),
    "openai": init_chat_model("openai:gpt-4.1-mini"),
}

def call_model(state: MessagesState, runtime: Runtime[ContextSchema]):
    model = MODELS[runtime.context.model_provider]
    messages = state["messages"]
    if (system_message := runtime.context.system_message):
        messages = [SystemMessage(system_message)] + messages
    response = model.invoke(messages)
    return {"messages": [response]}

builder = StateGraph(MessagesState, context_schema=ContextSchema)
builder.add_node("model", call_model)
builder.add_edge(START, "model")
builder.add_edge("model", END)

graph = builder.compile()

# Usage
input_message = {"role": "user", "content": "hi"}
response = graph.invoke({"messages": [input_message]}, context={"model_provider": "openai", "system_message": "Respond in Italian."})
for message in response["messages"]:
    message.pretty_print()
Add retry policies
添加重试策略 
There are many use cases where you may wish for your node to have a custom retry policy, for example if you are calling an API, querying a database, or calling an LLM, etc. LangGraph lets you add retry policies to nodes.
在许多用例中,您可能希望您的节点具有自定义重试策略,例如,如果您正在调用 API,查询数据库或调用 LLM 等。LangGraph 允许您向节点添加重试策略。
To configure a retry policy, pass the retry_policy parameter to the add_node. The retry_policy parameter takes in a RetryPolicy named tuple object. Below we instantiate a RetryPolicy object with the default parameters and associate it with a node:
要配置重试策略,请将 retry_policy 参数传递给 add_node。retry_policy 参数接受一个名为 RetryPolicy 的元组对象。下面我们使用默认参数实例化 RetryPolicy 对象,并将其与节点关联:
from langgraph.pregel import RetryPolicy

builder.add_node(
    "node_name",
    node_function,
    retry_policy=RetryPolicy(),
)
By default, the retry_on parameter uses the default_retry_on function, which retries on any exception except for the following:
默认情况下,retry_on 参数使用 default_retry_on 函数,该函数会对除以下情况以外的任何异常进行重试:
ValueErrorTypeErrorArithmeticErrorImportErrorLookupErrorNameErrorSyntaxErrorRuntimeErrorReferenceErrorStopIterationStopAsyncIterationOSError
In addition, for exceptions from popular http request libraries such as requests and httpx it only retries on 5xx status codes.
此外,对于常见的 http 请求库(如 requests 和 httpx) 的异常,它只会在 5xx 状态码上重试。
Extended example: customizing retry policies
扩展示例:自定义重试策略
Consider an example in which we are reading from a SQL database. Below we pass two different retry policies to nodes:
import sqlite3
from typing_extensions import TypedDict
from langchain.chat_models import init_chat_model
from langgraph.graph import END, MessagesState, StateGraph, START
from langgraph.pregel import RetryPolicy
from langchain_community.utilities import SQLDatabase
from langchain_core.messages import AIMessage

db = SQLDatabase.from_uri("sqlite:///:memory:")
model = init_chat_model("anthropic:claude-3-5-haiku-latest")

def query_database(state: MessagesState):
    query_result = db.run("SELECT * FROM Artist LIMIT 10;")
    return {"messages": [AIMessage(content=query_result)]}

def call_model(state: MessagesState):
    response = model.invoke(state["messages"])
    return {"messages": [response]}

# Define a new graph
builder = StateGraph(MessagesState)
builder.add_node(
    "query_database",
    query_database,
    retry_policy=RetryPolicy(retry_on=sqlite3.OperationalError),
)
builder.add_node("model", call_model, retry_policy=RetryPolicy(max_attempts=5))
builder.add_edge(START, "model")
builder.add_edge("model", "query_database")
builder.add_edge("query_database", END)
graph = builder.compile()
Add node caching
添加节点缓存 
Node caching is useful in cases where you want to avoid repeating operations, like when doing something expensive (either in terms of time or cost). LangGraph lets you add individualized caching policies to nodes in a graph.
在您希望避免重复操作的情况下,节点缓存非常有用,例如在执行一些昂贵的操作(无论是在时间还是成本方面)时。LangGraph 允许您将个性化的缓存策略添加到图中的节点。
To configure a cache policy, pass the cache_policy parameter to the add_node function. In the following example, a CachePolicy object is instantiated with a time to live of 120 seconds and the default key_func generator. Then it is associated with a node:
要配置缓存策略,请将该高速缓存_policy 参数传递给 add_node 函数。在下面的示例中,CachePolicy 对象被实例化,生存时间为 120 秒,并使用默认的 key_func 生成器。然后它与一个节点关联:
from langgraph.types import CachePolicy

builder.add_node(
    "node_name",
    node_function,
    cache_policy=CachePolicy(ttl=120),
)
Then, to enable node-level caching for a graph, set the cache argument when compiling the graph. The example below uses InMemoryCache to set up a graph with in-memory cache, but SqliteCache is also available.
然后,要为图形启用节点级缓存,请在编译图形时设置该高速缓存参数。下面的示例使用 InMemoryCache 来设置一个带有内存缓存的图,但 SqliteCache 也可用。
Create a sequence of steps
创建一系列步骤 
Prerequisites 先决条件
This guide assumes familiarity with the above section on state.
本指南假定您熟悉上面关于状态的部分。
Here we demonstrate how to construct a simple sequence of steps. We will show:
在这里,我们演示如何构建一个简单的步骤序列。我们将展示:
- How to build a sequential graph
如何构建序列图 - Built-in short-hand for constructing similar graphs.
内置的速记用于构建类似的图形。
To add a sequence of nodes, we use the .add_node and .add_edge methods of our graph:
为了添加一系列节点,我们使用图的 .add_node 和 .add_edge 方法:
API Reference: START | StateGraph
API 参考:START|状态图
from langgraph.graph import START, StateGraph

builder = StateGraph(State)

# Add nodes
builder.add_node(step_1)
builder.add_node(step_2)
builder.add_node(step_3)

# Add edges
builder.add_edge(START, "step_1")
builder.add_edge("step_1", "step_2")
builder.add_edge("step_2", "step_3")
We can also use the built-in shorthand .add_sequence:
我们也可以使用内置的简写 .add_sequence:
builder = StateGraph(State).add_sequence([step_1, step_2, step_3])
builder.add_edge(START, "step_1")
Why split application steps into a sequence with LangGraph?
为什么要使用 LangGraph 将应用程序步骤拆分为一个序列?
LangGraph makes it easy to add an underlying persistence layer to your application. This allows state to be checkpointed in between the execution of nodes, so your LangGraph nodes govern:
- How state updates are checkpointed
- How interruptions are resumed in human-in-the-loop workflows
- How we can "rewind" and branch-off executions using LangGraph's time travel features
They also determine how execution steps are streamed, and how your application is visualized and debugged using LangGraph Studio.
Let's demonstrate an end-to-end example. We will create a sequence of three steps:
让我们演示一个端到端的示例。我们将创建一个包含三个步骤的序列:
- Populate a value in a key of the state
在状态的键中填充值 - Update the same value
更新相同的值 - Populate a different value
填充不同的值
Let's first define our state. This governs the schema of the graph, and can also specify how to apply updates. See this section for more detail.
首先,让我们来定义我们的国家 。这控制了图的模式 ,还可以指定如何应用更新。有关详细信息,请参阅本节 。
In our case, we will just keep track of two values:
在我们的例子中,我们将只跟踪两个值:
Our nodes are just Python functions that read our graph's state and make updates to it. The first argument to this function will always be the state:
我们的节点只是读取我们的图的状态并对其进行更新的 Python 函数。此函数的第一个参数将始终是状态:
def step_1(state: State):
    return {"value_1": "a"}

def step_2(state: State):
    current_value_1 = state["value_1"]
    return {"value_1": f"{current_value_1} b"}

def step_3(state: State):
    return {"value_2": 10}
Note 注意
Note that when issuing updates to the state, each node can just specify the value of the key it wishes to update.
请注意,当对状态进行更新时,每个节点只能指定它希望更新的键的值。
By default, this will overwrite the value of the corresponding key. You can also use reducers to control how updates are processed— for example, you can append successive updates to a key instead. See this section for more detail.
默认情况下,这将覆盖相应键的值。 你也可以使用 reducer 来控制更新的处理方式-例如,你可以将连续的更新附加到一个键上。 有关详细信息,请参阅本节。
Finally, we define the graph. We use StateGraph to define a graph that operates on this state.
最后,我们定义了图。我们使用 StateGraph 来定义一个对这个状态进行操作的图。
We will then use add_node and add_edge to populate our graph and define its control flow.
然后我们将使用 add_node 和 add_edge 来填充我们的图并定义其控制流。
API Reference: START | StateGraph
API 参考:START|状态图
from langgraph.graph import START, StateGraph

builder = StateGraph(State)

# Add nodes
builder.add_node(step_1)
builder.add_node(step_2)
builder.add_node(step_3)

# Add edges
builder.add_edge(START, "step_1")
builder.add_edge("step_1", "step_2")
builder.add_edge("step_2", "step_3")
Specifying custom names 禁用自定义名称
You can specify custom names for nodes using .add_node:
您可以使用. add_node 为节点指定自定义名称:
Note that: 请注意:
.add_edgetakes the names of nodes, which for functions defaults tonode.__name__.. add_edge 接受节点的名称,对于函数,默认为 node。__名称__。- We must specify the entry point of the graph. For this we add an edge with the START node.
我们必须指定图的入口点。为此,我们添加一个带有 START 节点的边。 - The graph halts when there are no more nodes to execute.
当没有更多的节点要执行时,图形停止。
We next compile our graph. This provides a few basic checks on the structure of the graph (e.g., identifying orphaned nodes). If we were adding persistence to our application via a checkpointer, it would also be passed in here.
接下来,我们编译图表。这提供了对图的结构的一些基本检查(例如,识别孤立节点)。如果我们通过检查指针向应用程序添加持久性,它也会在这里传递。
LangGraph provides built-in utilities for visualizing your graph. Let's inspect our sequence. See this guide for detail on visualization.
LangGraph 提供了内置的实用程序来可视化您的图形。让我们检查我们的序列。有关可视化的详细信息,请参阅本指南 。
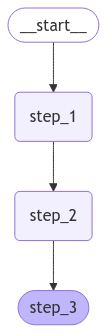
Let's proceed with a simple invocation:
让我们继续一个简单的调用:
Note that: 请注意:
- We kicked off invocation by providing a value for a single state key. We must always provide a value for at least one key.
我们通过为单个状态键提供一个值来启动调用。我们必须始终为至少一个键提供值。 - The value we passed in was overwritten by the first node.
我们传入的值被第一个节点覆盖了。 - The second node updated the value.
第二个节点更新了该值。 - The third node populated a different value.
第三个节点填充了不同的值。
Built-in shorthand 内置速记
langgraph>=0.2.46 includes a built-in short-hand add_sequence for adding node sequences. You can compile the same graph as follows:langgraph>=0.2.46 包含一个内置的用于添加节点序列的简写 add_sequence。您可以按如下方式编译相同的图表:
Create branches
创建分支 
Parallel execution of nodes is essential to speed up overall graph operation. LangGraph offers native support for parallel execution of nodes, which can significantly enhance the performance of graph-based workflows.
节点的并行执行对于加速整个图形操作至关重要。LangGraph 为节点的并行执行提供了原生支持,这可以显着提高基于图的工作流的性能。
This parallelization is achieved through fan-out and fan-in mechanisms, utilizing both standard edges and conditional_edges. Below are some examples showing how to add create branching dataflows that work for you.
这种并行化是通过扇出和扇入机制实现的,同时利用标准边缘和条件边缘 。下面是一些示例,展示了如何添加适合您的创建分支流程。
Run graph nodes in parallel
并行运行图节点 
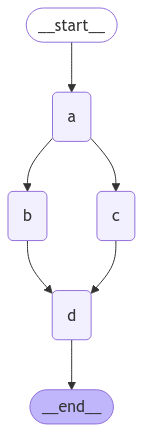
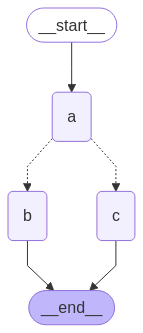
In this example, we fan out from Node A to B and C and then fan in to D. With our state, we specify the reducer add operation. This will combine or accumulate values for the specific key in the State, rather than simply overwriting the existing value. For lists, this means concatenating the new list with the existing list. See the above section on state reducers for more detail on updating state with reducers.
在本例中,我们从节点 A 扇出到 B 和 C,然后扇入到 D。对于我们的状态, 我们指定 reducer add 操作 。这将为 State 中的特定键组合联合收割机或累积值,而不是简单地将现有值重新组合。对于列表,这意味着将新列表与现有列表连接起来。 有关使用 reducer 更新状态的更多详细信息,请参见上面关于状态 reducer 的部分。
API Reference: StateGraph | START | END
API 参考:StateGraph|开始|端
import operator
from typing import Annotated, Any
from typing_extensions import TypedDict
from langgraph.graph import StateGraph, START, END

class State(TypedDict):
    # The operator.add reducer fn makes this append-only
    aggregate: Annotated[list, operator.add]

def a(state: State):
    print(f'Adding "A" to {state["aggregate"]}')
    return {"aggregate": ["A"]}

def b(state: State):
    print(f'Adding "B" to {state["aggregate"]}')
    return {"aggregate": ["B"]}

def c(state: State):
    print(f'Adding "C" to {state["aggregate"]}')
    return {"aggregate": ["C"]}

def d(state: State):
    print(f'Adding "D" to {state["aggregate"]}')
    return {"aggregate": ["D"]}

builder = StateGraph(State)
builder.add_node(a)
builder.add_node(b)
builder.add_node(c)
builder.add_node(d)
builder.add_edge(START, "a")
builder.add_edge("a", "b")
builder.add_edge("a", "c")
builder.add_edge("b", "d")
builder.add_edge("c", "d")
builder.add_edge("d", END)
graph = builder.compile()
With the reducer, you can see that the values added in each node are accumulated.
使用 reducer,您可以看到在每个节点中添加的值都是累积的。
Note 注意
In the above example, nodes "b" and "c" are executed concurrently in the same superstep. Because they are in the same step, node "d" executes after both "b" and "c" are finished.
在上述示例中,节点 “B” 和 “c” 在同一超步中同时执行。因为它们在同一步骤中,所以节点 “d” 在 “B” 和 “c” 都完成之后执行。
Importantly, updates from a parallel superstep may not be ordered consistently. If you need a consistent, predetermined ordering of updates from a parallel superstep, you should write the outputs to a separate field in the state together with a value with which to order them.
重要的是,来自并行超步的更新可能不会一致地排序。如果您需要一个一致的、预定义的并行超步更新顺序,您应该将输出写入状态中的一个单独字段,并使用一个值对它们进行排序。
Exception handling? 异常处理?
LangGraph executes nodes within supersteps, meaning that while parallel branches are executed in parallel, the entire superstep is transactional. If any of these branches raises an exception, none of the updates are applied to the state (the entire superstep errors).
Importantly, when using a checkpointer, results from successful nodes within a superstep are saved, and don't repeat when resumed.
If you have error-prone (perhaps want to handle flakey API calls), LangGraph provides two ways to address this:
- You can write regular python code within your node to catch and handle exceptions.
- You can set a retry_policy to direct the graph to retry nodes that raise certain types of exceptions. Only failing branches are retried, so you needn't worry about performing redundant work.
Together, these let you perform parallel execution and fully control exception handling.
Defer node execution
延迟节点执行 
Deferring node execution is useful when you want to delay the execution of a node until all other pending tasks are completed. This is particularly relevant when branches have different lengths, which is common in workflows like map-reduce flows.
当您希望延迟节点的执行直到所有其他挂起任务完成时,延迟节点执行非常有用。当分支具有不同的长度时,这一点尤其重要,这在诸如 map-reduce 流之类的工作流中很常见。
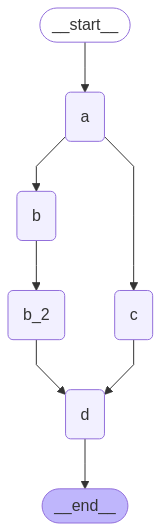
The above example showed how to fan-out and fan-in when each path was only one step. But what if one branch had more than one step? Let's add a node "b_2" in the "b" branch:
上面的例子展示了当每条路径只有一步时如何扇出和扇入。但如果一个分支有多个步骤呢?让我们在 “B” 分支中添加一个节点 “b_2”:
API Reference: StateGraph | START | END
API 参考:StateGraph|开始|端
import operator
from typing import Annotated, Any
from typing_extensions import TypedDict
from langgraph.graph import StateGraph, START, END

class State(TypedDict):
    # The operator.add reducer fn makes this append-only
    aggregate: Annotated[list, operator.add]

def a(state: State):
    print(f'Adding "A" to {state["aggregate"]}')
    return {"aggregate": ["A"]}

def b(state: State):
    print(f'Adding "B" to {state["aggregate"]}')
    return {"aggregate": ["B"]}

def b_2(state: State):
    print(f'Adding "B_2" to {state["aggregate"]}')
    return {"aggregate": ["B_2"]}

def c(state: State):
    print(f'Adding "C" to {state["aggregate"]}')
    return {"aggregate": ["C"]}

def d(state: State):
    print(f'Adding "D" to {state["aggregate"]}')
    return {"aggregate": ["D"]}

builder = StateGraph(State)
builder.add_node(a)
builder.add_node(b)
builder.add_node(b_2)
builder.add_node(c)
builder.add_node(d, defer=True)
builder.add_edge(START, "a")
builder.add_edge("a", "b")
builder.add_edge("a", "c")
builder.add_edge("b", "b_2")
builder.add_edge("b_2", "d")
builder.add_edge("c", "d")
builder.add_edge("d", END)
graph = builder.compile()
Adding "A" to []
Adding "B" to ['A']
Adding "C" to ['A']
Adding "B_2" to ['A', 'B', 'C']
Adding "D" to ['A', 'B', 'C', 'B_2']
In the above example, nodes "b" and "c" are executed concurrently in the same superstep. We set defer=True on node d so it will not execute until all pending tasks are finished. In this case, this means that "d" waits to execute until the entire "b" branch is finished.
在上述示例中,节点 “B” 和 “c” 在同一超步中同时执行。我们在节点 d 上设置 defer=True,这样它就不会执行,直到所有挂起的任务都完成。在这种情况下,这意味着 “d” 等待执行,直到整个 “B” 分支完成。
Conditional branching
条件分支 
If your fan-out should vary at runtime based on the state, you can use add_conditional_edges to select one or more paths using the graph state. See example below, where node a generates a state update that determines the following node.
如果您的扇出在运行时应该根据状态而变化,则可以使用 add_conditional_edges 来使用图形状态选择一个或多个路径。参见下面的示例,其中节点 a 生成状态更新,该状态更新确定以下节点。
API Reference: StateGraph | START | END
API 参考:StateGraph|开始|端
import operator
from typing import Annotated, Literal, Sequence
from typing_extensions import TypedDict
from langgraph.graph import StateGraph, START, END

class State(TypedDict):
    aggregate: Annotated[list, operator.add]
    # Add a key to the state. We will set this key to determine
    # how we branch.
    which: str

def a(state: State):
    print(f'Adding "A" to {state["aggregate"]}')
    return {"aggregate": ["A"], "which": "c"}

def b(state: State):
    print(f'Adding "B" to {state["aggregate"]}')
    return {"aggregate": ["B"]}

def c(state: State):
    print(f'Adding "C" to {state["aggregate"]}')
    return {"aggregate": ["C"]}

builder = StateGraph(State)
builder.add_node(a)
builder.add_node(b)
builder.add_node(c)
builder.add_edge(START, "a")
builder.add_edge("b", END)
builder.add_edge("c", END)

def conditional_edge(state: State) -> Literal["b", "c"]:
    # Fill in arbitrary logic here that uses the state
    # to determine the next node
    return state["which"]

builder.add_conditional_edges("a", conditional_edge)

graph = builder.compile()
Tip 尖端
Your conditional edges can route to multiple destination nodes. For example:
您的条件边可以路由到多个目标节点。举例来说:
Map-Reduce and the Send API
Map-Reduce 和发送 API
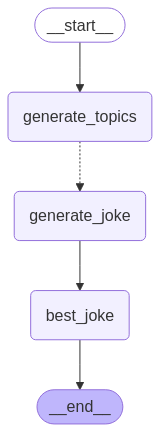
LangGraph supports map-reduce and other advanced branching patterns using the Send API. Here is an example of how to use it:
LangGraph 支持使用 Send API 的 map-reduce 和其他高级分支模式。下面是一个如何使用它的例子:
API Reference: StateGraph | START | END | Send
API 参考:StateGraph|开始|端|发送
from langgraph.graph import StateGraph, START, END
from langgraph.types import Send
from typing_extensions import TypedDict, Annotated
import operator

class OverallState(TypedDict):
    topic: str
    subjects: list[str]
    jokes: Annotated[list[str], operator.add]
    best_selected_joke: str

def generate_topics(state: OverallState):
    return {"subjects": ["lions", "elephants", "penguins"]}

def generate_joke(state: OverallState):
    joke_map = {
        "lions": "Why don't lions like fast food? Because they can't catch it!",
        "elephants": "Why don't elephants use computers? They're afraid of the mouse!",
        "penguins": "Why don't penguins like talking to strangers at parties? Because they find it hard to break the ice."
    }
    return {"jokes": [joke_map[state["subject"]]]}

def continue_to_jokes(state: OverallState):
    return [Send("generate_joke", {"subject": s}) for s in state["subjects"]]

def best_joke(state: OverallState):
    return {"best_selected_joke": "penguins"}

builder = StateGraph(OverallState)
builder.add_node("generate_topics", generate_topics)
builder.add_node("generate_joke", generate_joke)
builder.add_node("best_joke", best_joke)
builder.add_edge(START, "generate_topics")
builder.add_conditional_edges("generate_topics", continue_to_jokes, ["generate_joke"])
builder.add_edge("generate_joke", "best_joke")
builder.add_edge("best_joke", END)
builder.add_edge("generate_topics", END)
graph = builder.compile()
# Call the graph: here we call it to generate a list of jokes
for step in graph.stream({"topic": "animals"}):
    print(step)
{'generate_topics': {'subjects': ['lions', 'elephants', 'penguins']}}
{'generate_joke': {'jokes': ["Why don't lions like fast food? Because they can't catch it!"]}}
{'generate_joke': {'jokes': ["Why don't elephants use computers? They're afraid of the mouse!"]}}
{'generate_joke': {'jokes': ['Why don't penguins like talking to strangers at parties? Because they find it hard to break the ice.']}}
{'best_joke': {'best_selected_joke': 'penguins'}}
Create and control loops
创建和控制循环 
When creating a graph with a loop, we require a mechanism for terminating execution. This is most commonly done by adding a conditional edge that routes to the END node once we reach some termination condition.
当创建一个带有循环的图时,我们需要一个终止执行的机制。这通常是通过添加一个条件边来完成的,一旦我们达到某个终止条件,该条件边就会路由到 END 节点。
You can also set the graph recursion limit when invoking or streaming the graph. The recursion limit sets the number of supersteps that the graph is allowed to execute before it raises an error. Read more about the concept of recursion limits here.
您还可以在调用或流式传输图形时设置图形递归限制。递归限制设置在引发错误之前允许图形执行的超步数。 在这里阅读更多关于递归极限的概念。
Let's consider a simple graph with a loop to better understand how these mechanisms work.
让我们考虑一个带有循环的简单图,以更好地理解这些机制是如何工作的。
Tip 尖端
To return the last value of your state instead of receiving a recursion limit error, see the next section.
要返回状态的最后一个值而不是接收递归限制错误,请参阅下一节 。
When creating a loop, you can include a conditional edge that specifies a termination condition:
创建循环时,可以包含指定终止条件的条件边:
builder = StateGraph(State)
builder.add_node(a)
builder.add_node(b)

def route(state: State) -> Literal["b", END]:
    if termination_condition(state):
        return END
    else:
        return "b"

builder.add_edge(START, "a")
builder.add_conditional_edges("a", route)
builder.add_edge("b", "a")
graph = builder.compile()
To control the recursion limit, specify "recursion_limit" in the config. This will raise a GraphRecursionError, which you can catch and handle:
要控制递归限制,请在配置中指定 “recursion_limit”。这将引发一个 GraphRecursionError,您可以捕获并处理它:
from langgraph.errors import GraphRecursionError

try:
    graph.invoke(inputs, {"recursion_limit": 3})
except GraphRecursionError:
    print("Recursion Error")
Let's define a graph with a simple loop. Note that we use a conditional edge to implement a termination condition.
让我们用一个简单的循环定义一个图。请注意,我们使用条件边来实现终止条件。
API Reference: StateGraph | START | END
API 参考:StateGraph|开始|端
import operator
from typing import Annotated, Literal
from typing_extensions import TypedDict
from langgraph.graph import StateGraph, START, END

class State(TypedDict):
    # The operator.add reducer fn makes this append-only
    aggregate: Annotated[list, operator.add]

def a(state: State):
    print(f'Node A sees {state["aggregate"]}')
    return {"aggregate": ["A"]}

def b(state: State):
    print(f'Node B sees {state["aggregate"]}')
    return {"aggregate": ["B"]}

# Define nodes
builder = StateGraph(State)
builder.add_node(a)
builder.add_node(b)

# Define edges
def route(state: State) -> Literal["b", END]:
    if len(state["aggregate"]) < 7:
        return "b"
    else:
        return END

builder.add_edge(START, "a")
builder.add_conditional_edges("a", route)
builder.add_edge("b", "a")
graph = builder.compile()
This architecture is similar to a ReAct agent in which node "a" is a tool-calling model, and node "b" represents the tools.
此架构类似于 ReAct 代理 ,其中节点 “a” 是工具调用模型,节点 “B” 表示工具。
In our route conditional edge, we specify that we should end after the "aggregate" list in the state passes a threshold length.
在我们的路由条件边中,我们指定在状态中的 “聚合” 列表超过阈值长度后结束。
Invoking the graph, we see that we alternate between nodes "a" and "b" before terminating once we reach the termination condition.
通过绘制图,我们可以看到,一旦达到终止条件,就在终止之前在节点 “a” 和 “B” 之间交替。
Node A sees []
Node B sees ['A']
Node A sees ['A', 'B']
Node B sees ['A', 'B', 'A']
Node A sees ['A', 'B', 'A', 'B']
Node B sees ['A', 'B', 'A', 'B', 'A']
Node A sees ['A', 'B', 'A', 'B', 'A', 'B']
Impose a recursion limit
强加一个递归限制 
In some applications, we may not have a guarantee that we will reach a given termination condition. In these cases, we can set the graph's recursion limit. This will raise a GraphRecursionError after a given number of supersteps. We can then catch and handle this exception:
在某些应用程序中,我们可能无法保证我们将达到给定的终止条件。在这些情况下,我们可以设置图的递归限制 。这将在给定的超级步数后引发 GraphRecursionError。然后我们可以捕获并处理这个异常:
from langgraph.errors import GraphRecursionError

try:
    graph.invoke({"aggregate": []}, {"recursion_limit": 4})
except GraphRecursionError:
    print("Recursion Error")
Node A sees []
Node B sees ['A']
Node C sees ['A', 'B']
Node D sees ['A', 'B']
Node A sees ['A', 'B', 'C', 'D']
Recursion Error
Extended example: return state on hitting recursion limit
扩展示例:在达到递归限制时返回状态
Instead of raising GraphRecursionError, we can introduce a new key to the state that keeps track of the number of steps remaining until reaching the recursion limit. We can then use this key to determine if we should end the run.
LangGraph implements a special RemainingSteps annotation. Under the hood, it creates a ManagedValue channel -- a state channel that will exist for the duration of our graph run and no longer.
import operator
from typing import Annotated, Literal
from typing_extensions import TypedDict
from langgraph.graph import StateGraph, START, END
from langgraph.managed.is_last_step import RemainingSteps

class State(TypedDict):
    aggregate: Annotated[list, operator.add]
    remaining_steps: RemainingSteps

def a(state: State):
    print(f'Node A sees {state["aggregate"]}')
    return {"aggregate": ["A"]}

def b(state: State):
    print(f'Node B sees {state["aggregate"]}')
    return {"aggregate": ["B"]}

# Define nodes
builder = StateGraph(State)
builder.add_node(a)
builder.add_node(b)

# Define edges
def route(state: State) -> Literal["b", END]:
    if state["remaining_steps"] <= 2:
        return END
    else:
        return "b"

builder.add_edge(START, "a")
builder.add_conditional_edges("a", route)
builder.add_edge("b", "a")
graph = builder.compile()

# Test it out
result = graph.invoke({"aggregate": []}, {"recursion_limit": 4})
print(result)
Extended example: loops with branches
扩展示例:带有分支的循环
To better understand how the recursion limit works, let's consider a more complex example. Below we implement a loop, but one step fans out into two nodes:
import operator
from typing import Annotated, Literal
from typing_extensions import TypedDict
from langgraph.graph import StateGraph, START, END

class State(TypedDict):
    aggregate: Annotated[list, operator.add]

def a(state: State):
    print(f'Node A sees {state["aggregate"]}')
    return {"aggregate": ["A"]}

def b(state: State):
    print(f'Node B sees {state["aggregate"]}')
    return {"aggregate": ["B"]}

def c(state: State):
    print(f'Node C sees {state["aggregate"]}')
    return {"aggregate": ["C"]}

def d(state: State):
    print(f'Node D sees {state["aggregate"]}')
    return {"aggregate": ["D"]}

# Define nodes
builder = StateGraph(State)
builder.add_node(a)
builder.add_node(b)
builder.add_node(c)
builder.add_node(d)

# Define edges
def route(state: State) -> Literal["b", END]:
    if len(state["aggregate"]) < 7:
        return "b"
    else:
        return END

builder.add_edge(START, "a")
builder.add_conditional_edges("a", route)
builder.add_edge("b", "c")
builder.add_edge("b", "d")
builder.add_edge(["c", "d"], "a")
graph = builder.compile()
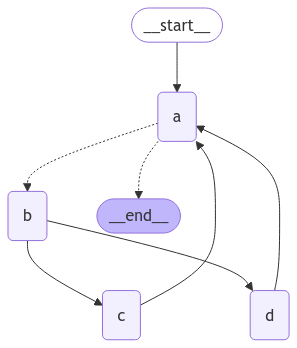
This graph looks complex, but can be conceptualized as loop of supersteps:
- Node A
- Node B
- Nodes C and D
- Node A
- ...
We have a loop of four supersteps, where nodes C and D are executed concurrently.
Invoking the graph as before, we see that we complete two full "laps" before hitting the termination condition:
Node A sees []
Node B sees ['A']
Node D sees ['A', 'B']
Node C sees ['A', 'B']
Node A sees ['A', 'B', 'C', 'D']
Node B sees ['A', 'B', 'C', 'D', 'A']
Node D sees ['A', 'B', 'C', 'D', 'A', 'B']
Node C sees ['A', 'B', 'C', 'D', 'A', 'B']
Node A sees ['A', 'B', 'C', 'D', 'A', 'B', 'C', 'D']
However, if we set the recursion limit to four, we only complete one lap because each lap is four supersteps:
Async¶ 异步 
Using the async programming paradigm can produce significant performance improvements when running IO-bound code concurrently (e.g., making concurrent API requests to a chat model provider).
当并发地运行 IO 绑定代码时,使用 Java 编程范例可以产生显著的性能改进(例如,向聊天模型提供者发出并发 API 请求)。
To convert a sync implementation of the graph to an async implementation, you will need to:
要将图的同步实现转换为同步实现,您需要:
- Update
nodesuseasync definstead ofdef.
更新节点使用dec def而不是def。 - Update the code inside to use
awaitappropriately.
更新里面的代码以适当地使用await。 - Invoke the graph with
.ainvokeor.astreamas desired.
根据需要使用.ainvoke或.astream标记图形。
Because many LangChain objects implement the Runnable Protocol which has async variants of all the sync methods it's typically fairly quick to upgrade a sync graph to an async graph.
因为许多 LangChain 对象实现了 Runnable Protocol,它具有所有同步方法的 JavaC 变体,所以通常将同步图升级为 JavaC 图相当快。
See example below. To demonstrate async invocations of underlying LLMs, we will include a chat model:
参见下面的示例。为了演示底层 LLM 的 CMAC 调用,我们将包括一个聊天模型:
import os
from langchain.chat_models import init_chat_model

os.environ["OPENAI_API_KEY"] = "sk-..."

llm = init_chat_model("openai:gpt-4.1")
👉 Read the OpenAI integration docs
import os
from langchain.chat_models import init_chat_model

os.environ["ANTHROPIC_API_KEY"] = "sk-..."

llm = init_chat_model("anthropic:claude-3-5-sonnet-latest")
👉 Read the Anthropic integration docs
import os
from langchain.chat_models import init_chat_model

os.environ["AZURE_OPENAI_API_KEY"] = "..."
os.environ["AZURE_OPENAI_ENDPOINT"] = "..."
os.environ["OPENAI_API_VERSION"] = "2025-03-01-preview"

llm = init_chat_model(
    "azure_openai:gpt-4.1",
    azure_deployment=os.environ["AZURE_OPENAI_DEPLOYMENT_NAME"],
)
👉 Read the Azure integration docs
import os
from langchain.chat_models import init_chat_model

os.environ["GOOGLE_API_KEY"] = "..."

llm = init_chat_model("google_genai:gemini-2.0-flash")
👉 Read the Google GenAI integration docs
👉阅读 Google GenAI 集成文档
from langchain.chat_models import init_chat_model

# Follow the steps here to configure your credentials:
# https://docs.aws.amazon.com/bedrock/latest/userguide/getting-started.html

llm = init_chat_model(
    "anthropic.claude-3-5-sonnet-20240620-v1:0",
    model_provider="bedrock_converse",
)
👉 Read the AWS Bedrock integration docs
API Reference: init_chat_model | StateGraph
API 参考:init_chat_model|状态图
from langchain.chat_models import init_chat_model
from langgraph.graph import MessagesState, StateGraph

async def node(state: MessagesState):
    new_message = await llm.ainvoke(state["messages"])
    return {"messages": [new_message]}

builder = StateGraph(MessagesState).add_node(node).set_entry_point("node")
graph = builder.compile()

input_message = {"role": "user", "content": "Hello"}
result = await graph.ainvoke({"messages": [input_message]})
Async streaming 异步流
See the streaming guide for examples of streaming with async.
请参阅流媒体指南 ,了解使用 Woodsc 进行流媒体的示例。
Combine control flow and state updates with Command
使用 Command 将联合收割机控制流和状态更新结合起来
It can be useful to combine control flow (edges) and state updates (nodes). For example, you might want to BOTH perform state updates AND decide which node to go to next in the SAME node. LangGraph provides a way to do so by returning a Command object from node functions:
组合联合收割机控制流(边)和状态更新(节点)可能是有用的。例如,您可能既要执行状态更新,又要决定在 MySQL 节点中下一个要转到哪个节点。LangGraph 提供了一种方法,通过从节点函数返回一个 Command 对象来实现:
def my_node(state: State) -> Command[Literal["my_other_node"]]:
    return Command(
        # state update
        update={"foo": "bar"},
        # control flow
        goto="my_other_node"
    )
We show an end-to-end example below. Let's create a simple graph with 3 nodes: A, B and C. We will first execute node A, and then decide whether to go to Node B or Node C next based on the output of node A.
我们在下面展示了一个端到端的示例。让我们创建一个简单的图,其中有 3 个节点:A、B 和 C。我们将首先执行节点 A,然后根据节点 A 的输出决定下一步是转到节点 B 还是节点 C。
API Reference: StateGraph | START | Command
API 参考:StateGraph|开始|命令
import random
from typing_extensions import TypedDict, Literal
from langgraph.graph import StateGraph, START
from langgraph.types import Command

# Define graph state
class State(TypedDict):
    foo: str

# Define the nodes

def node_a(state: State) -> Command[Literal["node_b", "node_c"]]:
    print("Called A")
    value = random.choice(["b", "c"])
    # this is a replacement for a conditional edge function
    if value == "b":
        goto = "node_b"
    else:
        goto = "node_c"

    # note how Command allows you to BOTH update the graph state AND route to the next node
    return Command(
        # this is the state update
        update={"foo": value},
        # this is a replacement for an edge
        goto=goto,
    )

def node_b(state: State):
    print("Called B")
    return {"foo": state["foo"] + "b"}

def node_c(state: State):
    print("Called C")
    return {"foo": state["foo"] + "c"}
We can now create the StateGraph with the above nodes. Notice that the graph doesn't have conditional edges for routing! This is because control flow is defined with Command inside node_a.
我们现在可以用上面的节点创建 StateGraph。请注意,图中没有用于路由的条件边 !这是因为控制流是用 node_a 中的 Command 定义的。
builder = StateGraph(State)
builder.add_edge(START, "node_a")
builder.add_node(node_a)
builder.add_node(node_b)
builder.add_node(node_c)
# NOTE: there are no edges between nodes A, B and C!

graph = builder.compile()
Important 重要
You might have noticed that we used Command as a return type annotation, e.g. Command[Literal["node_b", "node_c"]]. This is necessary for the graph rendering and tells LangGraph that node_a can navigate to node_b and node_c.
您可能已经注意到我们使用 Command 作为返回类型注释,例如 Command[Literal["node_b", "node_c"]] 。 这对于图形渲染是必要的,并告诉 LangGraph node_a 可以导航到 node_B 和 node_c。
If we run the graph multiple times, we'd see it take different paths (A -> B or A -> C) based on the random choice in node A.
如果我们多次运行该图,我们会看到它会根据节点 A 中的随机选择采取不同的路径(A -> B 或 A -> C)。
Navigate to a node in a parent graph
导航到父图中的节点 
If you are using subgraphs, you might want to navigate from a node within a subgraph to a different subgraph (i.e. a different node in the parent graph). To do so, you can specify graph=Command.PARENT in Command:
如果您使用子图 ,您可能希望从子图中的节点导航到不同的子图(即父图中的不同节点)。为此,您可以在 Command 中指定 graph=Command. PANView:
def my_node(state: State) -> Command[Literal["my_other_node"]]:
    return Command(
        update={"foo": "bar"},
        goto="other_subgraph",  # where `other_subgraph` is a node in the parent graph
        graph=Command.PARENT
    )
Let's demonstrate this using the above example. We'll do so by changing node_a in the above example into a single-node graph that we'll add as a subgraph to our parent graph.
让我们用上面的例子来说明这一点。我们将通过将上面示例中的 node_a 更改为单节点图来实现这一点,并将其作为子图添加到父图中。
State updates with Command.PARENT
使用 Command. PANDO 更新状态
When you send updates from a subgraph node to a parent graph node for a key that's shared by both parent and subgraph state schemas, you must define a reducer for the key you're updating in the parent graph state. See the example below.
当您将更新从子图节点发送到父图节点时,对于父图和子图状态模式共享的键,您必须为在父图状态中更新的键定义一个 reducer。请参阅下面的示例。
import operator
from typing_extensions import Annotated

class State(TypedDict):
    # NOTE: we define a reducer here
    foo: Annotated[str, operator.add]

def node_a(state: State):
    print("Called A")
    value = random.choice(["a", "b"])
    # this is a replacement for a conditional edge function
    if value == "a":
        goto = "node_b"
    else:
        goto = "node_c"

    # note how Command allows you to BOTH update the graph state AND route to the next node
    return Command(
        update={"foo": value},
        goto=goto,
        # this tells LangGraph to navigate to node_b or node_c in the parent graph
        # NOTE: this will navigate to the closest parent graph relative to the subgraph
        graph=Command.PARENT,
    )

subgraph = StateGraph(State).add_node(node_a).add_edge(START, "node_a").compile()

def node_b(state: State):
    print("Called B")
    # NOTE: since we've defined a reducer, we don't need to manually append
    # new characters to existing 'foo' value. instead, reducer will append these
    # automatically (via operator.add)
    return {"foo": "b"}

def node_c(state: State):
    print("Called C")
    return {"foo": "c"}

builder = StateGraph(State)
builder.add_edge(START, "subgraph")
builder.add_node("subgraph", subgraph)
builder.add_node(node_b)
builder.add_node(node_c)

graph = builder.compile()
Use inside tools
使用内部工具 
A common use case is updating graph state from inside a tool. For example, in a customer support application you might want to look up customer information based on their account number or ID in the beginning of the conversation.
一个常见的用例是从工具内部更新图形状态。例如,在客户支持应用程序中,您可能希望在对话开始时根据客户的帐号或 ID 查找客户信息。
To update the graph state from the tool, you can return Command(update={"my_custom_key": "foo", "messages": [...]}) from the tool:
要从工具更新图形状态,您可以从工具返回 Command(update={"my_custom_key": "foo", "messages": [...]}) :
@tool
def lookup_user_info(tool_call_id: Annotated[str, InjectedToolCallId], config: RunnableConfig):
    """Use this to look up user information to better assist them with their questions."""
    user_info = get_user_info(config.get("configurable", {}).get("user_id"))
    return Command(
        update={
            # update the state keys
            "user_info": user_info,
            # update the message history
            "messages": [ToolMessage("Successfully looked up user information", tool_call_id=tool_call_id)]
        }
    )
Important 重要
You MUST include messages (or any state key used for the message history) in Command.update when returning Command from a tool and the list of messages in messages MUST contain a ToolMessage. This is necessary for the resulting message history to be valid (LLM providers require AI messages with tool calls to be followed by the tool result messages).
当从工具返回命令时,必须在命令.update 中包含消息 (或用于消息历史的任何状态键),并且消息中的消息列表必须包含 ToolMessage。这对于产生的消息历史是有效的是必要的(LLM 提供程序要求 AI 消息与工具调用,然后是工具结果消息)。
If you are using tools that update state via Command, we recommend using prebuilt ToolNode which automatically handles tools returning Command objects and propagates them to the graph state. If you're writing a custom node that calls tools, you would need to manually propagate Command objects returned by the tools as the update from the node.
如果您使用的工具通过命令更新状态,我们建议使用预构建的 ToolNode,它会自动处理返回命令对象的工具,并将它们传播到图形状态。如果您正在编写一个调用工具的自定义节点,则需要手动传播工具返回的 Command 对象作为节点的更新。
Visualize your graph
可视化您的图表 
Here we demonstrate how to visualize the graphs you create.
在这里,我们演示如何可视化您创建的图形。
You can visualize any arbitrary Graph, including StateGraph. Let's have some fun by drawing fractals :).
您可以可视化任何任意 Graph,包括 StateGraph。让我们通过绘制分形来获得一些乐趣:)。
API Reference: StateGraph | START | END | add_messages
API 参考:StateGraph|开始|端|添加消息
import random
from typing import Annotated, Literal
from typing_extensions import TypedDict
from langgraph.graph import StateGraph, START, END
from langgraph.graph.message import add_messages

class State(TypedDict):
    messages: Annotated[list, add_messages]

class MyNode:
    def __init__(self, name: str):
        self.name = name
    def __call__(self, state: State):
        return {"messages": [("assistant", f"Called node {self.name}")]}

def route(state) -> Literal["entry_node", "__end__"]:
    if len(state["messages"]) > 10:
        return "__end__"
    return "entry_node"

def add_fractal_nodes(builder, current_node, level, max_level):
    if level > max_level:
        return
    # Number of nodes to create at this level
    num_nodes = random.randint(1, 3)  # Adjust randomness as needed
    for i in range(num_nodes):
        nm = ["A", "B", "C"][i]
        node_name = f"node_{current_node}_{nm}"
        builder.add_node(node_name, MyNode(node_name))
        builder.add_edge(current_node, node_name)
        # Recursively add more nodes
        r = random.random()
        if r > 0.2 and level + 1 < max_level:
            add_fractal_nodes(builder, node_name, level + 1, max_level)
        elif r > 0.05:
            builder.add_conditional_edges(node_name, route, node_name)
        else:
            # End
            builder.add_edge(node_name, "__end__")

def build_fractal_graph(max_level: int):
    builder = StateGraph(State)
    entry_point = "entry_node"
    builder.add_node(entry_point, MyNode(entry_point))
    builder.add_edge(START, entry_point)
    add_fractal_nodes(builder, entry_point, 1, max_level)
    # Optional: set a finish point if required
    builder.add_edge(entry_point, END)  # or any specific node
    return builder.compile()

app = build_fractal_graph(3)
Mermaid¶ 美人鱼 
We can also convert a graph class into Mermaid syntax.
我们也可以将一个 graph 类转换成 Mermaid 语法。
%%{init: {'flowchart': {'curve': 'linear'}}}%%
graph TD;
    __start__([<p>__start__</p>]):::first
    entry_node(entry_node)
    node_entry_node_A(node_entry_node_A)
    node_entry_node_B(node_entry_node_B)
    node_node_entry_node_B_A(node_node_entry_node_B_A)
    node_node_entry_node_B_B(node_node_entry_node_B_B)
    node_node_entry_node_B_C(node_node_entry_node_B_C)
    __end__([<p>__end__</p>]):::last
    __start__ --> entry_node;
    entry_node --> __end__;
    entry_node --> node_entry_node_A;
    entry_node --> node_entry_node_B;
    node_entry_node_B --> node_node_entry_node_B_A;
    node_entry_node_B --> node_node_entry_node_B_B;
    node_entry_node_B --> node_node_entry_node_B_C;
    node_entry_node_A -.-> entry_node;
    node_entry_node_A -.-> __end__;
    node_node_entry_node_B_A -.-> entry_node;
    node_node_entry_node_B_A -.-> __end__;
    node_node_entry_node_B_B -.-> entry_node;
    node_node_entry_node_B_B -.-> __end__;
    node_node_entry_node_B_C -.-> entry_node;
    node_node_entry_node_B_C -.-> __end__;
    classDef default fill:#f2f0ff,line-height:1.2
    classDef first fill-opacity:0
    classDef last fill:#bfb6fc
PNG¶ 重试 错误原因
If preferred, we could render the Graph into a .png. Here we could use three options:
如果愿意,我们可以将 Graph 渲染为 .png。在这里,我们可以使用三个选项:
- Using Mermaid.ink API (does not require additional packages)
使用 Mermaid.ink API(不需要额外的软件包) - Using Mermaid + Pyppeteer (requires
pip install pyppeteer)
使用 Mermaid + Pyppeteer(需要pip 安装 Pyppeteer) - Using graphviz (which requires
pip install graphviz)
使用 graphviz(需要pip install graphviz)
Using Mermaid.Ink 使用美人鱼。墨水
By default, draw_mermaid_png() uses Mermaid.Ink's API to generate the diagram.
默认情况下,draw_mermaid_png() 使用 Mermaid.Ink 的 API 生成图表。
API Reference: CurveStyle | MermaidDrawMethod | NodeStyles
API 参考:CurveStyle| MermaidDrawMethod|节点样式
from IPython.display import Image, display
from langchain_core.runnables.graph import CurveStyle, MermaidDrawMethod, NodeStyles

display(Image(app.get_graph().draw_mermaid_png()))
Using Mermaid + Pyppeteer
使用美人鱼+ Pyppeteer
import nest_asyncio

nest_asyncio.apply()  # Required for Jupyter Notebook to run async functions

display(
    Image(
        app.get_graph().draw_mermaid_png(
            curve_style=CurveStyle.LINEAR,
            node_colors=NodeStyles(first="#ffdfba", last="#baffc9", default="#fad7de"),
            wrap_label_n_words=9,
            output_file_path=None,
            draw_method=MermaidDrawMethod.PYPPETEER,
            background_color="white",
            padding=10,
        )
    )
)
Using Graphviz 使用 Graphviz