![]()
MinIO is a high-performance, S3-compatible object storage solution released under the GNU AGPL v3.0 license. Designed for speed and scalability, it powers AI/ML, analytics, and data-intensive workloads with industry-leading performance.
MinIO 是一款高性能、兼容 S3 的对象存储解决方案,采用 GNU AGPL v3.0 许可证发布。它专为速度和可扩展性而设计,以业界领先的性能为 AI/ML、分析和数据密集型工作负载提供支持。
🔹 S3 API Compatible – Seamless integration with existing S3 tools
🔹 Built for AI & Analytics – Optimized for large-scale data pipelines
🔹 High Performance – Ideal for demanding storage workloads.
🔹 S3 API 兼容 - 与现有 S3 工具无缝集成 🔹 专为 AI 和分析而构建 - 针对大规模数据管道进行了优化 🔹 高性能 - 非常适合要求苛刻的存储工作负载。
AI storage documentation (https://min.io/solutions/object-storage-for-ai).
AI 存储文档( https://min.io/solutions/object-storage-for-ai )。
This README provides quickstart instructions on running MinIO on bare metal hardware, including container-based installations. For Kubernetes environments, use the MinIO Kubernetes Operator.
本 README 提供了在裸机上运行 MinIO 的快速入门说明,包括基于容器的安装。对于 Kubernetes 环境,请使用 MinIO Kubernetes Operator 。
Use the following commands to run a standalone MinIO server as a container.
使用以下命令将独立的 MinIO 服务器作为容器运行。
Standalone MinIO servers are best suited for early development and evaluation. Certain features such as versioning, object locking, and bucket replication
require distributed deploying MinIO with Erasure Coding. For extended development and production, deploy MinIO with Erasure Coding enabled - specifically,
with a minimum of 4 drives per MinIO server. See MinIO Erasure Code Overview
for more complete documentation.
独立的 MinIO 服务器最适合早期开发和评估。某些功能(例如版本控制、对象锁定和存储桶复制)需要使用纠删码技术进行分布式部署。对于扩展开发和生产环境,请在部署 MinIO 时启用纠删码技术 - 具体来说,每个 MinIO 服务器至少配备 4 个驱动器。请参阅 MinIO 纠删码概述
以获得更完整的文档。
Run the following command to run the latest stable image of MinIO as a container using an ephemeral data volume:
运行以下命令,使用临时数据卷将 MinIO 的最新稳定映像作为容器运行:
podman run -p 9000:9000 -p 9001:9001 \
  quay.io/minio/minio server /data --console-address ":9001"
The MinIO deployment starts using default root credentials minioadmin:minioadmin. You can test the deployment using the MinIO Console, an embedded
object browser built into MinIO Server. Point a web browser running on the host machine to http://127.0.0.1:9000 and log in with the
root credentials. You can use the Browser to create buckets, upload objects, and browse the contents of the MinIO server.
MinIO 部署使用默认的 root 凭据 minioadmin:minioadmin 启动。您可以使用 MinIO 控制台(MinIO 服务器内置的对象浏览器)测试部署。在主机上运行的 Web 浏览器中访问 http://127.0.0.1:9000 ,并使用 root 凭据登录。您可以使用浏览器创建存储桶、上传对象以及浏览 MinIO 服务器的内容。
You can also connect using any S3-compatible tool, such as the MinIO Client mc commandline tool. See
Test using MinIO Client mc for more information on using the mc commandline tool. For application developers,
see https://min.io/docs/minio/linux/developers/minio-drivers.html to view MinIO SDKs for supported languages.
你也可以使用任何兼容 S3 的工具进行连接,例如 MinIO Client mc 命令行工具。请参阅
使用 MinIO 客户端 mc 进行测试, 了解更多关于使用 mc 命令行工具的信息。对于应用程序开发者,请参阅 https://min.io/docs/minio/linux/developers/minio-drivers.html 查看 MinIO SDK 支持的语言版本。
Note 笔记
To deploy MinIO on with persistent storage, you must map local persistent directories from the host OS to the container using the podman -v option.
For example, -v /mnt/data:/data maps the host OS drive at /mnt/data to /data on the container.
要使用持久存储部署 MinIO,必须使用 podman -v 选项将本地持久目录从主机操作系统映射到容器。例如, -v /mnt/data:/data 将主机操作系统驱动器 /mnt/data 映射到容器上的 /data 。
Use the following commands to run a standalone MinIO server on macOS.
使用以下命令在 macOS 上运行独立的 MinIO 服务器。
Standalone MinIO servers are best suited for early development and evaluation. Certain features such as versioning, object locking, and bucket replication require distributed deploying MinIO with Erasure Coding. For extended development and production, deploy MinIO with Erasure Coding enabled - specifically, with a minimum of 4 drives per MinIO server. See MinIO Erasure Code Overview for more complete documentation.
独立的 MinIO 服务器最适合早期开发和评估。某些功能(例如版本控制、对象锁定和存储桶复制)需要分布式部署并启用纠删码的 MinIO。对于扩展开发和生产环境,请在部署 MinIO 时启用纠删码 - 具体来说,每个 MinIO 服务器至少配备 4 个驱动器。有关更完整的文档,请参阅 MinIO 纠删码概述 。
Run the following command to install the latest stable MinIO package using Homebrew. Replace /data with the path to the drive or directory in which you want MinIO to store data.
运行以下命令,使用 Homebrew 安装最新的稳定版 MinIO 软件包。将 /data 替换为你希望 MinIO 存储数据的驱动器或目录的路径。
brew install minio/stable/minio
minio server /data
Note 笔记
If you previously installed minio using brew install minio then it is recommended that you reinstall minio from minio/stable/minio official repo instead.
如果您之前使用 brew install minio 安装了 minio,那么建议您从 minio/stable/minio 官方 repo 重新安装 minio。
brew uninstall minio
brew install minio/stable/minio
The MinIO deployment starts using default root credentials minioadmin:minioadmin. You can test the deployment using the MinIO Console, an embedded web-based object browser built into MinIO Server. Point a web browser running on the host machine to http://127.0.0.1:9000 and log in with the root credentials. You can use the Browser to create buckets, upload objects, and browse the contents of the MinIO server.
You can also connect using any S3-compatible tool, such as the MinIO Client mc commandline tool. See Test using MinIO Client mc for more information on using the mc commandline tool. For application developers, see https://min.io/docs/minio/linux/developers/minio-drivers.html/ to view MinIO SDKs for supported languages.
Use the following command to download and run a standalone MinIO server on macOS. Replace /data with the path to the drive or directory in which you want MinIO to store data.
wget https://dl.min.io/server/minio/release/darwin-amd64/minio
chmod +x minio
./minio server /data
The MinIO deployment starts using default root credentials minioadmin:minioadmin. You can test the deployment using the MinIO Console, an embedded web-based object browser built into MinIO Server. Point a web browser running on the host machine to http://127.0.0.1:9000 and log in with the root credentials. You can use the Browser to create buckets, upload objects, and browse the contents of the MinIO server.
You can also connect using any S3-compatible tool, such as the MinIO Client mc commandline tool. See Test using MinIO Client mc for more information on using the mc commandline tool. For application developers, see https://min.io/docs/minio/linux/developers/minio-drivers.html to view MinIO SDKs for supported languages.
Use the following command to run a standalone MinIO server on Linux hosts running 64-bit Intel/AMD architectures. Replace /data with the path to the drive or directory in which you want MinIO to store data.
wget https://dl.min.io/server/minio/release/linux-amd64/minio
chmod +x minio
./minio server /data
The following table lists supported architectures. Replace the wget URL with the architecture for your Linux host.
| Architecture | URL |
|---|---|
| 64-bit Intel/AMD | https://dl.min.io/server/minio/release/linux-amd64/minio |
| 64-bit ARM | https://dl.min.io/server/minio/release/linux-arm64/minio |
| 64-bit PowerPC LE (ppc64le) | https://dl.min.io/server/minio/release/linux-ppc64le/minio |
The MinIO deployment starts using default root credentials minioadmin:minioadmin. You can test the deployment using the MinIO Console, an embedded web-based object browser built into MinIO Server. Point a web browser running on the host machine to http://127.0.0.1:9000 and log in with the root credentials. You can use the Browser to create buckets, upload objects, and browse the contents of the MinIO server.
You can also connect using any S3-compatible tool, such as the MinIO Client mc commandline tool. See Test using MinIO Client mc for more information on using the mc commandline tool. For application developers, see https://min.io/docs/minio/linux/developers/minio-drivers.html to view MinIO SDKs for supported languages.
Note
Standalone MinIO servers are best suited for early development and evaluation. Certain features such as versioning, object locking, and bucket replication require distributed deploying MinIO with Erasure Coding. For extended development and production, deploy MinIO with Erasure Coding enabled - specifically, with a minimum of 4 drives per MinIO server. See MinIO Erasure Code Overview for more complete documentation.
To run MinIO on 64-bit Windows hosts, download the MinIO executable from the following URL:
https://dl.min.io/server/minio/release/windows-amd64/minio.exeUse the following command to run a standalone MinIO server on the Windows host. Replace D:\ with the path to the drive or directory in which you want MinIO to store data. You must change the terminal or powershell directory to the location of the minio.exe executable, or add the path to that directory to the system $PATH:
minio.exe server D:\The MinIO deployment starts using default root credentials minioadmin:minioadmin. You can test the deployment using the MinIO Console, an embedded web-based object browser built into MinIO Server. Point a web browser running on the host machine to http://127.0.0.1:9000 and log in with the root credentials. You can use the Browser to create buckets, upload objects, and browse the contents of the MinIO server.
You can also connect using any S3-compatible tool, such as the MinIO Client mc commandline tool. See Test using MinIO Client mc for more information on using the mc commandline tool. For application developers, see https://min.io/docs/minio/linux/developers/minio-drivers.html to view MinIO SDKs for supported languages.
Note
Standalone MinIO servers are best suited for early development and evaluation. Certain features such as versioning, object locking, and bucket replication require distributed deploying MinIO with Erasure Coding. For extended development and production, deploy MinIO with Erasure Coding enabled - specifically, with a minimum of 4 drives per MinIO server. See MinIO Erasure Code Overview for more complete documentation.
Use the following commands to compile and run a standalone MinIO server from source. Source installation is only intended for developers and advanced users. If you do not have a working Golang environment, please follow How to install Golang. Minimum version required is go1.24
go install github.com/minio/minio@latestThe MinIO deployment starts using default root credentials minioadmin:minioadmin. You can test the deployment using the MinIO Console, an embedded web-based object browser built into MinIO Server. Point a web browser running on the host machine to http://127.0.0.1:9000 and log in with the root credentials. You can use the Browser to create buckets, upload objects, and browse the contents of the MinIO server.
You can also connect using any S3-compatible tool, such as the MinIO Client mc commandline tool. See Test using MinIO Client mc for more information on using the mc commandline tool. For application developers, see https://min.io/docs/minio/linux/developers/minio-drivers.html to view MinIO SDKs for supported languages.
Note
Standalone MinIO servers are best suited for early development and evaluation. Certain features such as versioning, object locking, and bucket replication require distributed deploying MinIO with Erasure Coding. For extended development and production, deploy MinIO with Erasure Coding enabled - specifically, with a minimum of 4 drives per MinIO server. See MinIO Erasure Code Overview for more complete documentation.
MinIO strongly recommends against using compiled-from-source MinIO servers for production environments.
By default MinIO uses the port 9000 to listen for incoming connections. If your platform blocks the port by default, you may need to enable access to the port.
For hosts with ufw enabled (Debian based distros), you can use ufw command to allow traffic to specific ports. Use below command to allow access to port 9000
ufw allow 9000Below command enables all incoming traffic to ports ranging from 9000 to 9010.
ufw allow 9000:9010/tcpFor hosts with firewall-cmd enabled (CentOS), you can use firewall-cmd command to allow traffic to specific ports. Use below commands to allow access to port 9000
firewall-cmd --get-active-zonesThis command gets the active zone(s). Now, apply port rules to the relevant zones returned above. For example if the zone is public, use
firewall-cmd --zone=public --add-port=9000/tcp --permanentNote
permanent makes sure the rules are persistent across firewall start, restart or reload. Finally reload the firewall for changes to take effect.
firewall-cmd --reloadFor hosts with iptables enabled (RHEL, CentOS, etc), you can use iptables command to enable all traffic coming to specific ports. Use below command to allow
access to port 9000
iptables -A INPUT -p tcp --dport 9000 -j ACCEPT
service iptables restart
Below command enables all incoming traffic to ports ranging from 9000 to 9010.
iptables -A INPUT -p tcp --dport 9000:9010 -j ACCEPT
service iptables restartMinIO Server comes with an embedded web based object browser. Point your web browser to http://127.0.0.1:9000 to ensure your server has started successfully.
Note
MinIO runs console on random port by default, if you wish to choose a specific port use --console-address to pick a specific interface and port.
MinIO redirects browser access requests to the configured server port (i.e. 127.0.0.1:9000) to the configured Console port. MinIO uses the hostname or IP address specified in the request when building the redirect URL. The URL and port must be accessible by the client for the redirection to work.
For deployments behind a load balancer, proxy, or ingress rule where the MinIO host IP address or port is not public, use the MINIO_BROWSER_REDIRECT_URL environment variable to specify the external hostname for the redirect. The LB/Proxy must have rules for directing traffic to the Console port specifically.
For example, consider a MinIO deployment behind a proxy https://minio.example.net, https://console.minio.example.net with rules for forwarding traffic on port :9000 and :9001 to MinIO and the MinIO Console respectively on the internal network. Set MINIO_BROWSER_REDIRECT_URL to https://console.minio.example.net to ensure the browser receives a valid reachable URL.
| Dashboard | Creating a bucket |
|---|---|
 |
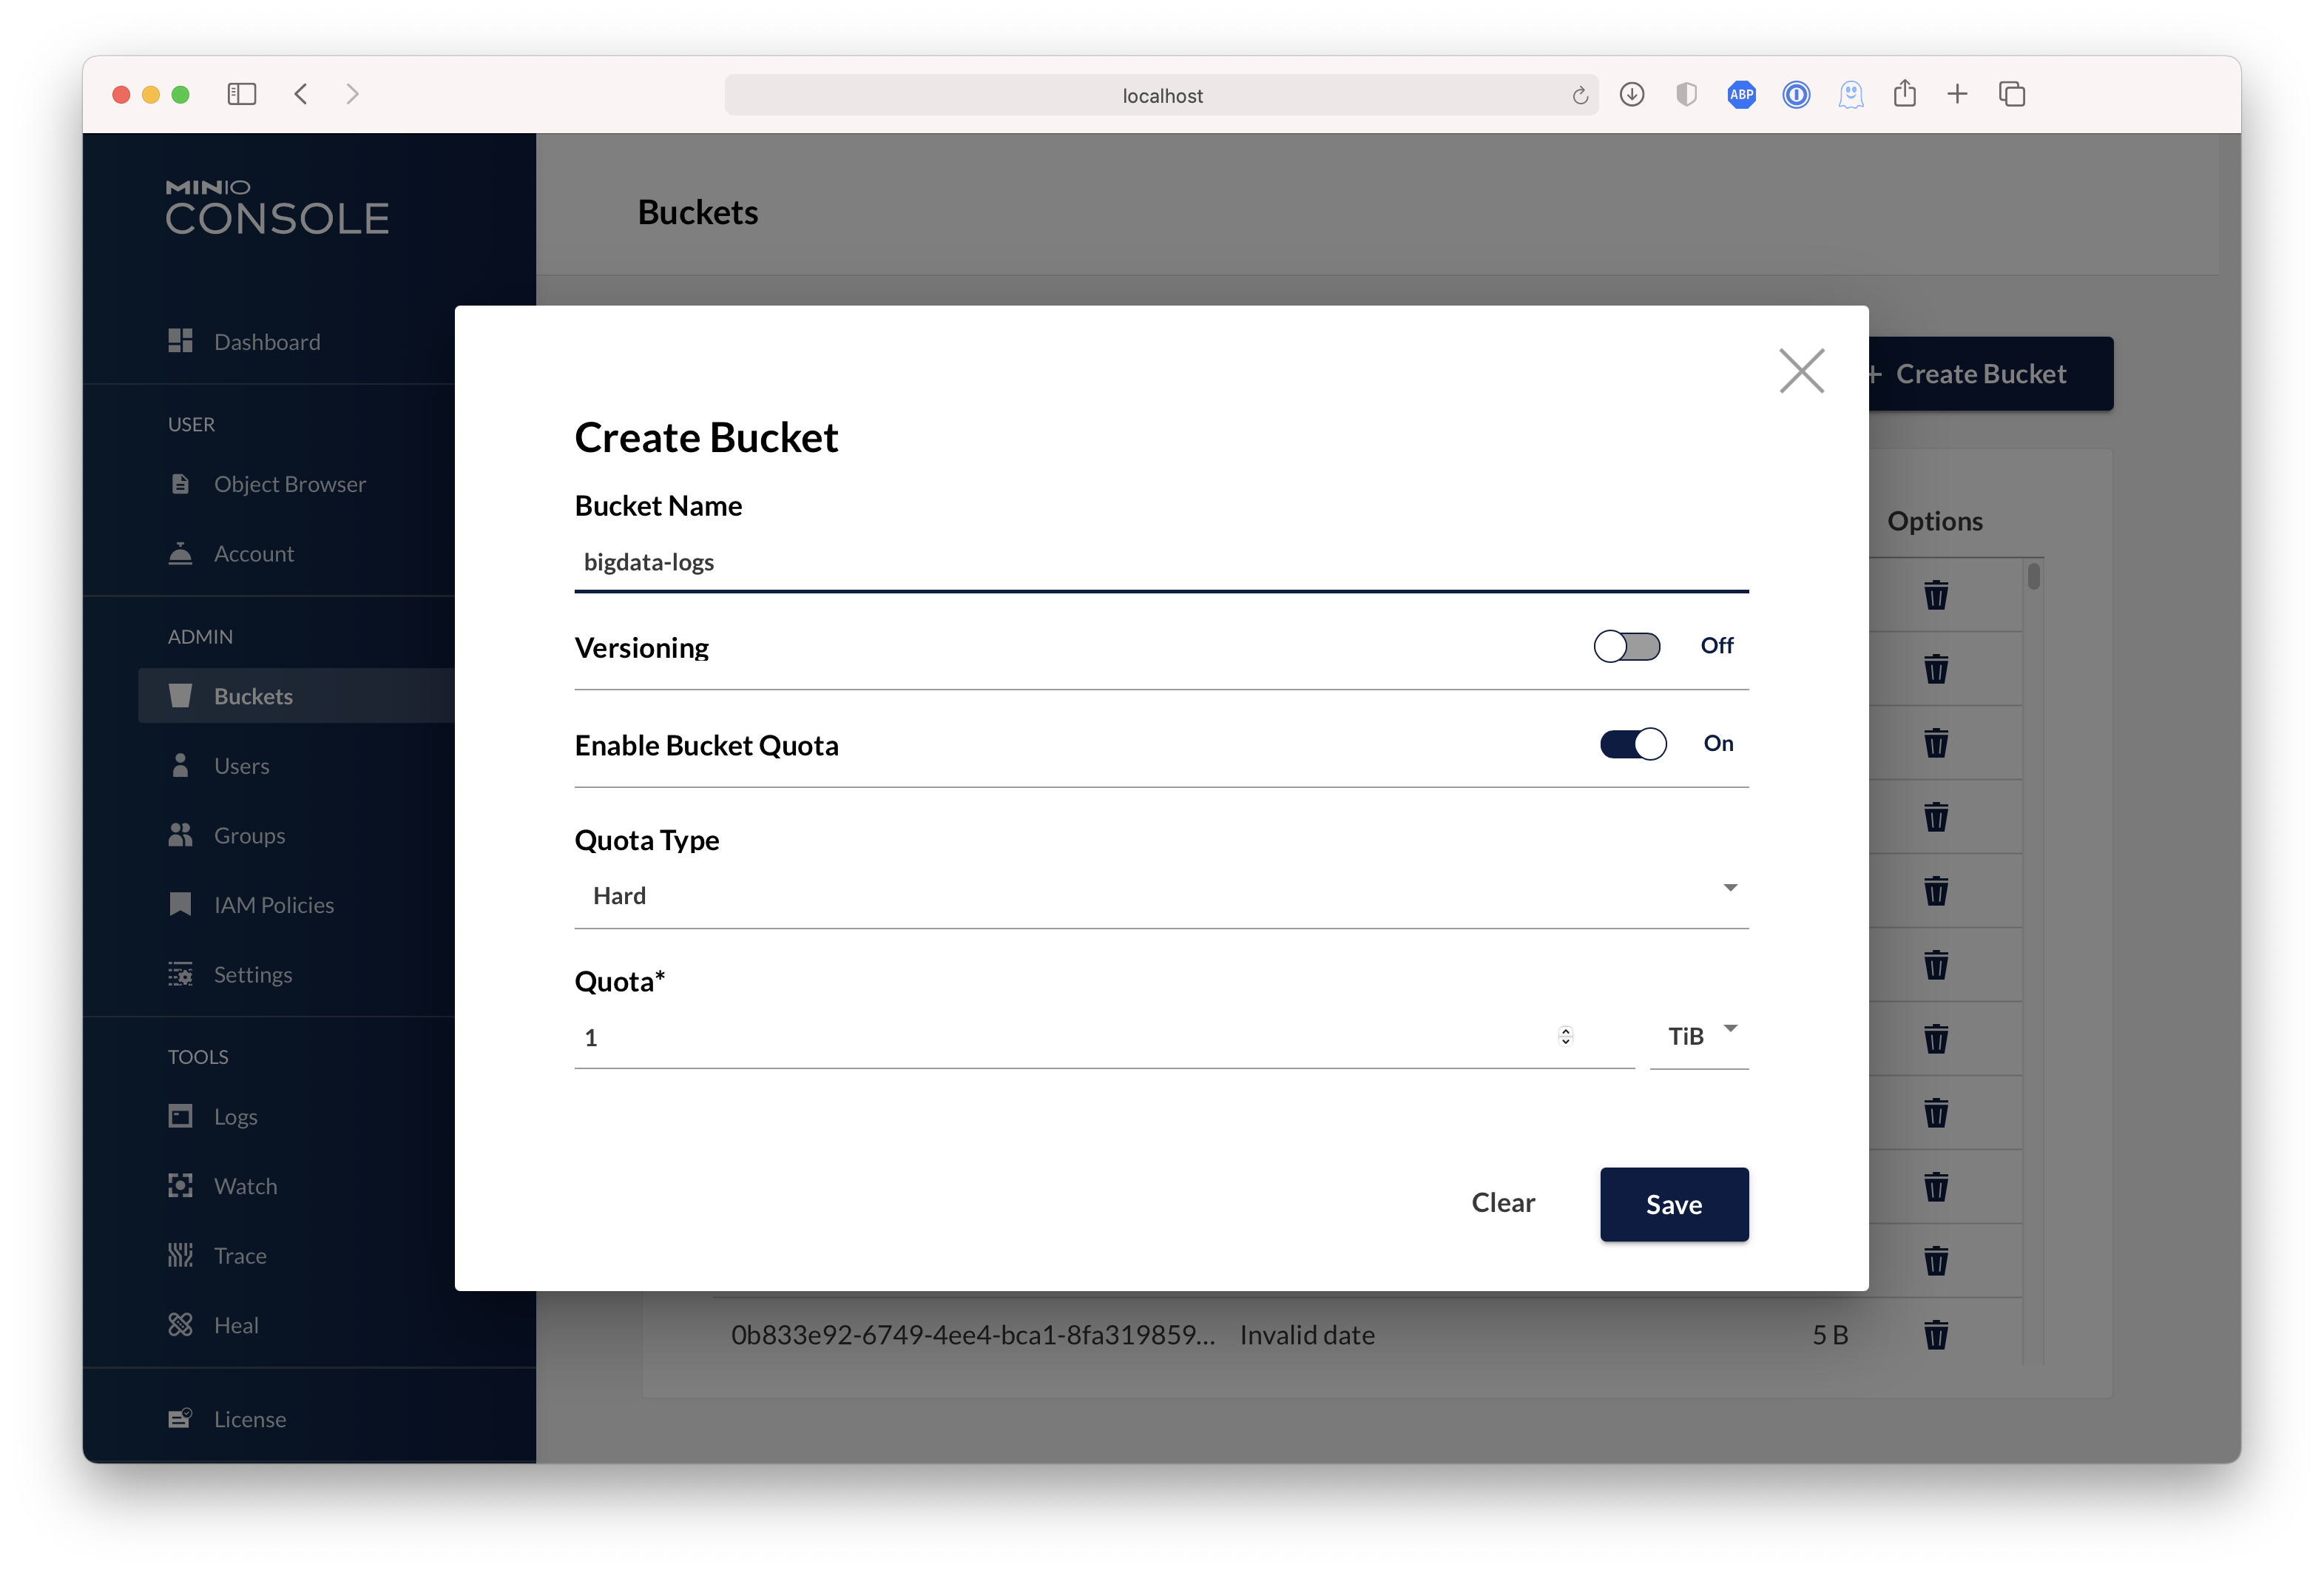 |
mc provides a modern alternative to UNIX commands like ls, cat, cp, mirror, diff etc. It supports filesystems and Amazon S3 compatible cloud storage services. Follow the MinIO Client Quickstart Guide for further instructions.
Upgrades require zero downtime in MinIO, all upgrades are non-disruptive, all transactions on MinIO are atomic. So upgrading all the servers simultaneously is the recommended way to upgrade MinIO.
Note
requires internet access to update directly from https://dl.min.io, optionally you can host any mirrors at https://my-artifactory.example.com/minio/
- For deployments that installed the MinIO server binary by hand, use
mc admin update
mc admin update <minio alias, e.g., myminio>-
For deployments without external internet access (e.g. airgapped environments), download the binary from https://dl.min.io and replace the existing MinIO binary let's say for example
/opt/bin/minio, apply executable permissionschmod +x /opt/bin/minioand proceed to performmc admin service restart alias/. -
For installations using Systemd MinIO service, upgrade via RPM/DEB packages parallelly on all servers or replace the binary lets say
/opt/bin/minioon all nodes, apply executable permissionschmod +x /opt/bin/minioand process to performmc admin service restart alias/.
- Test all upgrades in a lower environment (DEV, QA, UAT) before applying to production. Performing blind upgrades in production environments carries significant risk.
- Read the release notes for MinIO before performing any upgrade, there is no forced requirement to upgrade to latest release upon every release. Some release may not be relevant to your setup, avoid upgrading production environments unnecessarily.
- If you plan to use
mc admin update, MinIO process must have write access to the parent directory where the binary is present on the host system. mc admin updateis not supported and should be avoided in kubernetes/container environments, please upgrade containers by upgrading relevant container images.- We do not recommend upgrading one MinIO server at a time, the product is designed to support parallel upgrades please follow our recommended guidelines.
- MinIO Erasure Code Overview
- Use
mcwith MinIO Server - Use
minio-goSDK with MinIO Server - The MinIO documentation website
Please follow MinIO Contributor's Guide
- MinIO source is licensed under the GNU AGPLv3.
- MinIO documentation is licensed under CC BY 4.0.
- License Compliance