

We covered a lot of ground in our post about How Tailscale
Works. However, we glossed over how we can get through NATs
(Network Address Translators) and connect your devices directly to
each other, no matter what’s standing between them. Let’s talk about
that now!
我们在《Tailscale 工作原理》一文中探讨了许多内容。然而,我们略过了如何穿透 NAT(网络地址转换器)实现设备间直连的技术细节——无论它们之间隔着什么网络障碍。现在就来深入探讨这个话题!
Let’s start with a simple problem: establishing a peer-to-peer
connection between two machines. In Tailscale’s case, we want to set
up a WireGuard® tunnel, but that doesn’t really matter. The
techniques we use are widely applicable and the work of many people
over decades. For example, WebRTC uses this bag of tricks to
send peer-to-peer audio, video and data between web browsers. VoIP
phones and some video games use similar techniques, though not always
successfully.
让我们从一个简单问题开始:在两台机器间建立点对点连接。以 Tailscale 为例,我们需要建立 WireGuard®隧道,但具体协议并不重要。这些穿透技术具有广泛适用性,凝聚了数十年来众多研究者的智慧。例如 WebRTC 就运用类似技巧实现浏览器间的音视频点对点传输,VoIP 电话和部分电子游戏也采用相近技术(尽管成功率参差不齐)。
We’ll be discussing these techniques generically, using Tailscale and
others for examples where appropriate. Let’s say you’re making your
own protocol and that you want NAT traversal. You need two things.
我们将以通用视角讨论这些技术,适时以 Tailscale 等案例辅助说明。假设您正在开发新协议并需要实现 NAT 穿透,必须解决两个核心问题。
First, the protocol should be based on UDP. You can do NAT traversal
with TCP, but it adds another layer of complexity to an already quite
complex problem, and may even require kernel customizations depending
on how deep you want to go. We’re going to focus on UDP for the rest
of this article.
首先,协议应基于 UDP 实现。虽然 TCP 也能实现 NAT 穿透,但这会让本就复杂的问题更加棘手,甚至可能需要定制内核模块——具体取决于你想深入的程度。本文后续内容将聚焦 UDP 方案。
If you’re reaching for TCP because you want a stream-oriented
connection when the NAT traversal is done, consider using QUIC
instead. It builds on top of UDP, so we can focus on UDP for NAT
traversal and still have a nice stream protocol at the end.
若你选择 TCP 是希望在 NAT 穿透后获得面向流的连接,建议改用 QUIC 协议。它基于 UDP 构建,这样我们既能专注 UDP 穿透方案,最终又能获得优质的流式协议。
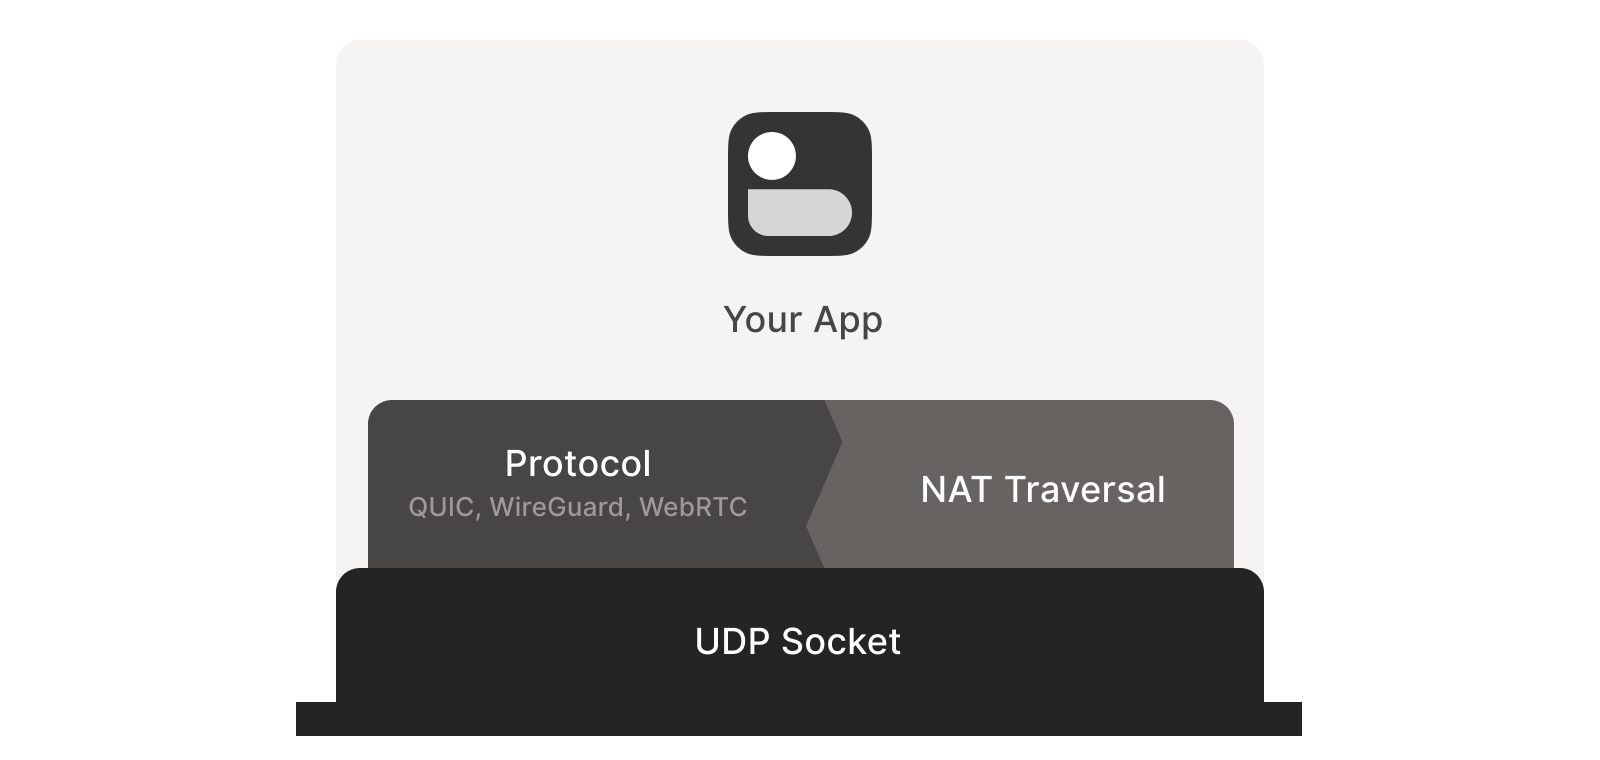
Second, you need direct control over the network socket that’s sending
and receiving network packets. As a rule, you can’t take an existing
network library and make it traverse NATs, because you have to send
and receive extra packets that aren’t part of the “main” protocol
you’re trying to speak. Some protocols tightly integrate the NAT
traversal with the rest (e.g. WebRTC). But if you’re building your
own, it’s helpful to think of NAT traversal as a separate entity that
shares a socket with your main protocol. Both run in parallel, one
enabling the other.
其次,你需要直接控制收发网络数据包的套接字。通常无法直接让现有网络库实现 NAT 穿透,因为必须收发与"主协议"无关的额外数据包。某些协议(如 WebRTC)将穿透功能深度集成在协议中。但若自行构建,宜将 NAT 穿透视为与主协议共享套接字的独立模块,二者并行运作相辅相成。
Direct socket access may be tough depending on your situation. One
workaround is to run a local proxy. Your protocol speaks to this
proxy, and the proxy does both NAT traversal and relaying of your
packets to the peer. This layer of indirection lets you benefit from
NAT traversal without altering your original program.
根据实际情况,直接访问套接字可能较为困难。一种变通方案是运行本地代理:您的协议与该代理通信,由代理同时完成 NAT 穿透和数据包中继转发。这层间接机制让您无需修改原有程序即可享受 NAT 穿透的优势。
With prerequisites out of the way, let’s go through NAT traversal from
first principles. Our goal is to get UDP packets flowing
bidirectionally between two devices, so that our other protocol
(WireGuard, QUIC, WebRTC, …) can do something cool. There are two
obstacles to having this Just Work: stateful firewalls and NAT
devices.
明确了基本概念后,让我们从基本原理出发理解 NAT 穿透技术。核心目标是实现两个设备间 UDP 数据包的双向传输,从而支撑上层协议(如 WireGuard、QUIC、WebRTC 等)实现高级功能。要实现"开箱即用"需要突破两大障碍:有状态防火墙和 NAT 设备。
Figuring out firewalls 防火墙应对策略
Stateful firewalls are the simpler of our two problems. In fact, most
NAT devices include a stateful firewall, so we need to solve this
subset before we can tackle NATs.
有状态防火墙是两者中相对简单的问题。实际上,大多数 NAT 设备都内置有状态防火墙功能,因此在攻克 NAT 之前需要先解决这个子集问题。
There are many incarnations to consider. Some you might recognize are
the Windows Defender firewall, Ubuntu’s ufw (using iptables/nftables),
BSD’s pf (also used by macOS) and AWS’s Security Groups. They’re all
very configurable, but the most common configuration allows all
“outbound” connections and blocks all “inbound” connections. There
might be a few handpicked exceptions, such as allowing inbound SSH.
需要考虑的实现形式多种多样。您可能熟悉的有 Windows Defender 防火墙、Ubuntu 的 ufw(基于 iptables/nftables)、BSD 的 pf(macOS 也采用此方案)以及 AWS 安全组。这些防火墙都具有高度可配置性,但最常见的配置模式是允许所有"出站"连接而阻断所有"入站"连接。可能会设置少量手动例外规则,例如允许入站 SSH 连接。
But connections and “direction” are a figment of the protocol
designer’s imagination. On the wire, every connection ends up being
bidirectional; it’s all individual packets flying back and forth. How
does the firewall know what’s inbound and what’s outbound?
但连接及其"方向性"本质上是协议设计者构想的概念。在实际网络传输中,所有连接最终都是双向的——无非是数据包来回传输而已。那么防火墙如何区分入站和出站流量呢?
That’s where the stateful part comes in. Stateful firewalls remember
what packets they’ve seen in the past and can use that knowledge when
deciding what to do with new packets that show up.
这正是状态防火墙发挥作用之处。状态防火墙会记录历史数据包信息,并基于这些信息决策如何处理新到达的数据包。
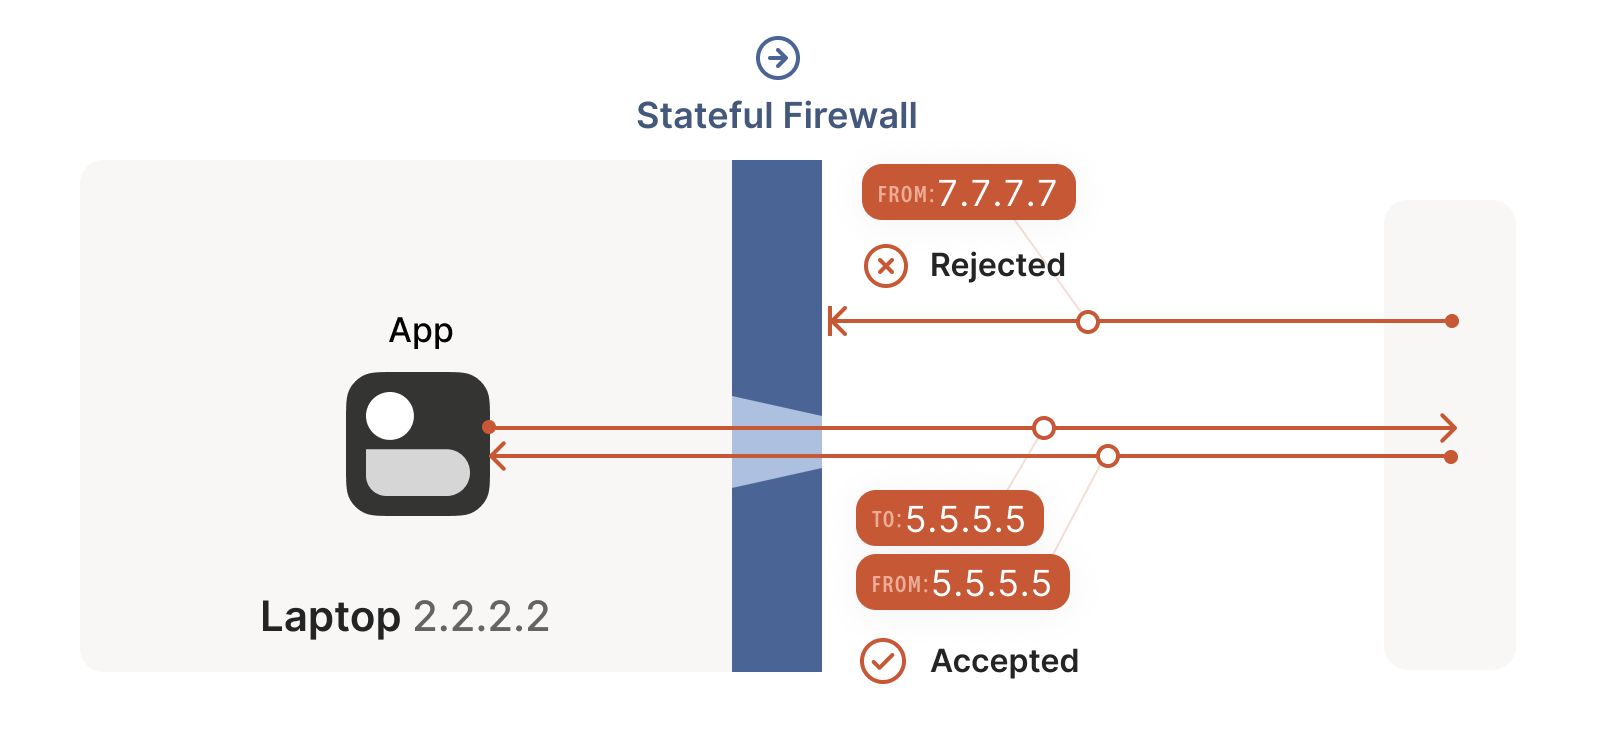
For UDP, the rule is very simple: the firewall allows an inbound UDP
packet if it previously saw a matching outbound packet. For example,
if our laptop firewall sees a UDP packet leaving the laptop from
2.2.2.2:1234 to 7.7.7.7:5678, it’ll make a note that incoming
packets from 7.7.7.7:5678 to 2.2.2.2:1234 are also fine. The
trusted side of the world clearly intended to communicate with
7.7.7.7:5678, so we should let them talk back.
对于 UDP 协议,规则非常简单:只要防火墙先前看到过匹配的出站数据包,就会允许对应的入站 UDP 数据包通过。例如,如果我们的笔记本电脑防火墙检测到从 2.2.2.2:1234 发往 7.7.7.7:5678 的出站 UDP 数据包,就会记录下允许从 7.7.7.7:5678 返回 2.2.2.2:1234 的入站数据包。显然,受信任的一方是有意与 7.7.7.7:5678 进行通信的,因此我们应当允许其回传数据。
(As an aside, some very relaxed firewalls might allow traffic from
anywhere back to 2.2.2.2:1234 once 2.2.2.2:1234 has communicated
with anyone. Such firewalls make our traversal job easier, but are
increasingly rare.)
(顺便一提,某些规则宽松的防火墙可能允许 2.2.2.2:1234 与任何对象通信后,来自任意地址的流量都能返回 2.2.2.2:1234 。这类防火墙会让我们的穿透工作更轻松,但如今已越来越少见。)
Firewall face-off 防火墙对峙
This rule for UDP traffic is only a minor problem for us, as long as
all the firewalls on the path are “facing” the same way. That’s
usually the case when you’re communicating with a server on the
internet. Our only constraint is that the machine that’s behind the
firewall must be the one initiating all connections. Nothing can
talk to it, unless it talks first.
这条针对 UDP 流量的规则对我们来说只是个小问题,只要路径上所有防火墙都"朝向"同一方向。当你与互联网服务器通信时通常就是这种情况。我们唯一的限制是:位于防火墙后的机器必须主动发起所有连接。除非它先开口,否则任何设备都无法与之对话。
This is fine, but not very interesting: we’ve reinvented client/server
communication, where the server makes itself easily reachable to
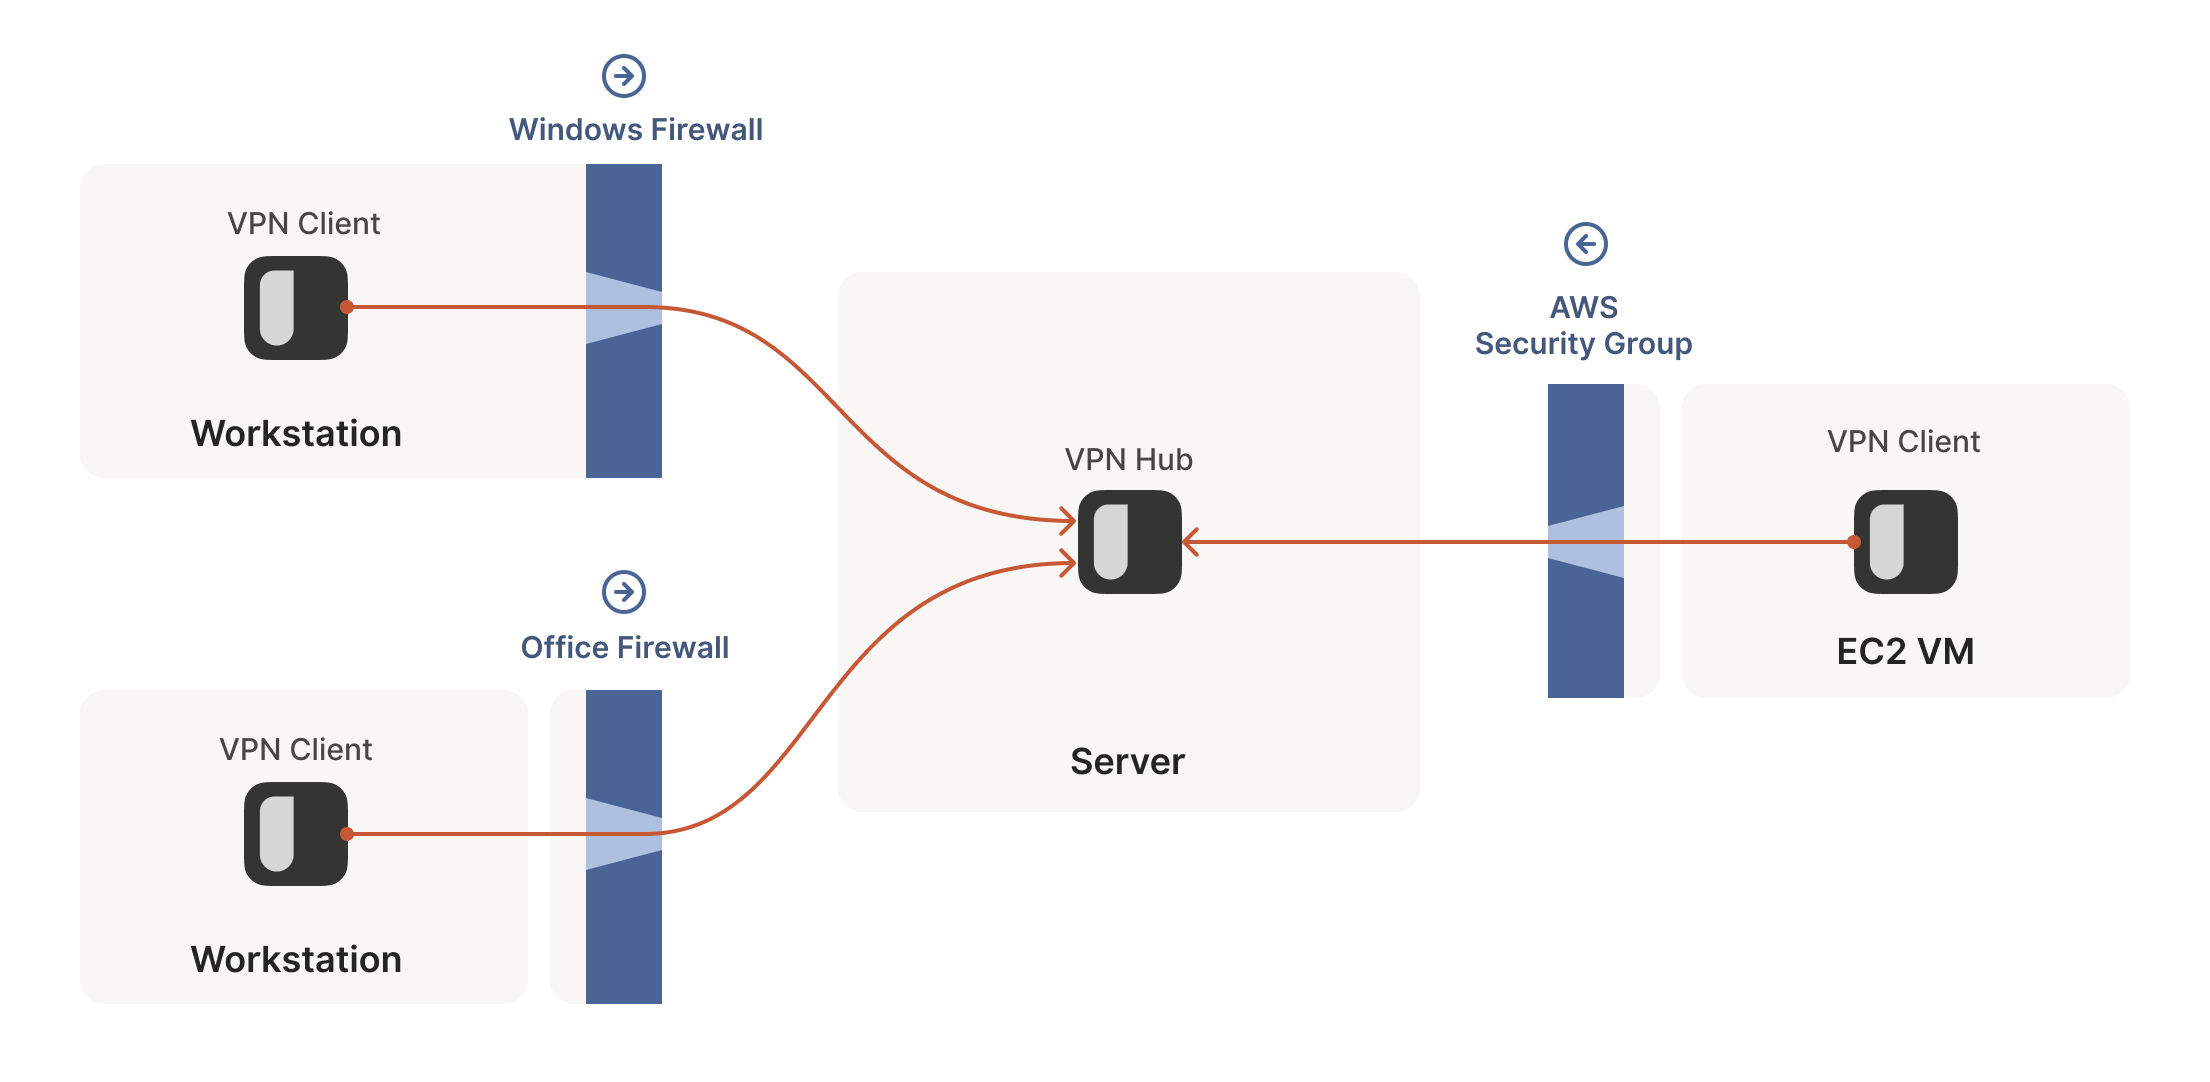
clients. In the VPN world, this leads to a hub-and-spoke topology: the
hub has no firewalls blocking access to it and the firewalled spokes
connect to the hub.
这虽然可行但不够有趣:我们不过是 reinvented 了客户端/服务器通信模式,让服务器能轻松被客户端访问。在 VPN 领域,这会形成星型拓扑结构:中心节点没有防火墙阻挡访问,而受防火墙保护的分支节点则主动连接中心节点。
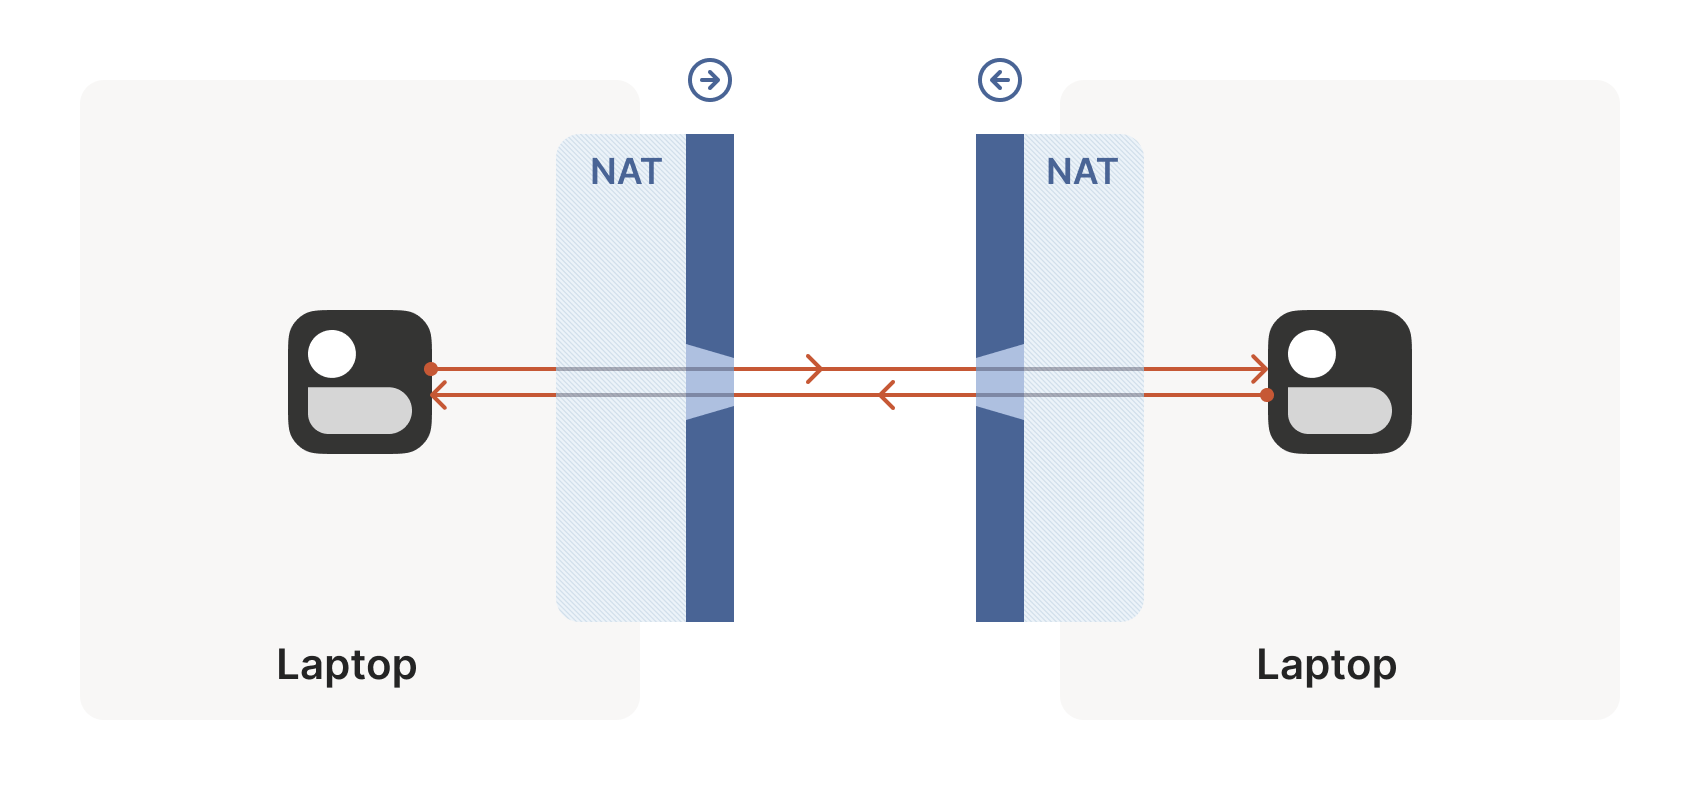
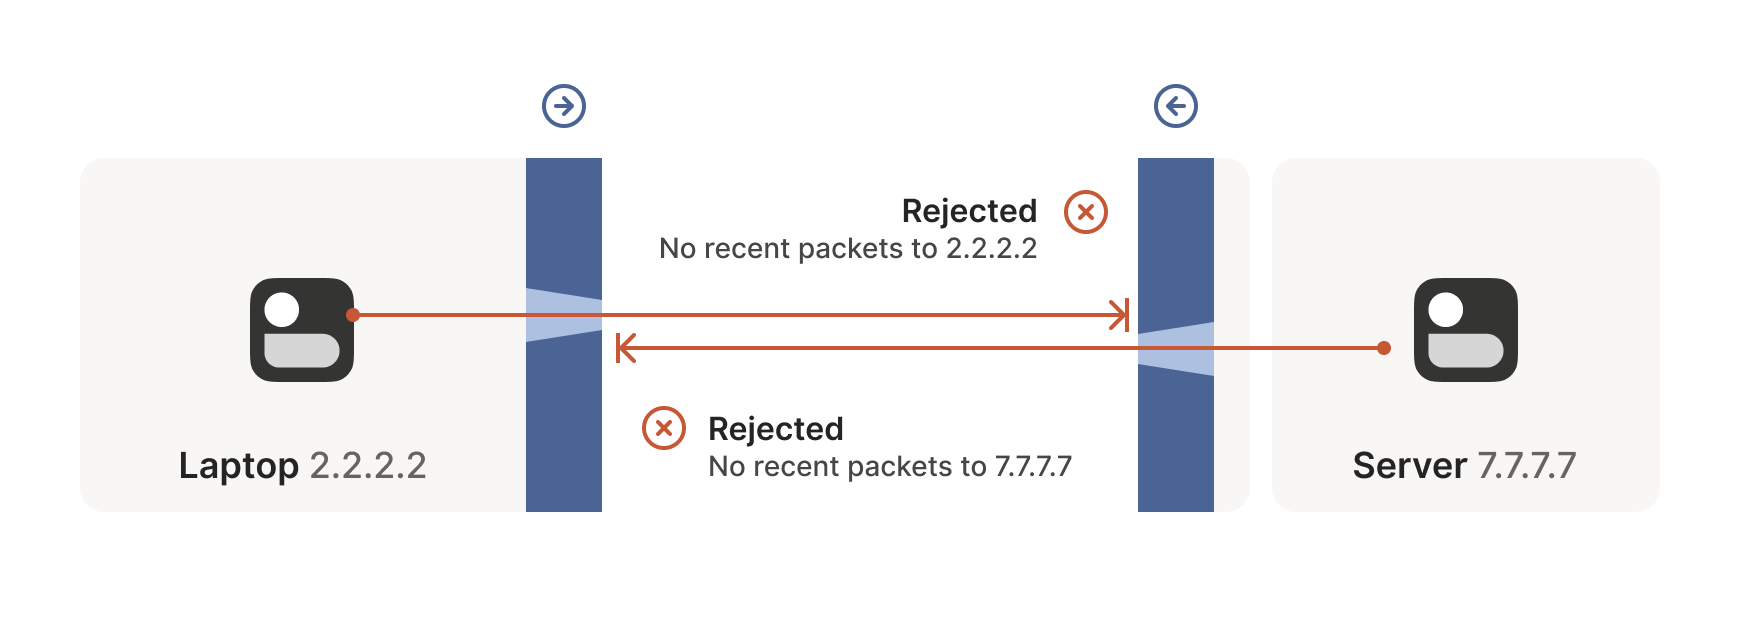
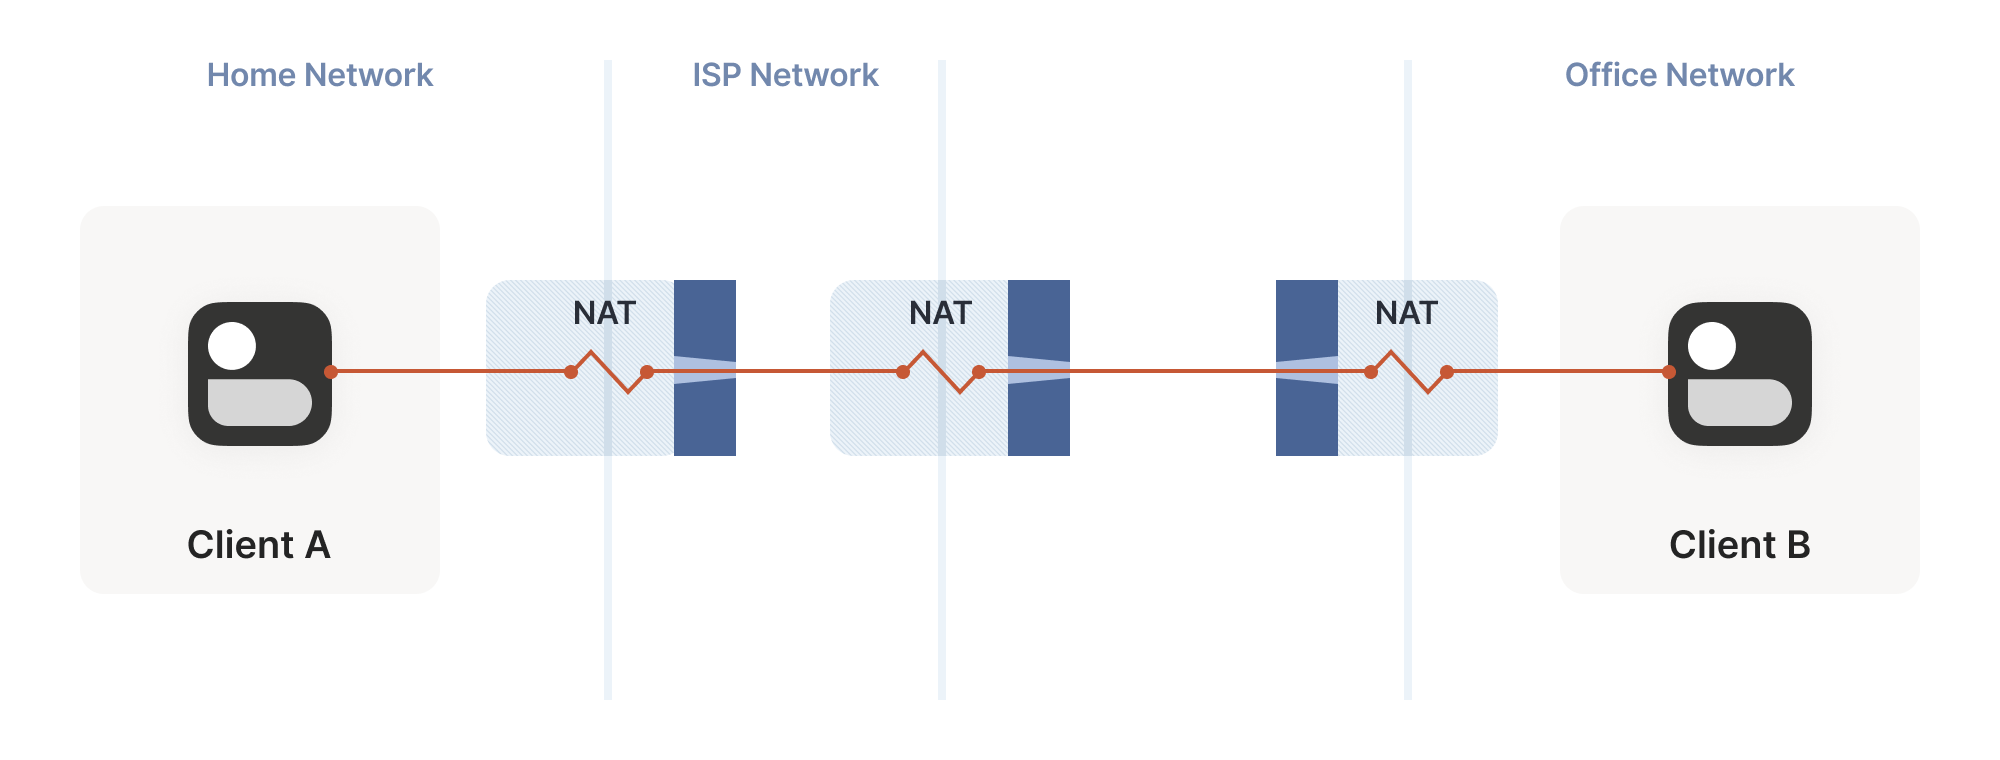
The problems start when two of our “clients” want to talk
directly. Now the firewalls are facing each other. According to the
rule we established above, this means both sides must go first, but
also that neither can go first, because the other side has to go
first!
当两个"客户端"需要直接对话时问题就出现了。此时防火墙会形成对峙局面。根据我们之前确立的规则,这意味着双方都必须先发起连接,但同时又意味着谁都不能先行动——因为对方必须先行出手!
How do we get around this? One way would be to require users to
reconfigure one or both of the firewalls to “open a port” and allow
the other machine’s traffic. This is not very user friendly. It also
doesn’t scale to mesh networks like Tailscale, in which we expect the
peers to be moving around the internet with some regularity. And, of
course, in many cases you don’t have control over the firewalls: you
can’t reconfigure the router in your favorite coffee shop, or at the
airport. (At least, hopefully not!)
我们该如何解决这个问题?一种方法是要求用户重新配置一个或两个防火墙来"开放端口",允许另一台设备的流量通过。这种做法对用户不太友好,也无法扩展到像 Tailscale 这样的网状网络——在这种网络中,我们预期节点会定期在互联网上移动。当然,在很多情况下你根本无法控制防火墙:你不可能在喜欢的咖啡馆或机场里重新配置路由器(至少希望如此!)
We need another option. One that doesn’t involve reconfiguring
firewalls.
我们需要另一种方案。一种无需重新配置防火墙的方案。
Finessing finicky firewalls
巧妙应对棘手的防火墙
The trick is to carefully read the rule we established for our
stateful firewalls. For UDP, the rule is: packets must flow out
before packets can flow back in.
关键在于仔细理解我们为状态防火墙制定的规则。对于 UDP 协议,规则是:数据包必须先流出,才能有数据包流回。
However, nothing says the packets must be related to each other
beyond the IPs and ports lining up correctly. As long as some packet
flowed outwards with the right source and destination, any packet that
looks like a response will be allowed back in, even if the other
side never received your packet!
但规则从未规定这些数据包之间必须存在关联性——只要 IP 地址和端口正确对应即可。只要某个数据包以正确的源地址和目的地址向外发送,任何看似回应的数据包都会被允许返回,即使对方从未收到过你的数据包!
So, to traverse these multiple stateful firewalls, we need to share
some information to get underway: the peers have to know in advance
the ip:port their counterpart is using. One approach is to
statically configure each peer by hand, but this approach doesn’t
scale very far. To move beyond that, we built a coordination
server to keep the ip:port information synchronized in a
flexible, secure manner.
因此,要穿越这些多层级的状态防火墙,我们需要预先共享一些关键信息:通信双方必须提前知晓对方正在使用的 ip:port 。虽然可以通过手动静态配置每个节点来实现,但这种方式扩展性有限。为此,我们构建了一个协调服务器,以灵活安全的方式保持 ip:port 信息的同步。
Then, the peers start sending UDP packets to each other. They must
expect some of these packets to get lost, so they can’t carry any
precious information unless you’re prepared to retransmit them. This
is generally true of UDP, but especially true here. We’re going to
lose some packets in this process.
随后,通信双方开始互相发送 UDP 数据包。由于必须预料到部分数据包会丢失,这些数据包除非做好重传准备,否则不能携带任何关键信息。这虽然是 UDP 协议的普遍特性,但在此场景下尤为突出——我们注定会在这个环节丢失部分数据包。
Our laptop and workstation are now listening on fixed ports, so that
they both know exactly what ip:port to talk to. Let’s take a look at
what happens.
此时我们的笔记本电脑和工作站已在固定端口上启动监听,双方都能准确知道应该与哪个 ip:port 进行通信。让我们具体看看接下来会发生什么。
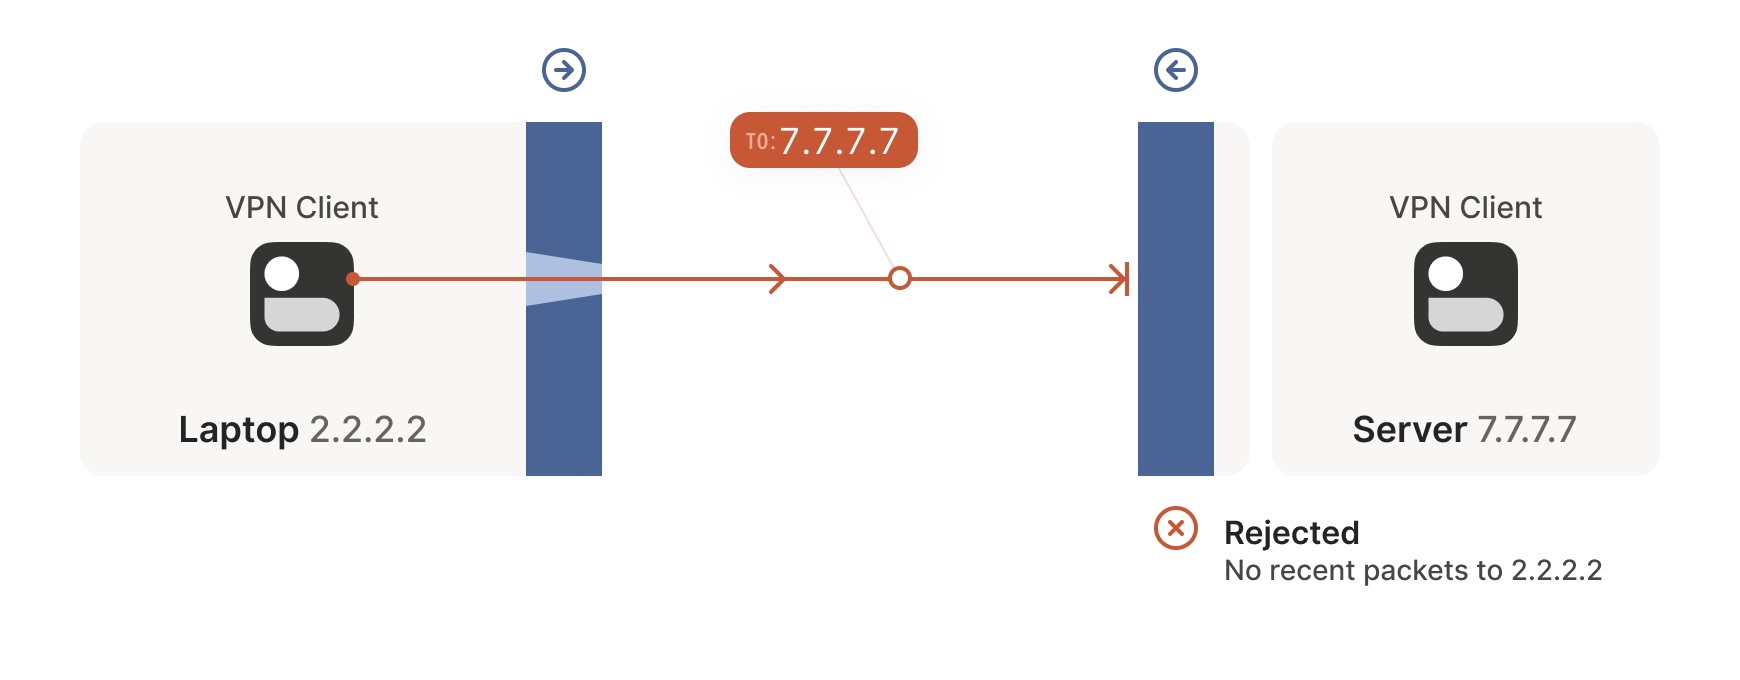
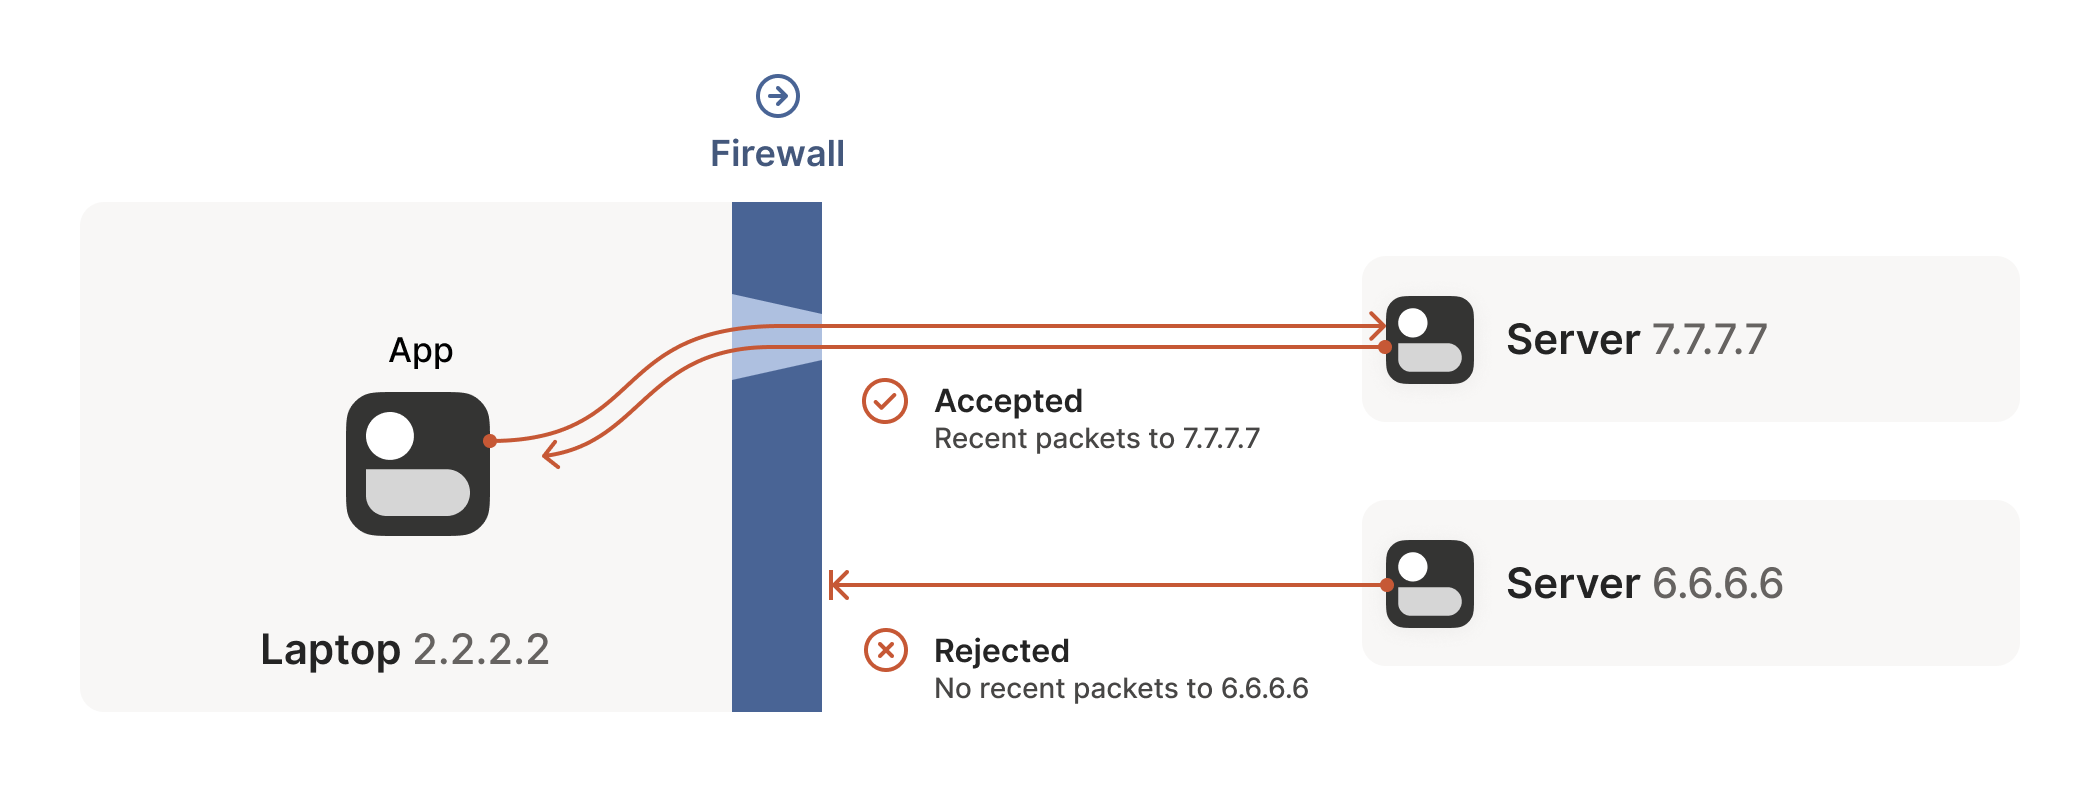
The laptop’s first packet, from 2.2.2.2:1234 to 7.7.7.7:5678, goes
through the Windows Defender firewall and out to the internet. The
corporate firewall on the other end blocks the packet, since it has no
record of 7.7.7.7:5678 ever talking to 2.2.2.2:1234. However,
Windows Defender now remembers that it should expect and allow
responses from 7.7.7.7:5678 to 2.2.2.2:1234.
笔记本电脑发出的首个数据包从 2.2.2.2:1234 发往 7.7.7.7:5678 ,经过 Windows Defender 防火墙后进入互联网。远端的企业防火墙拦截了该数据包,因其未记录过 7.7.7.7:5678 与 2.2.2.2:1234 的通信历史。但此时 Windows Defender 已记住应当接受并放行来自 7.7.7.7:5678 到 2.2.2.2:1234 的响应数据包。
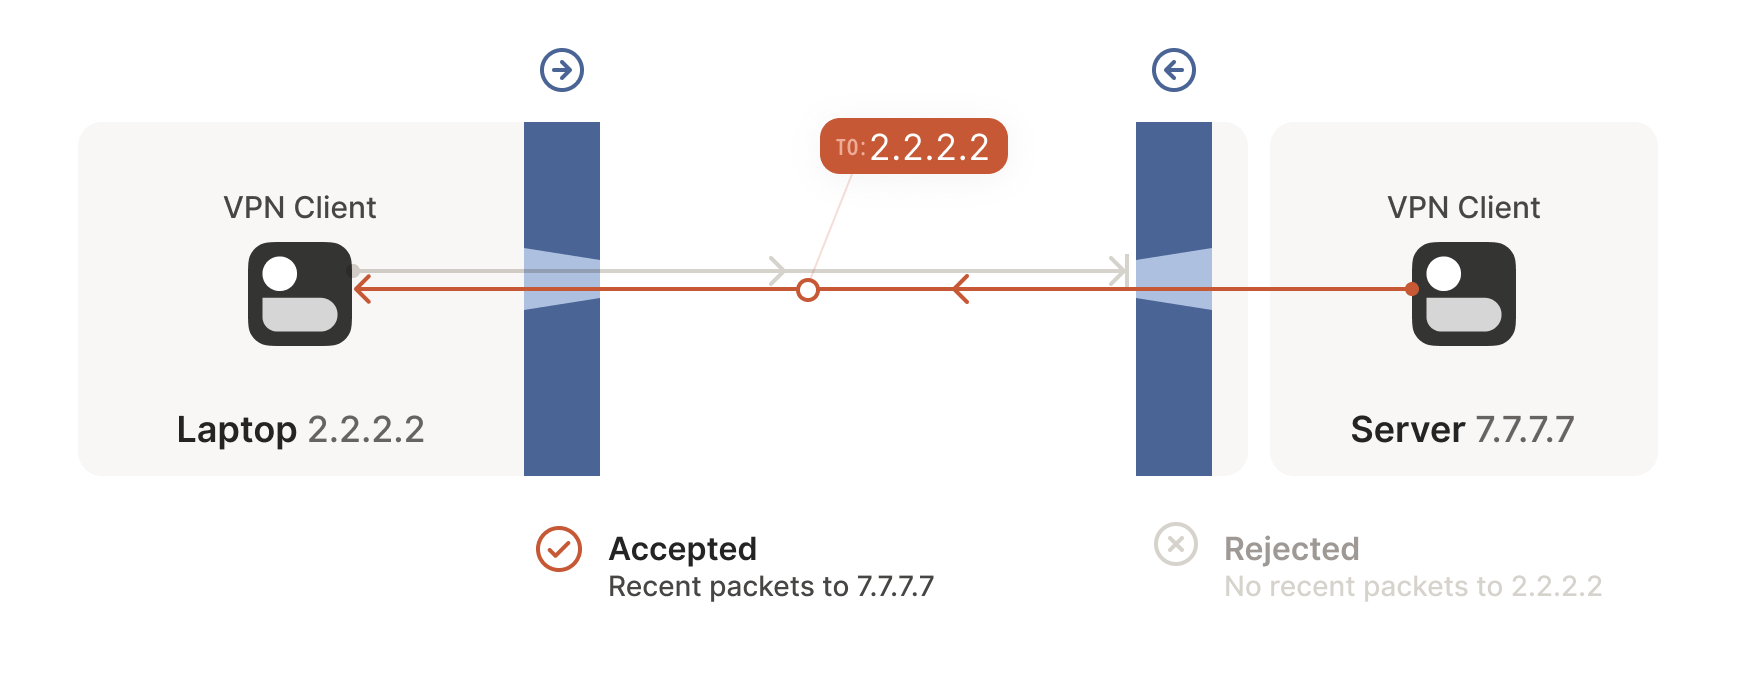
Next, the workstation’s first packet from 7.7.7.7:5678 to
2.2.2.2:1234 goes through the corporate firewall and across the
internet. When it arrives at the laptop, Windows Defender thinks “ah,
a response to that outbound request I saw”, and lets the packet
through! Additionally, the corporate firewall now remembers that it
should expect responses from 2.2.2.2:1234 to 7.7.7.7:5678, and
that those packets are also okay.
随后,工作站发出的首个数据包从 7.7.7.7:5678 发往 2.2.2.2:1234 ,穿越企业防火墙进入互联网。当数据包抵达笔记本电脑时,Windows Defender 判定"这是对先前外发请求的响应",便予以放行!同时企业防火墙也记住了应当接受来自 2.2.2.2:1234 到 7.7.7.7:5678 的响应数据包,并允许这些数据包通过。
Encouraged by the receipt of a packet from the workstation, the laptop
sends another packet back. It goes through the Windows Defender
firewall, through the corporate firewall (because it’s a “response” to
a previously sent packet), and arrives at the workstation.
在成功接收工作站数据包的激励下,笔记本电脑再次发送回应数据包。该数据包先后通过 Windows Defender 防火墙和企业防火墙(因其属于"对已发送数据包的响应"),最终抵达工作站。
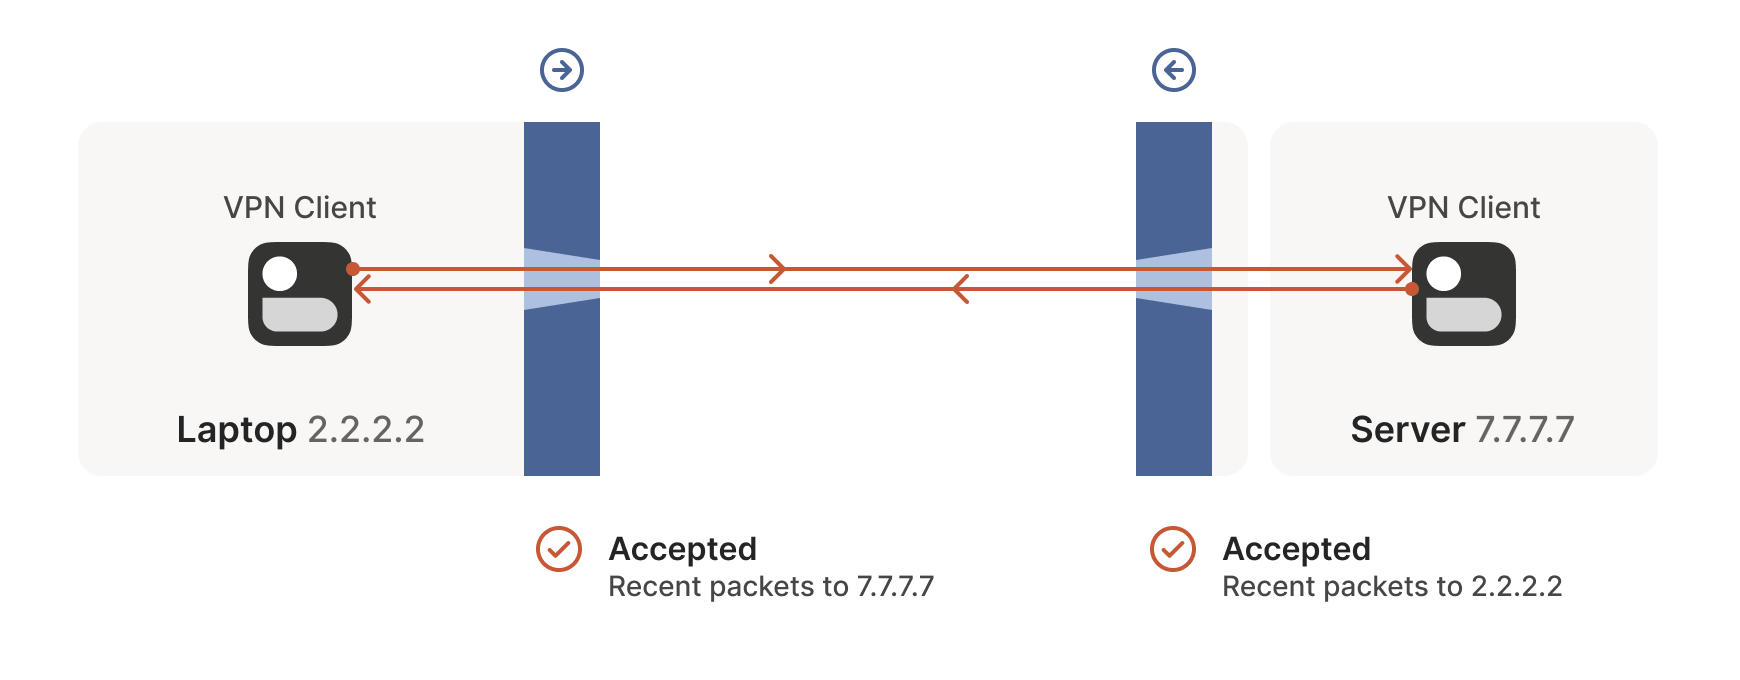
Success! We’ve established two-way communication through a pair of
firewalls that, at first glance, would have prevented it.
成功!我们已成功建立双向通信,尽管乍看之下这对防火墙本应阻止这种连接。
Creative connectivity caveats
创造性连接的注意事项
It’s not always so easy. We’re relying on some indirect influence over
third-party systems, which requires careful handling. What do we need
to keep in mind when managing firewall-traversing connections?
事情并非总是如此简单。我们依赖于对第三方系统的间接影响,这需要谨慎处理。在管理穿越防火墙的连接时,需要牢记哪些要点?
Both endpoints must attempt communication at roughly the same time, so
that all the intermediate firewalls open up while both peers are still
around. One approach is to have the peers retry continuously, but this
is wasteful. Wouldn’t it be better if both peers knew to start
establishing a connection at the same time?
两个终端必须大致同时尝试通信,这样所有中间防火墙才能在双方仍在线时保持开放状态。一种方法是让终端持续重试,但这会造成资源浪费。如果双方都知道要在同一时间开始建立连接,岂不是更好?
This may sound a little recursive: to communicate, first you need to
be able to communicate. However, this preexisting “side channel”
doesn’t need to be very fancy: it can have a few seconds of latency,
and only needs to deliver a few thousand bytes in total, so a tiny VM
can easily be a matchmaker for thousands of machines.
这听起来可能有点递归:为了通信,首先你需要能够通信。不过这个预先存在的"旁路通道"不需要很复杂:它可以有几秒钟的延迟,总共只需要传输几千字节的数据,因此一台微型虚拟机就能轻松为数千台机器充当媒人。
In the distant past, I used XMPP chat messages as the side channel,
with great results. As another example, WebRTC requires you to come up
with your own “signalling channel” (a name that reveals WebRTC’s IP
telephony ancestry), and plug it into the WebRTC APIs. In Tailscale,
our coordination server and fleet of DERP (Detour Encrypted Routing
Protocol) servers act as our side channel.
在遥远的过去,我曾用 XMPP 聊天消息作为旁路通道,效果极佳。另一个例子是 WebRTC 要求开发者自行搭建"信令通道"(这个名称暴露了 WebRTC 源自 IP 电话的技术血统),并将其接入 WebRTC 接口。而在 Tailscale 中,我们的协调服务器和 DERP(迂回加密路由协议)服务器集群就充当着旁路通道的角色。
Stateful firewalls have limited memory, meaning that we need periodic
communication to keep connections alive. If no packets are seen for a
while (a common value for UDP is 30 seconds), the firewall forgets
about the session, and we have to start over. To avoid this, we use a
timer and must either send packets regularly to reset the timers, or
have some out-of-band way of restarting the connection on demand.
状态防火墙的内存容量有限,这意味着我们需要定期通信来维持连接活性。如果长时间未检测到数据包(UDP 协议的常见超时值为 30 秒),防火墙就会遗忘会话状态,迫使我们必须重新建立连接。为避免这种情况,我们设置了计时器机制——要么定期发送数据包重置计时器,要么通过带外通信方式实现按需重启连接。
On the plus side, one thing we don’t need to worry about is exactly
how many firewalls exist between our two peers. As long as they are
stateful and allow outbound connections, the simultaneous transmission
technique will get through any number of layers. That’s really nice,
because it means we get to implement the logic once, and it’ll work
everywhere.
值得庆幸的是,我们完全无需关心通信双方之间究竟存在多少道防火墙。只要这些防火墙具备状态检测功能并允许外发连接,同步传输技术就能穿透任意层级的防护。这实在妙不可言,意味着我们只需实现一次逻辑,就能实现全场景通用。
…Right? ...对吧?
Well, not quite. For this to work, our peers need to know in advance
what ip:port to use for their counterparts. This is where NATs come
into play, and ruin our fun.
其实并不完全如此。要让这种方式奏效,通信双方需要预先知道对方使用的 ip:port 。这时网络地址转换(NAT)就登场了——同时也毁掉了我们的美好设想。
The nature of NATs
NAT 的本质特性
We can think of NAT (Network Address Translator) devices as stateful
firewalls with one more really annoying feature: in addition to all
the stateful firewalling stuff, they also alter packets as they go
through.
我们可以把 NAT(网络地址转换)设备视为具备一项特别烦人功能的状态防火墙:除了执行常规的状态防火墙功能外,它们还会篡改经过的数据包。
A NAT device is anything that does any kind of
Network Address Translation, i.e. altering the source or destination
IP address or port. However, when talking about connectivity problems
and NAT traversal, all the problems come from Source NAT, or SNAT for
short. As you might expect, there is also DNAT (Destination NAT), and
it’s very useful but not relevant to NAT traversal.
任何执行网络地址转换(即修改源/目标 IP 地址或端口)的设备都属于 NAT 设备。但讨论连接性问题与 NAT 穿透时,所有难题都源于源地址转换(简称 SNAT)。正如你所料,还存在目标地址转换(DNAT),虽然它非常实用,但与 NAT 穿透技术无关。
The most common use of SNAT is to connect many devices to the
internet, using fewer IP addresses than the number of devices. In the
case of consumer-grade routers, we map all devices onto a single
public-facing IP address. This is desirable because it turns out that
there are way more devices in the world that want internet access,
than IP addresses to give them (at least in IPv4 — we’ll come to IPv6
in a little bit). NATs let us have many devices sharing a single IP
address, so despite the global shortage of IPv4 addresses, we can
scale the internet further with the addresses at hand.
SNAT 最常见的用途是以少于设备数量的 IP 地址将多台设备连接到互联网。对于家用路由器而言,我们会将所有设备映射到单个公网 IP 地址上。这种方式非常实用,因为全球需要联网的设备数量远超可分配的 IP 地址数量(至少在 IPv4 时代如此——稍后我们会讨论 IPv6)。网络地址转换技术(NAT)使得多台设备能共享单个 IP 地址,因此尽管全球 IPv4 地址短缺,我们仍能利用现有地址进一步扩展互联网规模。
Navigating a NATty network
穿越 NAT 网络
Let’s look at what happens when your laptop is connected to your home
Wi-Fi and talks to a server on the internet.
让我们看看当笔记本电脑连接家庭 Wi-Fi 并与互联网服务器通信时会发生什么。
Your laptop sends UDP packets from 192.168.0.20:1234 to
7.7.7.7:5678. This is exactly the same as if the laptop had a public
IP. But that won’t work on the internet: 192.168.0.20 is a private
IP address, which appears on many different peoples’ private
networks. The internet won’t know how to get responses back to us.
您的笔记本电脑会从 192.168.0.20:1234 向 7.7.7.7:5678 发送 UDP 数据包。这与笔记本电脑拥有公共 IP 时的情况完全相同。但这在互联网上行不通: 192.168.0.20 是一个私有 IP 地址,会出现在许多不同用户的私有网络中。互联网将无法知道如何将响应返回给我们。
Enter the home router. The laptop’s packets flow through the home
router on their way to the internet, and the router sees that this is
a new session that it’s never seen before.
家庭路由器登场。笔记本电脑的数据包在通往互联网的途中会经过家庭路由器,而路由器会识别出这是一个从未见过的新会话。
It knows that 192.168.0.20 won’t fly on the internet, but it can
work around that: it picks some unused UDP port on its own public IP
address — we’ll use 2.2.2.2:4242 — and creates a NAT mapping that
establishes an equivalence: 192.168.0.20:1234 on the LAN side is the
same as 2.2.2.2:4242 on the internet side.
路由器知道 192.168.0.20 在互联网上无法通行,但它有解决办法:它会从自己的公网 IP 地址中选取一个未被占用的 UDP 端口——我们假设是 2.2.2.2:4242 ——然后创建一个 NAT 映射来建立对应关系:局域网侧的 192.168.0.20:1234 等同于互联网侧的 2.2.2.2:4242 。
From now on, whenever it sees packets that match that mapping, it will rewrite
the IPs and ports in the packet appropriately.
此后每当路由器发现符合该映射规则的数据包时,就会相应地重写数据包中的 IP 地址和端口信息。
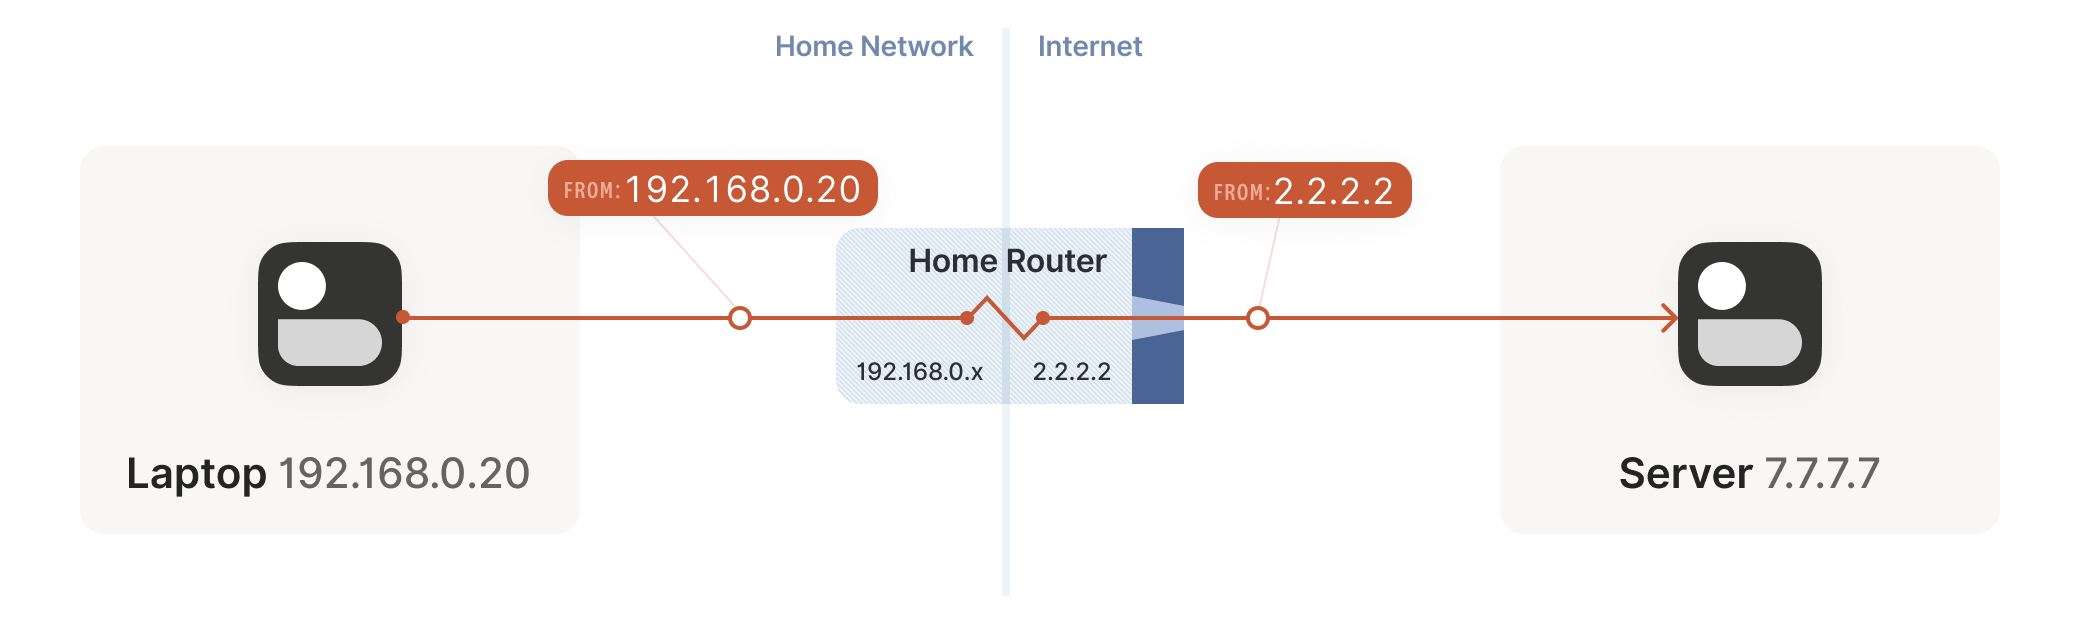
Resuming our packet’s journey: the home router applies the NAT mapping
it just created, and sends the packet onwards to the internet. Only
now, the packet is from 2.2.2.2:4242, not 192.168.0.20:1234. It
goes on to the server, which is none the wiser. It’s communicating
with 2.2.2.2:4242, like in our previous examples sans NAT.
继续数据包的旅程:家庭路由器应用刚创建的 NAT 映射,将数据包转发至互联网。此时数据包的源地址已变为 2.2.2.2:4242 而非 192.168.0.20:1234 。服务器接收后毫无察觉——就像之前没有 NAT 的示例那样,它始终认为自己正与 2.2.2.2:4242 通信。
Responses from the server flow back the other way as you’d expect,
with the home router rewriting 2.2.2.2:4242 back to
192.168.0.20:1234. The laptop is also none the wiser, from its
perspective the internet magically figured out what to do with its
private IP address.
服务器的响应数据包会如预期般逆向传输,家庭路由器将 2.2.2.2:4242 地址重新转换回 192.168.0.20:1234 。笔记本电脑同样毫无感知,从它的视角看,互联网神奇地处理了其私有 IP 地址的通信问题。
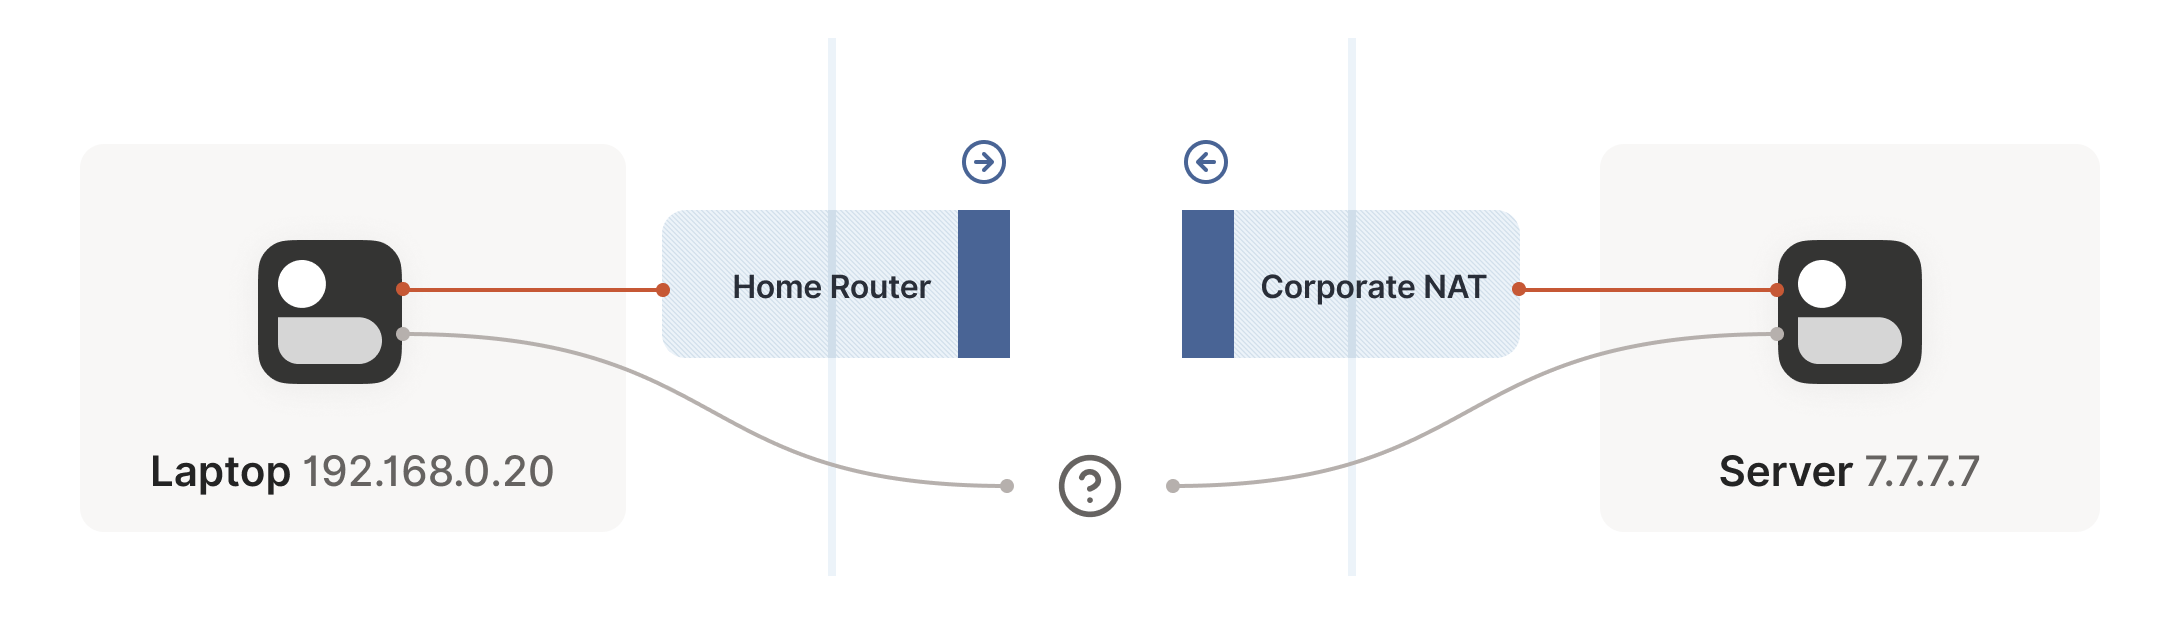
Our example here was with a home router, but the same principle
applies on corporate networks. The usual difference there is that the
NAT layer consists of multiple machines (for high availability or
capacity reasons), and they can have more than one public IP address,
so that they have more public ip:port combinations to choose from
and can sustain more active clients at once.
虽然本例以家庭路由器为例,但企业网络同样适用该原理。通常区别在于:企业级 NAT 层由多台设备组成(出于高可用或容量考虑),且可能拥有多个公网 IP 地址,这样就能提供更多 ip:port 地址组合选择,同时维持更多活跃客户端连接。

Multiple NATs on a single layer allow for higher availability or capacity, but function the same as a single NAT.
单层部署多个 NAT 可提升可用性或容量,但其功能与单个 NAT 相同。
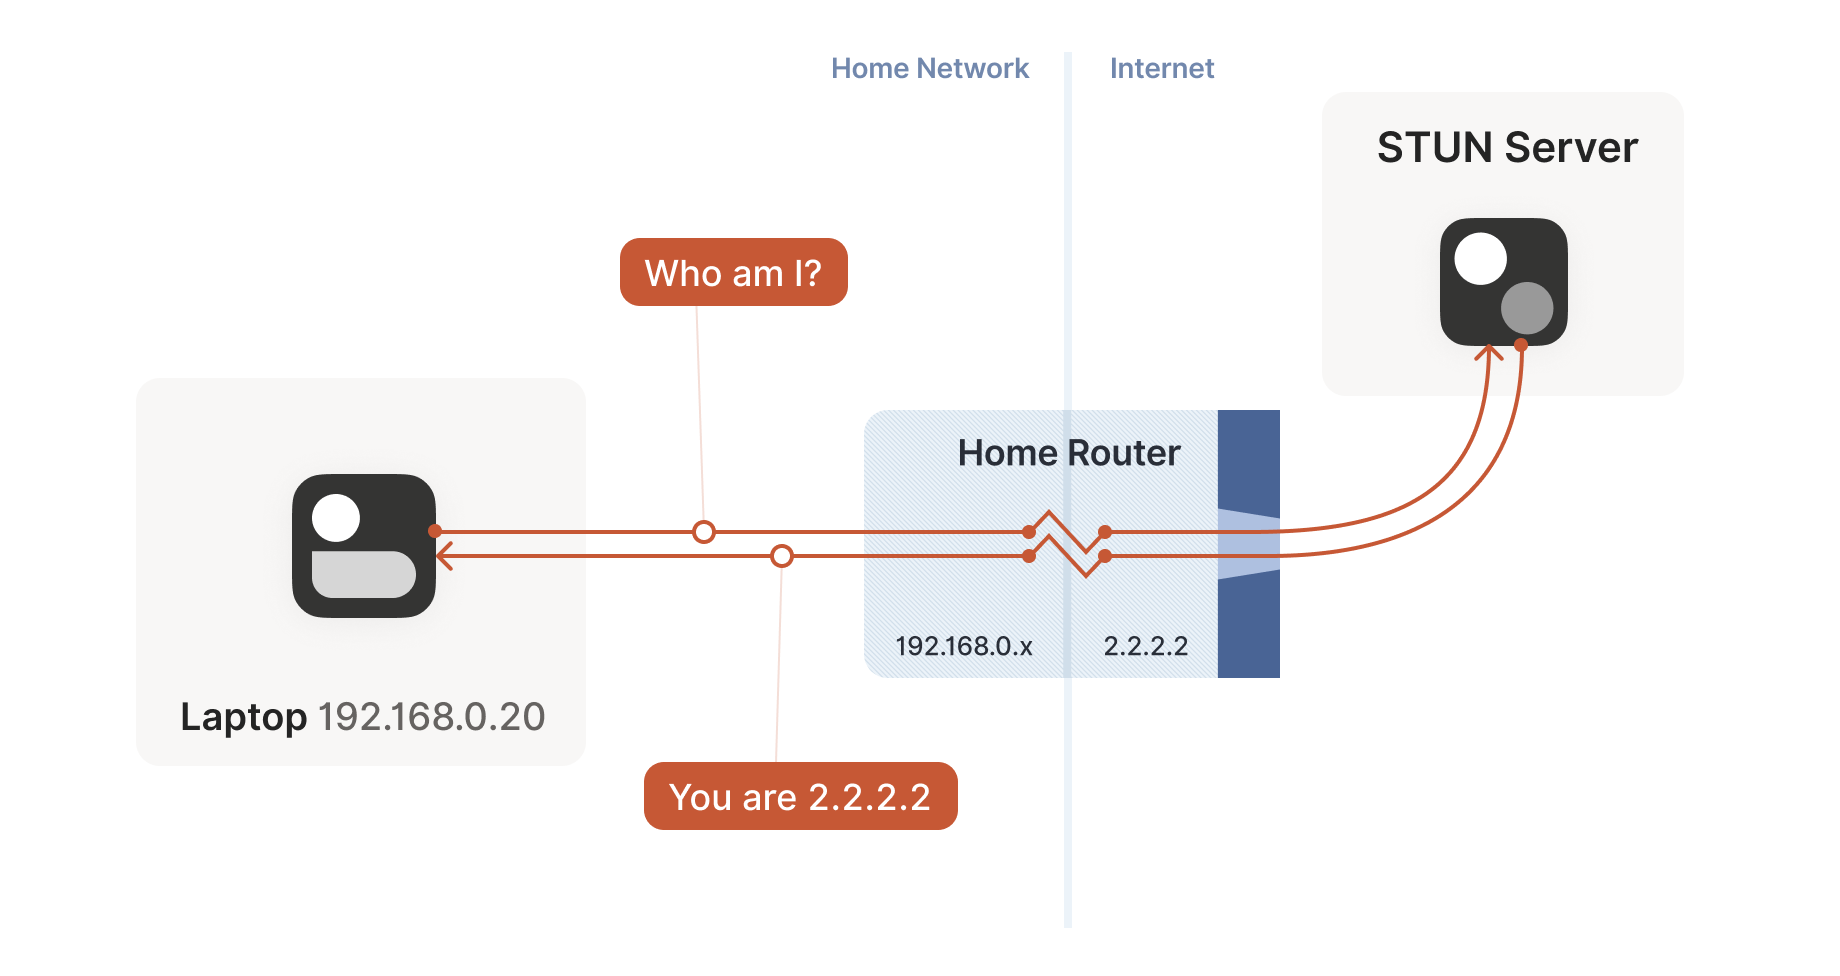
A study in STUN
STUN 协议研究
We now have a problem that looks like our earlier scenario with the
stateful firewalls, but with NAT devices:
现在我们面临的问题与之前有状态防火墙的情形类似,但这次是 NAT 设备造成的:
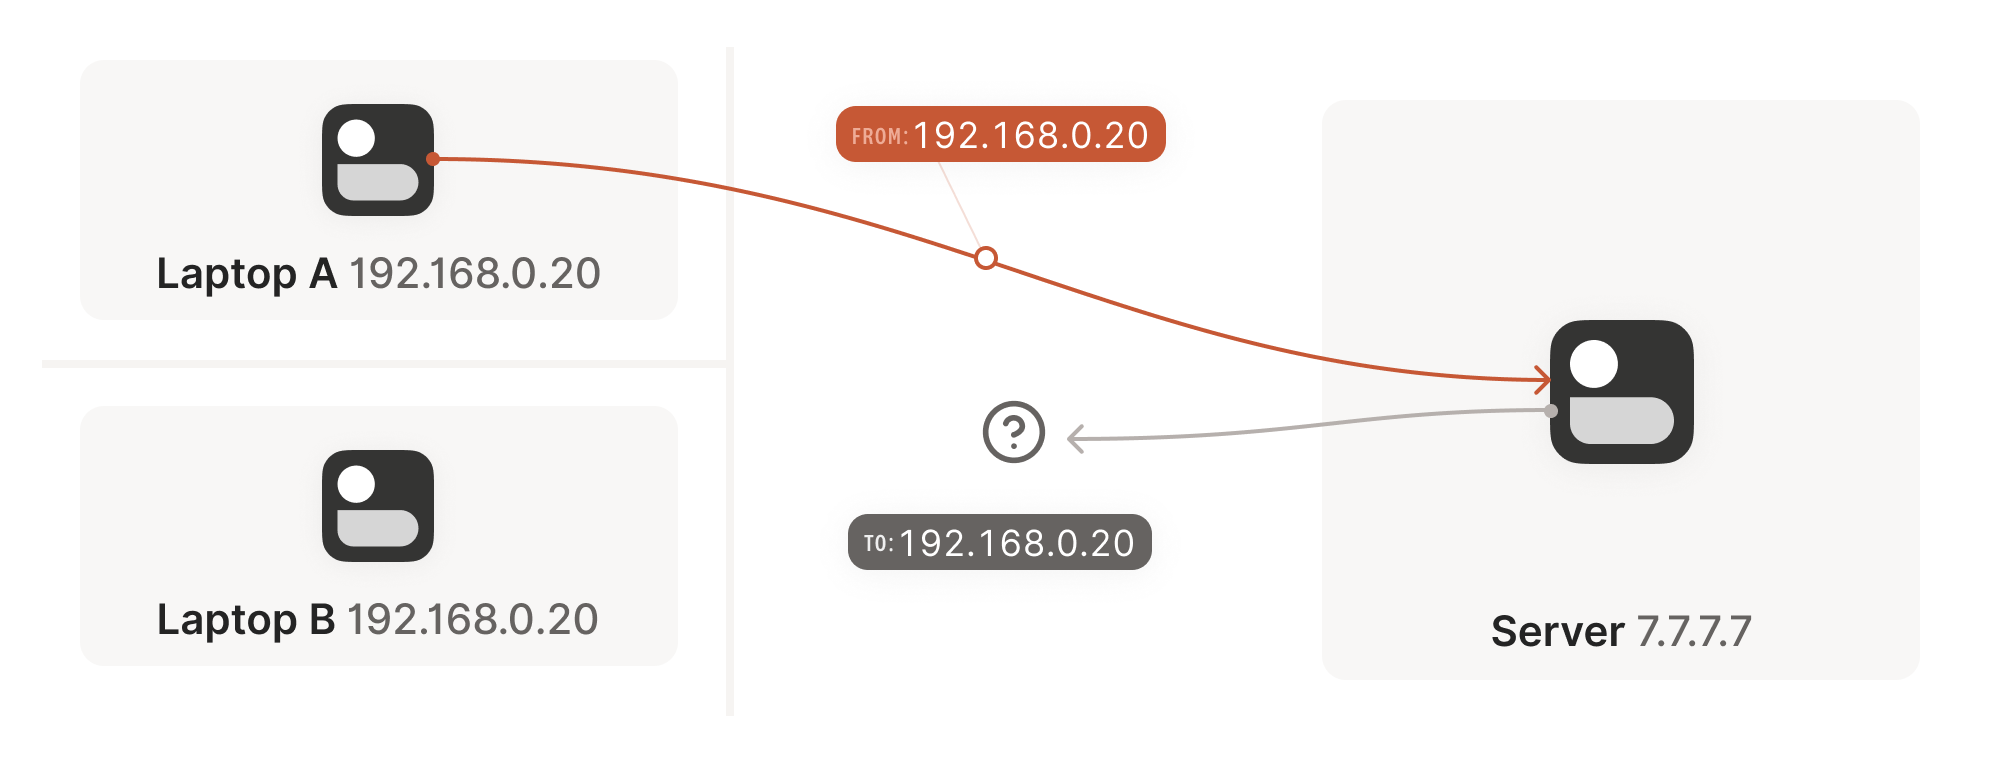
Our problem is that our two peers don’t know what the ip:port of
their peer is. Worse, strictly speaking there is no ip:port until
the other peer sends packets, since NAT mappings only get created when
outbound traffic towards the internet requires it. We’re back to our
stateful firewall problem, only worse: both sides have to speak first,
but neither side knows to whom to speak, and can’t know until the
other side speaks first.
问题的症结在于:通信双方都不知道对方的 ip:port 地址。更糟的是,严格来说 ip:port 地址在对方发送数据包前根本不存在——因为 NAT 映射只有在设备向互联网发送出站流量时才会创建。这又回到了有状态防火墙的老问题,且情况更棘手:双方都必须先发声,但彼此都不知道该向谁发送信息,而这个问题在对方先发声前又无解。
How do we break the deadlock? That’s where STUN comes in. STUN is both
a set of studies of the detailed behavior of NAT devices, and a
protocol that aids in NAT traversal. The main thing we care about for
now is the network protocol.
如何打破这种死循环?这就是 STUN 的用武之地。STUN 既是一套研究 NAT 设备具体行为的学术成果,也是辅助 NAT 穿透的通信协议。目前我们最关心的是其网络协议部分。
STUN relies on a simple observation: when you talk to a server on the
internet from a NATed client, the server sees the public ip:port
that your NAT device created for you, not your LAN ip:port. So, the
server can tell you what ip:port it saw. That way, you know what
traffic from your LAN ip:port looks like on the internet, you can
tell your peers about that mapping, and now they know where to send
packets! We’re back to our “simple” case of firewall traversal.
STUN 协议基于一个简单原理:当处于 NAT 后的客户端与互联网服务器通信时,服务器看到的是 NAT 设备为你生成的公网 ip:port ,而非你的局域网 ip:port 。因此服务器可以告诉你它观测到的 ip:port 。这样你就能了解局域网 ip:port 流量在互联网上的呈现形式,将此映射关系告知对等节点,它们便知道该将数据包发往何处!我们又回到了"简单"的防火墙穿透场景。
That’s fundamentally all that the STUN protocol is: your machine sends
a “what’s my endpoint from your point of view?” request to a STUN
server, and the server replies with “here’s the ip:port that I saw
your UDP packet coming from.”
STUN 协议的核心原理就是:你的设备向 STUN 服务器发送一个"从你的角度看我的通信端点是什么?"的请求,服务器则回复"我看到你的 UDP 数据包来自这个 ip:port 地址"。
(The STUN protocol has a bunch more stuff in it — there’s a way of
obfuscating the ip:port in the response to stop really broken NATs
from mangling the packet’s payload, and a whole authentication
mechanism that only really gets used by TURN and ICE, sibling
protocols to STUN that we’ll talk about in a bit. We can ignore all of
that stuff for address discovery.)
(STUN 协议还包含更多内容——有一种方法可以混淆响应中的 ip:port ,以防止严重损坏的 NAT 篡改数据包负载,还有一整套认证机制,实际上只有 STUN 的兄弟协议 TURN 和 ICE 会使用,我们稍后会讨论这些协议。对于地址发现而言,我们可以忽略所有这些内容。)
Incidentally, this is why we said in the introduction that, if you
want to implement this yourself, the NAT traversal logic and your main
protocol have to share a network socket. Each socket gets a different
mapping on the NAT device, so in order to discover your public
ip:port, you have to send and receive STUN packets from the socket
that you intend to use for communication, otherwise you’ll get a
useless answer.
顺便说一句,这就是为什么我们在引言中提到:如果你想自己实现这个功能,NAT 穿透逻辑必须与主协议共享同一个网络套接字。每个套接字在 NAT 设备上会获得不同的映射地址,因此要发现你的公网 ip:port ,必须通过实际通信所用的套接字收发 STUN 数据包,否则得到的将是无效地址。
How this helps 这如何解决问题
Given STUN as a tool, it seems like we’re close to done. Each machine
can do STUN to discover the public-facing ip:port for its local
socket, tell its peers what that is, everyone does the firewall
traversal stuff, and we’re all set… Right?
有了 STUN 这个工具,我们似乎快要大功告成了。每台设备可以通过 STUN 探测本地套接字对应的公网 ip:port ,将此地址告知对等节点,所有人完成防火墙穿越步骤后就能通信了...对吗?
Well, it’s a mixed bag. This’ll work in some cases, but not
others. Generally speaking, this’ll work with most home routers, and
will fail with some corporate NAT gateways. The probability of failure
increases the more the NAT device’s brochure mentions that it’s a
security device. (NATs do not enhance security in any meaningful way,
but that’s a rant for another time.)
实际情况喜忧参半。某些场景下这套方案可行,但另一些场景会失败。通常家用路由器都能成功,但部分企业级 NAT 网关会导致失败。当 NAT 设备宣传手册中频繁出现"安全设备"字样时,失败概率会显著上升(尽管 NAT 并不能实质提升安全性,不过这个话题改日再议)。
The problem is an assumption we made earlier: when the STUN server
told us that we’re 2.2.2.2:4242 from its perspective, we assumed
that meant that we’re 2.2.2.2:4242 from the entire internet’s
perspective, and that therefore anyone can reach us by talking to
2.2.2.2:4242.
问题在于我们之前的一个假设:当 STUN 服务器告诉我们从它的角度看我们是 2.2.2.2:4242 时,我们以为这意味着从整个互联网的角度看我们是 2.2.2.2:4242 ,因此任何人都可以通过与 2.2.2.2:4242 通信来访问我们。
As it turns out, that’s not always true. Some NAT devices behave
exactly in line with our assumptions. Their stateful firewall
component still wants to see packets flowing in the right order, but
we can reliably figure out the correct ip:port to give to our peer
and do our simultaneous transmission trick to get through. Those NATs
are great, and our combination of STUN and the simultaneous packet
sending will work fine with those.
事实证明,情况并非总是如此。部分 NAT 设备的行为完全符合我们的假设——其状态防火墙组件仍要求数据包按正确顺序传输,但我们可以准确推算出提供给对等端的正确 ip:port ,并通过同步传输技巧实现穿透。这类 NAT 表现优异,我们的 STUN 技术与数据包同步发送组合方案能与之完美配合。
(in theory, there are also NAT devices that are super relaxed, and
don’t ship with stateful firewall stuff at all. In those, you don’t
even need simultaneous transmission, the STUN request gives you an
internet ip:port that anyone can connect to with no further
ceremony. If such devices do still exist, they’re increasingly rare.)
理论上也存在一些极其宽松的 NAT 设备,它们根本不配备状态防火墙功能。对于这类设备,你甚至不需要同步传输——STUN 请求会直接为你提供一个互联网 ip:port 地址,任何人都能无需任何额外步骤直接连接。如果这类设备至今仍存在,它们正变得越来越罕见。
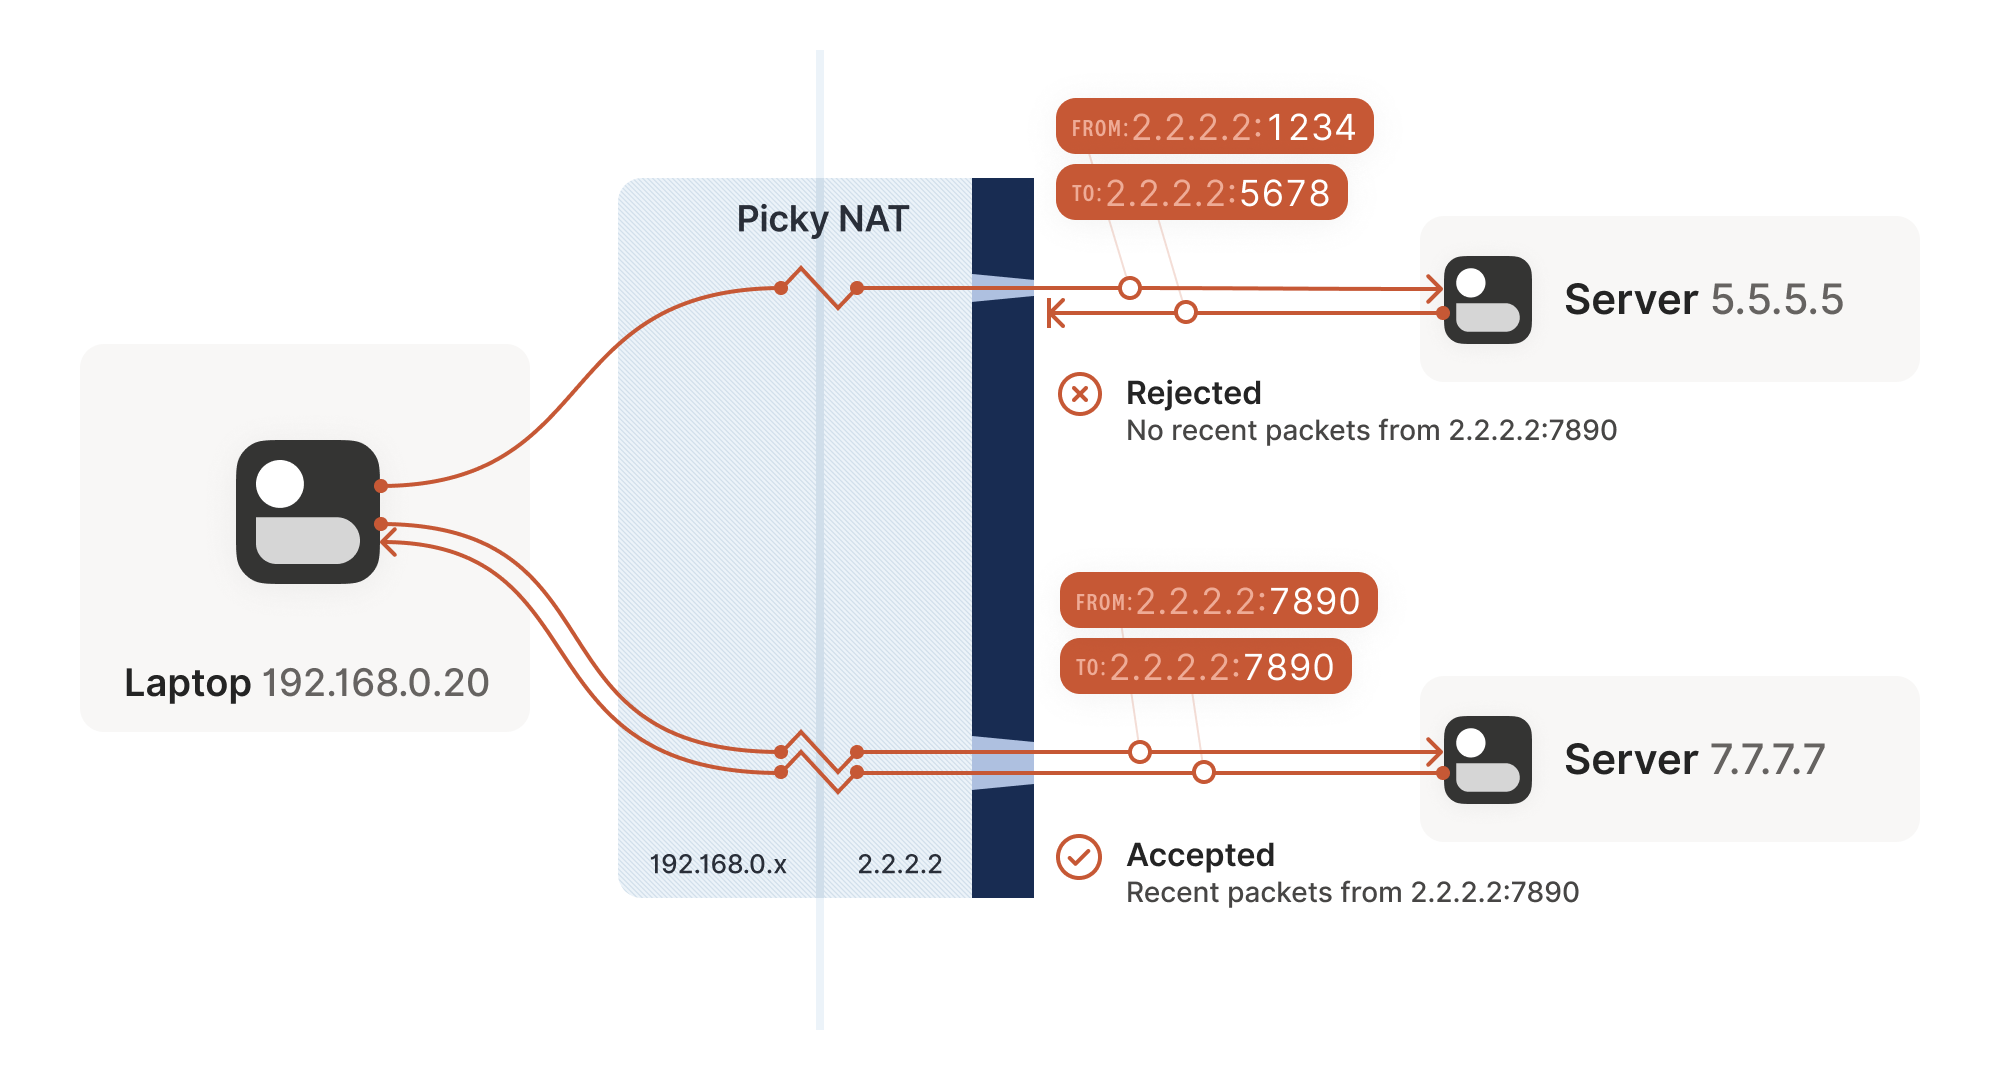
Other NAT devices are more difficult, and create a completely
different NAT mapping for every different destination that you talk
to. On such a device, if we use the same socket to send to
5.5.5.5:1234 and 7.7.7.7:2345, we’ll end up with two different
ports on 2.2.2.2, one for each destination. If you use the wrong port
to talk back, you don’t get through.
其他 NAT 设备则更为棘手,它们会为每个不同的通信目标创建完全独立的 NAT 映射。在这类设备上,如果我们使用同一个套接字分别向 5.5.5.5:1234 和 7.7.7.7:2345 发送数据,最终会在 2.2.2.2 上生成两个不同的端口号——每个目标对应一个专属端口。若使用错误的端口进行回复通信,数据将无法穿透。
Naming our NATs NAT 类型命名
Now that we’ve discovered that not all NAT devices behave in the same
way, we should talk terminology. If you’ve done anything related to
NAT traversal before, you might have heard of “Full Cone”, “Restricted
Cone”, “Port-Restricted Cone” and “Symmetric” NATs. These are terms
that come from early research into NAT traversal.
既然我们已经发现并非所有 NAT 设备的行为方式都相同,现在该讨论术语问题了。如果你之前接触过 NAT 穿透相关技术,可能听说过"全锥型"、"受限锥型"、"端口受限锥型"和"对称型"NAT 这些分类。这些术语源自早期的 NAT 穿透研究。
That terminology is honestly quite confusing. I always look up what a
Restricted Cone NAT is supposed to be. Empirically, I’m not alone in
this, because most of the internet calls “easy” NATs Full Cone, when
these days they’re much more likely to be Port-Restricted Cone.
坦白说这套术语体系相当令人困惑。我每次都要重新查阅"受限锥型 NAT"的具体定义。经验表明并非只有我这样,因为现在互联网上大多数所谓的"简单"NAT 被称作全锥型,而实际上它们更可能是端口受限锥型。
More recent research and RFCs have come up with a much better
taxonomy. First of all, they recognize that there are many more
varying dimensions of behavior than the single “cone” dimension of
earlier research, so focusing on the cone-ness of your NAT isn’t
necessarily helpful. Second, they came up with words that more plainly
convey what the NAT is doing.
最新研究和 RFC 文档提出了一套更科学的分类体系。首先,新体系认识到 NAT 行为存在多个变化维度,远非早期研究中单一的"锥型"维度所能概括,因此过分关注 NAT 的锥型特征并无必要。其次,新术语能更直观地反映 NAT 的实际行为特征。
The “easy” and “hard” NATs above differ in a single dimension: whether
or not their NAT mappings depend on what the destination is. RFC
4787 calls the easy variant “Endpoint-Independent Mapping”
(EIM for short), and the hard variant “Endpoint-Dependent Mapping”
(EDM for short). There’s a subcategory of EDM that specifies whether
the mapping varies only on the destination IP, or on both the
destination IP and port. For NAT traversal, the distinction doesn’t
matter. Both kinds of EDM NATs are equally bad news for us.
上述"简单"与"困难"NAT 的区别仅在于一个维度:其 NAT 映射是否取决于目标地址。RFC 4787 将简单变体称为"端点无关映射"(简称 EIM),困难变体则称为"端点相关映射"(简称 EDM)。EDM 还存在一个子类别,用于区分映射是仅随目标 IP 变化,还是同时随目标 IP 和端口变化。对于 NAT 穿透而言,这种细分并不重要——两种 EDM 型 NAT 对我们来说同样棘手。
In the grand tradition of naming things being hard,
endpoint-independent NATs still depend on an endpoint: each source
ip:port gets a different mapping, because otherwise your packets
would get mixed up with someone else’s packets, and that would be
chaos. Strictly speaking, we should say “Destination Endpoint
Independent Mapping” (DEIM?), but that’s a mouthful, and since “Source
Endpoint Independent Mapping” would be another way to say “broken”, we
don’t specify. Endpoint always means “Destination Endpoint.”
在命名事物这一艰巨的传统中,端点无关型 NAT 仍然依赖于一个端点:每个源地址 ip:port 会获得不同的映射关系,否则你的数据包就会与他人的数据包混为一谈,那将导致混乱。严格来说,我们应当称之为"目标端点无关映射"(DEIM?),但这名称过于冗长。而"源端点无关映射"等同于"故障映射",因此我们不作具体说明。这里的"端点"始终指代"目标端点"。
You might be wondering how 2 kinds of endpoint dependence maps into 4
kinds of cone-ness. The answer is that cone-ness encompasses two
orthogonal dimensions of NAT behavior. One is NAT mapping behavior,
which we looked at above, and the other is stateful firewall
behavior. Like NAT mapping behavior, the firewalls can be
Endpoint-Independent or a couple of variants of Endpoint-Dependent. If
you throw all of these into a matrix, you can reconstruct the
cone-ness of a NAT from its more fundamental properties:
你可能会疑惑,两种端点依赖类型如何映射为四种锥形类型。答案在于锥形类型涵盖了 NAT 行为的两个正交维度:其一是上文讨论的 NAT 映射行为,其二是状态防火墙行为。与 NAT 映射行为类似,防火墙可分为端点无关型或几种端点依赖型变体。若将这些特性排列成矩阵,就能从更基础的属性重构出 NAT 的锥形类型:
NAT Cone Types NAT 锥形类型
| Endpoint-Independent NAT mapping 端点无关型 NAT 映射 |
Endpoint-Dependent NAT mapping (all types) 端点相关型 NAT 映射(所有类型) |
|
|---|---|---|
| Endpoint-Independent firewall 端点无关型防火墙 |
Full Cone NAT 全锥型 NAT | N/A* 不适用* |
| Endpoint-Dependent firewall (dest. IP only) 依赖目标 IP 的防火墙 |
Restricted Cone NAT 受限锥形 NAT | N/A* 不适用* |
| Endpoint-Dependent firewall (dest. IP+port) 依赖目标 IP+端口的防火墙 |
Port-Restricted Cone NAT 端口受限圆锥型 NAT |
Symmetric NAT 对称型 NAT |
* can theoretically exist, but don't show up in the wild
*理论上可能存在,但实际环境中不会出现
Once broken down like this, we can see that cone-ness isn’t terribly
useful to us. The major distinction we care about is Symmetric versus
anything else — in other words, we care about whether a NAT device is
EIM or EDM.
经过这样拆解后,我们发现圆锥特性对我们并不特别重要。我们真正需要区分的是对称型与其他类型——换句话说,我们关注的是 NAT 设备是否具备端点独立映射(EIM)或端点依赖映射(EDM)特性。
While it’s neat to know exactly how your firewall behaves, we don’t
care from the point of view of writing NAT traversal code. Our
simultaneous transmission trick will get through all three variants of
firewalls. In the wild we’re overwhelmingly dealing only with
IP-and-port endpoint-dependent firewalls. So, for practical code, we
can simplify the table down to:
虽然精确了解防火墙的行为机制很有意义,但从编写 NAT 穿透代码的角度来看,我们并不需要关注这些细节。我们的同步传输技巧能穿透所有三种防火墙变体。在实际环境中,我们绝大多数情况下只需处理依赖 IP 和端口端点的防火墙。因此,对于实际编码而言,我们可以将表格简化为:
| Endpoint-Independent NAT mapping 端点无关型 NAT 映射 |
Endpoint-Dependent NAT mapping (dest. IP only) 端点依赖型 NAT 映射(仅目标 IP) |
|
|---|---|---|
| Firewall is yes 防火墙存在 | Easy NAT 简易 NAT | Hard NAT 复杂 NAT |
If you’d like to read more about the newer taxonomies of NATs, you can
get the full details in RFCs 4787 (NAT Behavioral
Requirements for UDP), 5382 (for TCP) and 5508
(for ICMP). And if you’re implementing a NAT device, these RFCs are
also your guide to what behaviors you should implement, to make them
well-behaved devices that play well with others and don’t generate
complaints about Halo multiplayer not working.
若想深入了解 NAT 的最新分类体系,可查阅 RFC 4787(UDP 的 NAT 行为要求)、RFC 5382(TCP 相关)和 RFC 5508(ICMP 相关)获取完整规范。若您正在开发 NAT 设备,这些 RFC 也是实现规范化行为的指南——确保设备兼容性强,不会因《光环》多人游戏无法运行而招致投诉。
Back to our NAT traversal. We were doing well with STUN and firewall
traversal, but these hard NATs are a big problem. It only takes one of
them in the whole path to break our current traversal plans.
回到 NAT 穿透技术。虽然 STUN 和防火墙穿透进展顺利,但这些严格型 NAT 仍是重大障碍。整条通信路径中只要存在一个此类 NAT,就会破坏现有穿透方案。
But wait, this post is titled “how NAT traversal works”, not “how NAT
traversal doesn’t work.” So presumably, I have a trick up my sleeve to
get out of this, right?
且慢,本文标题是"NAT 穿透原理"而非"NAT 穿透失败案例"。想必我藏有应对妙招吧?
Have you considered giving up?
您是否考虑过放弃治疗?
This is a good time to have the awkward part of our chat: what happens
when we empty our entire bag of tricks, and we still can’t get
through? A lot of NAT traversal code out there gives up and declares
connectivity impossible. That’s obviously not acceptable for us;
Tailscale is nothing without the connectivity.
现在该谈谈这个尴尬的话题了:当我们用尽所有技巧仍无法建立连接时该怎么办?市面上许多 NAT 穿透方案会直接放弃,宣布连接不可行。这对我们来说显然不可接受——Tailscale 若失去连接性就毫无意义。
We could use a relay that both sides can talk to unimpeded, and have
it shuffle packets back and forth. But wait, isn’t that terrible?
我们可以使用一个双方都能无障碍通信的中继服务器,让它来回转发数据包。但等等,这听起来不是很糟糕吗?
Sort of. It’s certainly not as good as a direct connection, but if the
relay is “near enough” to the network path your direct connection
would have taken, and has enough bandwidth, the impact on your
connection quality isn’t huge. There will be a bit more latency, maybe
less bandwidth. That’s still much better than no connection at all,
which is where we were heading.
某种程度上确实如此。虽然不如直连理想,但只要中继服务器位于接近直连路径的位置,且拥有足够带宽,对连接质量的影响其实有限。可能会增加少许延迟或降低一些带宽,但总比完全无法连接要好得多——而这正是我们原本面临的困境。
And keep in mind that we only resort to this in cases where direct
connections fail. We can still establish direct connections through a
lot of different networks. Having relays to handle the long tail
isn’t that bad.
请记住,我们仅在直连失败时才会启用这种方案。大多数网络环境下我们仍能建立直连通道,用中继服务器处理那些极端情况并非下策。
Additionally, some networks can break our connectivity much more
directly than by having a difficult NAT. For example, we’ve observed
that the UC Berkeley guest Wi-Fi blocks all outbound UDP except for DNS
traffic. No amount of clever NAT tricks is going to get around the
firewall eating your packets. So, we need some kind of reliable
fallback no matter what.
此外,某些网络会以比复杂 NAT 更直接的方式中断我们的连接。例如,我们观察到加州大学伯克利分校的访客 Wi-Fi 会屏蔽除 DNS 流量外的所有出站 UDP 数据包。再精妙的 NAT 技巧也无法绕过防火墙吞噬数据包的问题。因此无论如何我们都需要某种可靠的备用方案。
You could implement relays in a variety of ways. The classic way is a
protocol called TURN (Traversal Using Relays around NAT). We’ll skip
the protocol details, but the idea is that you authenticate yourself
to a TURN server on the internet, and it tells you “okay, I’ve
allocated ip:port, and will relay packets for you.” You tell your
peer the TURN ip:port, and we’re back to a completely trivial
client/server communication scenario.
中继服务可以通过多种方式实现。经典方案是采用名为 TURN(NAT 中继穿透)的协议。我们跳过协议细节,其核心思路是:你向互联网上的 TURN 服务器验证身份后,服务器会告知"我已分配 ip:port ,将为你中转数据包"。你将这个 TURN ip:port 地址告知对等节点后,通信就简化为完全基础的客户端/服务器模式。
For Tailscale, we didn’t use TURN for our relays. It’s not a
particularly pleasant protocol to work with, and unlike STUN there’s
no real interoperability benefit since there are no open TURN servers
on the internet.
Tailscale 没有采用 TURN 协议实现中继。该协议使用体验欠佳,且与 STUN 不同——由于互联网上没有开放的 TURN 服务器,采用它并不能带来真正的互操作性优势。
Instead, we created DERP (Detoured Encrypted Routing
Protocol), which is a general purpose packet relaying
protocol. It runs over HTTP, which is handy on networks with strict
outbound rules, and relays encrypted payloads based on the
destination’s public key.
相反,我们开发了 DERP(迂回加密路由协议),这是一种通用数据包中继协议。它基于 HTTP 协议运行,这在具有严格出站规则的网络中非常实用,并能根据目标公钥转发加密数据载荷。
As we briefly touched on earlier, we use this communication path both
as a data relay when NAT traversal fails (in the same role as TURN in
other systems) and as the side channel to help with NAT
traversal. DERP is both our fallback of last resort to get
connectivity, and our helper to upgrade to a peer-to-peer connection,
when that’s possible.
正如前文简要提及的,我们既将这种通信路径用作 NAT 穿透失败时的数据中继(与其他系统中的 TURN 角色相同),也将其作为辅助 NAT 穿透的旁路通道。DERP 既是确保连接的最后备用方案,也是在我们可能实现时升级为点对点连接的助推器。
Now that we have a relay, in addition to the traversal tricks we’ve
discussed so far, we’re in pretty good shape. We can’t get through
everything but we can get through quite a lot, and we have a backup
for when we fail. If you stopped reading now and implemented just the
above, I’d estimate you could get a direct connection over 90% of the
time, and your relays guarantee some connectivity all the time.
现在我们有了中继服务器,再加上之前讨论的那些穿透技巧,情况已经相当不错了。虽然不能突破所有网络限制,但能应对绝大多数场景,失败时还有备用方案。如果你此刻就停止阅读并只实现上述方案,我估计 90%的情况下都能建立直连,而中继服务器则能确保始终维持基本连通性。
NAT notes for nerds
给技术宅的 NAT 笔记
But… If you’re not satisfied with “good enough”, there’s still a lot
more we can do! What follows is a somewhat miscellaneous set of
tricks, which can help us out in specific situations. None of them
will solve NAT traversal by itself, but by combining them judiciously,
we can get incrementally closer to a 100% success rate.
不过…如果你不满足于"够用就好",我们还有很多招数可用!接下来介绍的是一些杂项技巧,能在特定场景下派上用场。它们都无法单独解决 NAT 穿透问题,但通过合理组合运用,我们可以逐步逼近 100%的成功率。
The benefits of birthdays
生日祝福的妙用
Let’s revisit our problem with hard NATs. The key issue is that the
side with the easy NAT doesn’t know what ip:port to send to on the
hard side. But must send to the right ip:port in order to open up
its firewall to return traffic. What can we do about that?
让我们重新审视严格型 NAT 的难题。关键问题在于:宽松型 NAT 端不知道严格型 NAT 端的 ip:port 地址,但必须准确发送至 ip:port 才能打开防火墙接收返回流量。这该如何解决?
Well, we know some ip:port for the hard side, because we ran
STUN. Let’s assume that the IP address we got is correct. That’s not
necessarily true, but let’s run with the assumption for now. As it
turns out, it’s mostly safe to assume this. (If you’re curious why,
see REQ-2 in RFC 4787.)
好吧,我们知道一些关于困难面的信息,因为我们已经运行了 STUN 协议。假设我们获取的 IP 地址是正确的——虽然这不一定成立,但暂且按这个假设进行。事实证明,这种假设在大多数情况下是安全的。(若好奇原因,可参阅 RFC 4787 中的 REQ-2 章节。)
If the IP address is correct, our only unknown is the port. There’s
65,535 possibilities… Could we try all of them? At 100 packets/sec,
that’s a worst case of 10 minutes to find the right one. It’s better
than nothing, but not great. And it really looks like a port scan
(because in fairness, it is), which may anger network intrusion
detection software.
如果 IP 地址正确,我们唯一未知的就是端口。共有 65,535 种可能性……我们能尝试所有端口吗?以每秒 100 个数据包的速度计算,最坏情况下需要 10 分钟才能找到正确的端口。这总比没有强,但效果并不理想。而且这看起来真的很像端口扫描(公平地说,确实如此),可能会激怒网络入侵检测软件。
We can do much better than that, with the help of the birthday
paradox. Rather than open 1 port on the hard side and have the
easy side try 65,535 possibilities, let’s open, say, 256 ports on the
hard side (by having 256 sockets sending to the easy side’s
ip:port), and have the easy side probe target ports at random.
借助生日悖论的原理,我们可以做得更好。与其在困难端开放 1 个端口并让简单端尝试 65,535 种可能性,不如在困难端开放 256 个端口(通过 256 个套接字向简单端的 ip:port 发送数据),并让简单端随机探测目标端口。
I’ll spare you the detailed math, but you can check out the dinky
python calculator I made while working it out. The
calculation is a very slight variant on the “classic” birthday
paradox, because it’s looking at collisions between two sets
containing distinct elements, rather than collisions within a single
set. Fortunately, the difference works out slightly in our favor!
Here’s the chances of a collision of open ports (i.e. successful
communication), as the number of random probes from the easy side
increases, and assuming 256 ports on the hard side:
我就不赘述复杂的数学计算了,不过你可以看看我推导时做的简易 Python 计算器。这个计算是"经典"生日悖论的一个微小变体,因为它考察的是两个包含不同元素的集合之间的碰撞,而非单一集合内部的碰撞。幸运的是,这种差异对我们稍微有利!以下是随着简单端随机探测次数增加时(假设困难端有 256 个端口),开放端口发生碰撞(即成功通信)的概率:
| Number of random probes 随机探测次数 |
Chance of success 成功概率 |
|---|---|
| 174 | 50% |
| 256 | 64% |
| 1024 | 98% |
| 2048 | 99.9% |
If we stick with a fairly modest probing rate of 100 ports/sec, half
the time we’ll get through in under 2 seconds. And even if we get
unlucky, 20 seconds in we’re virtually guaranteed to have found a way
in, after probing less than 4% of the total search space.
如果我们保持每秒 100 个端口的适度探测速率,半数情况下能在 2 秒内完成穿透。即便运气不佳,20 秒后也几乎能确保找到入口,而此时探测的端口数还不到总搜索空间的 4%。
That’s great! With this additional trick, one hard NAT in the path is
an annoying speedbump, but we can manage. What about two?
太棒了!有了这个额外技巧,路径上遇到一个严格 NAT 就像恼人的减速带,但我们还能应付。那要是两个呢?
We can try to apply the same trick, but now the search is much harder:
each random destination port we probe through a hard NAT also results
in a random source port. That means we’re now looking for a
collision on a {source port, destination port} pair, rather than
just the destination port.
我们可以尝试采用同样的技巧,但现在搜索难度大大增加:每次通过硬 NAT 探测随机目标端口时,也会产生随机的源端口。这意味着我们现在需要在 {source port, destination port} 端口对上寻找匹配,而不仅仅是目标端口。
Again I’ll spare you the calculations, but after 20 seconds in the
same regime as the previous setup (256 probes from one side, 2048 from
the other), our chance of success is… 0.01%.
同样地,我将省略计算过程。在与前文相同的测试条件下(一侧发送 256 次探测,另一侧发送 2048 次探测),经过 20 秒后,我们的成功率是...0.01%。
This shouldn’t be surprising if you’ve studied the birthday paradox
before. The birthday paradox lets us convert N “effort” into
something on the order of sqrt(N). But we squared the size of the
search space, so even the reduced amount of effort is still a lot more
effort. To hit a 99.9% chance of success, we need each side to send
170,000 probes. At 100 packets/sec, that’s 28 minutes of trying before
we can communicate. 50% of the time we’ll succeed after “only” 54,000
packets, but that’s still 9 minutes of waiting around with no
connection. Still, that’s better than the 1.2 years it would take
without the birthday paradox.
如果你之前研究过生日悖论,对此就不会感到惊讶。生日悖论让我们能将 N 次尝试转化为约 sqrt(N) 量级。但由于我们使搜索空间的大小平方化,即便降低后的尝试量仍然相当可观。要达到 99.9%的成功概率,双方各需发送 17 万次探测。以每秒 100 个数据包计算,这意味着需要 28 分钟才能建立通信。50%的情况下"仅"需发送 5.4 万个数据包即可成功,但即便如此仍需等待 9 分钟才能建立连接。不过相比没有生日悖论时需要耗费的 1.2 年,这已经好太多了。
In some applications, 28 minutes might still be worth it. Spend half
an hour brute-forcing your way through, then you can keep pinging to
keep the open path alive indefinitely — or at least until one of the
NATs reboots and dumps all its state, then you’re back to brute
forcing. But it’s not looking good for any kind of interactive
connectivity.
在某些应用场景中,28 分钟的等待或许仍具价值。花费半小时暴力破解建立通道后,你就能通过持续发送 ping 请求使这条开放路径永久保持活跃——至少在其中一台 NAT 设备重启并清除所有状态之前是如此,届时你将不得不重新开始暴力破解。但对于任何需要即时交互的连接需求而言,这种方案显然不尽如人意。
Worse, if you look at common office routers, you’ll find that they
have a surprisingly low limit on active sessions. For example, a
Juniper SRX 300 maxes out at 64,000 active sessions. We’d consume its
entire session table with our one attempt to get through! And that’s
assuming the router behaves gracefully when overloaded. And this is
all to get a single connection! What if we have 20 machines doing this
behind the same router? Disaster.
更糟糕的是,如果你查看常见的办公路由器,会发现它们对活动会话的限制低得惊人。例如,Juniper SRX 300 的最大活动会话数仅为 64,000。我们仅尝试建立一次连接就会耗尽它的整个会话表!这还是假设路由器在超负荷时能正常运作的情况。而这一切仅仅是为了建立一条连接!如果同一台路由器后面有 20 台机器同时进行这种操作呢?简直是灾难。
Still, with this trick we can make it through a slightly harder
network topology than before. That’s a big deal, because home routers
tend to be easy NATs, and hard NATs tend to be office routers or cloud
NAT gateways. That means this trick buys us improved connectivity for
the home-to-office and home-to-cloud scenarios, as well as a few
office-to-cloud and cloud-to-cloud scenarios.
尽管如此,借助这个技巧,我们就能穿透比之前稍复杂的网络拓扑结构。这意义重大,因为家用路由器通常属于简易型 NAT,而复杂 NAT 往往是企业路由器或云 NAT 网关。这意味着该技巧能显著提升家庭到办公室、家庭到云端的连接成功率,同时也能优化部分企业到云端及云端之间的通信场景。
Partially manipulating port maps
部分操控端口映射
Our hard NATs would be so much easier if we could ask the NATs to stop
being such jerks, and let more stuff through. Turns out, there’s a
protocol for that! Three of them, to be precise. Let’s talk about
port mapping protocols.
如果能让 NAT 设备不再那么顽固,允许更多流量通过,我们的硬 NAT 问题就会简单得多。事实上确实存在这样的协议!准确地说有三种。让我们来聊聊端口映射协议。
The oldest is the UPnP IGD (Universal Plug’n’Play Internet
Gateway Device) protocol. It was born in the late 1990’s, and as such
uses a lot of very 90’s technology (XML, SOAP, multicast HTTP over UDP
— yes, really) and is quite hard to implement correctly and securely —
but a lot of routers shipped with UPnP, and a lot still do. If we
strip away all the fluff, we find a very simple request-response that
all three of our port mapping protocols implement: “Hi, please forward
a WAN port to lan-ip:port,” and “okay, I’ve allocated wan-ip:port
for you.”
最古老的是 UPnP IGD(通用即插即用互联网网关设备)协议。它诞生于 1990 年代末,因此采用了大量 90 年代的技术(XML、SOAP、基于 UDP 的多播 HTTP——没错,确实如此),这使得正确且安全地实现该协议相当困难——但许多路由器都预装了 UPnP 功能,至今仍有大量设备支持。如果抛开所有技术细节,我们会发现这三种端口映射协议都实现了非常简单的请求-响应机制:"你好,请将 WAN 端口转发到 lan-ip:port ",以及"好的,我已为你分配了 wan-ip:port "。
Speaking of stripping away the fluff: some years after UPnP IGD came
out, Apple launched a competing protocol called NAT-PMP
(NAT Port Mapping Protocol). Unlike UPnP, it only does port
forwarding, and is extremely simple to implement, both on clients and
on NAT devices. A little bit after that, NAT-PMP v2 was reborn as
PCP (Port Control Protocol).
说到去除冗余功能:在 UPnP IGD 问世数年后,苹果公司推出了一项名为 NAT-PMP(NAT 端口映射协议)的竞争协议。与 UPnP 不同,它仅实现端口转发功能,无论在客户端还是 NAT 设备上都极其易于实现。不久之后,NAT-PMP 第二版以 PCP(端口控制协议)之名重获新生。
So, to help our connectivity further, we can look for UPnP IGD,
NAT-PMP and PCP on our local default gateway. If one of the protocols
elicits a response, we request a public port mapping. You can think of
this as a sort of supercharged STUN: in addition to discovering our
public ip:port, we can instruct the NAT to be friendlier to our
peers, by not enforcing firewall rules for that port. Any packet from
anywhere that lands on our mapped port will make it back to us.
因此,为了进一步提升连接性,我们可以在本地默认网关上寻找 UPnP IGD、NAT-PMP 和 PCP 协议。如果其中任一协议获得响应,我们就可以请求一个公共端口映射。你可以将其视为一种强化版的 STUN:除了发现我们的公共 ip:port 外,我们还能指示 NAT 设备对通信更友好——即不对该端口强制执行防火墙规则。任何来自外部的数据包只要命中映射端口,都能顺利抵达我们这里。
You can’t rely on these protocols being present. They might not be
implemented on your devices. They might be disabled by default and
nobody knew to turn them on. They might have been disabled by policy.
你不能依赖这些协议必然存在。它们可能未在你的设备上实现;可能默认处于关闭状态而无人知晓需要启用;也可能被策略强制禁用。
Disabling by policy is fairly common because UPnP suffered from a
number of high-profile vulnerabilities (since fixed, so newer devices
can safely offer UPnP, if implemented properly). Unfortunately, many
devices come with a single “UPnP” checkbox that actually toggles UPnP,
NAT-PMP and PCP all at once, so folks concerned about UPnP’s security
end up disabling the perfectly safe alternatives as well.
策略性禁用相当常见,因为 UPnP 曾曝出多起重大漏洞(现已修复,只要正确实现,新设备可安全提供 UPnP 功能)。遗憾的是,许多设备仅提供单一的"UPnP"复选框,实际却同时控制着 UPnP、NAT-PMP 和 PCP 的开关,导致那些担心 UPnP 安全性的用户,连完全安全的替代方案也一并禁用了。
Still, when it’s available, it effectively makes one NAT vanish from
the data path, which usually makes connectivity trivial… But let’s
look at the unusual cases.
不过,当这种技术可用时,它能有效消除数据路径中的一个 NAT,通常会使连接变得轻而易举……但让我们看看那些不寻常的情况。
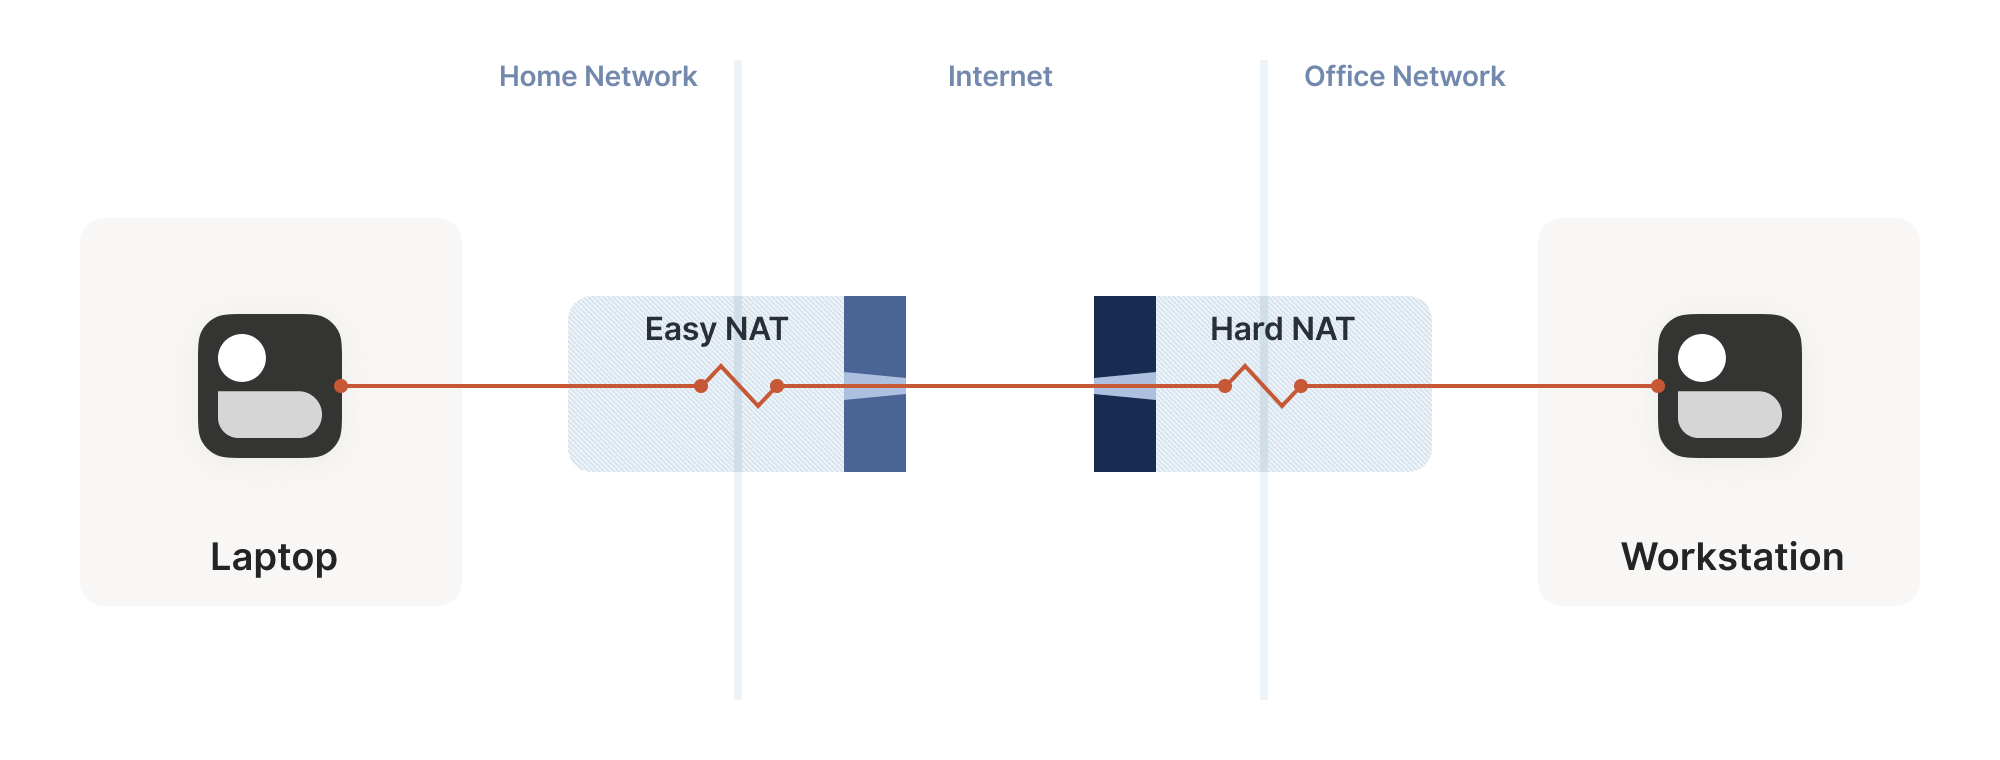
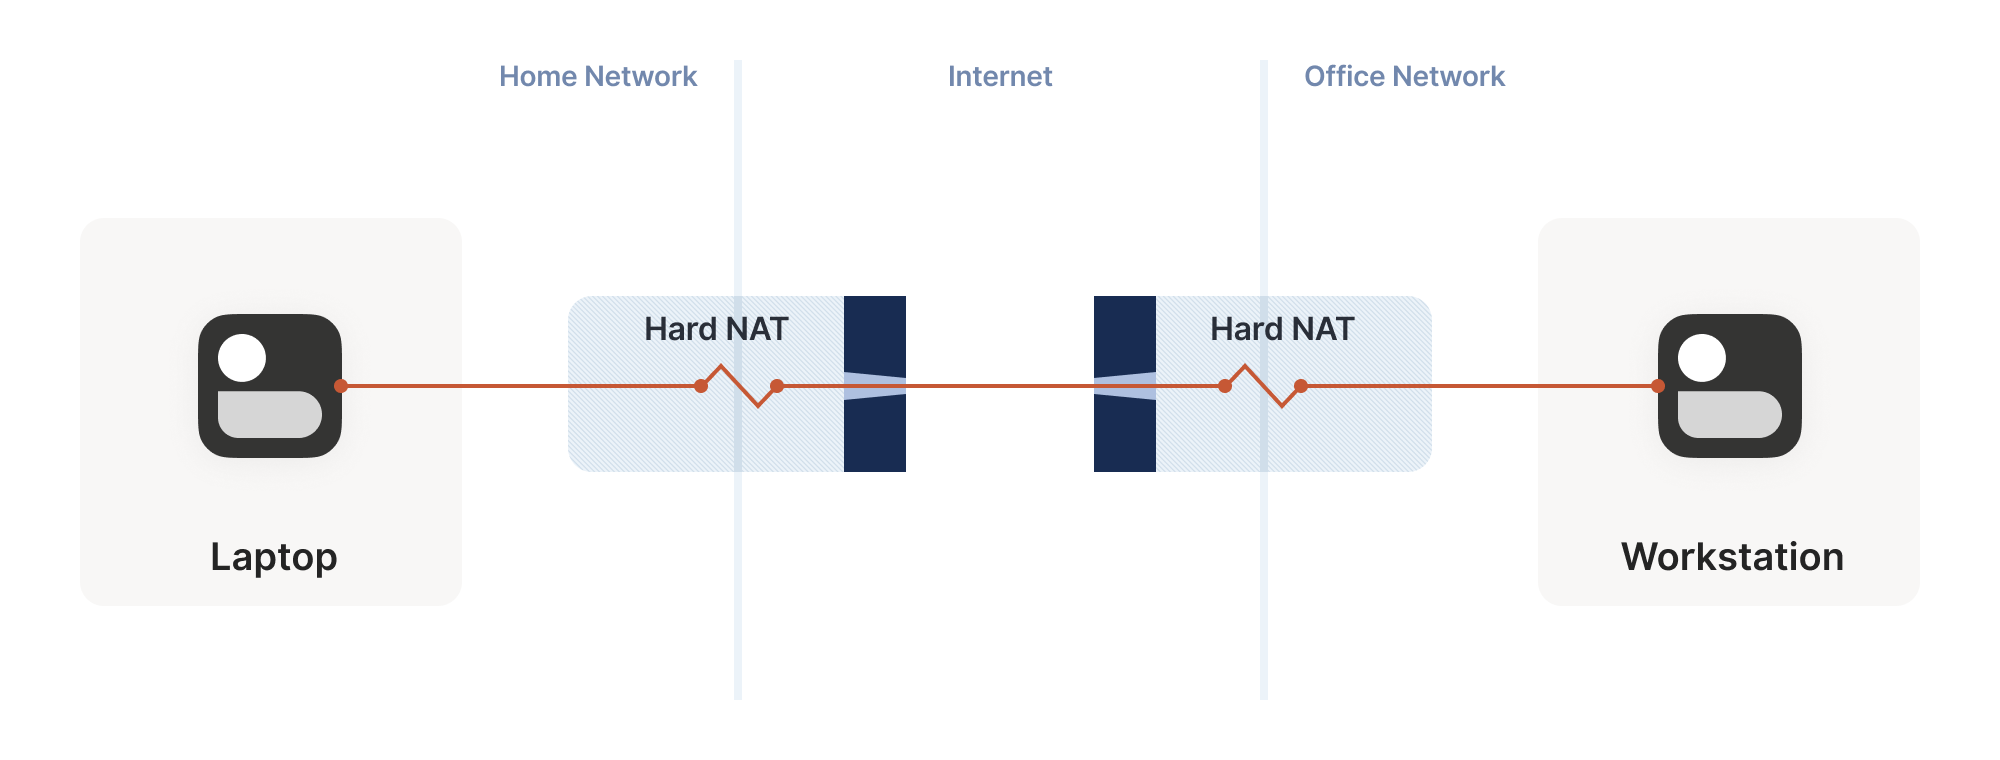
Negotiating numerous NATs
穿越多重 NAT
So far, the topologies we’ve looked at have each client behind one NAT
device, with the two NATs facing each other. What happens if we build
a “double NAT”, by chaining two NATs in front of one of our machines?
目前我们探讨的拓扑结构中,每个客户端都位于单个 NAT 设备后方,两个 NAT 设备彼此相对。如果我们在某台机器前串联两个 NAT 设备构建"双重 NAT",会发生什么情况?
What happens if we build a “double NAT”, by chaining two NATs in front of one of our machines?
如果我们在某台机器前串联两个 NAT 设备构建"双重 NAT",会发生什么情况?
In this example, not much of interest happens. Packets from client A
go through two different layers of NAT on their way to the
internet. But the outcome is the same as it was with multiple layers
of stateful firewalls: the extra layer is invisible to everyone, and
our other techniques will work fine regardless of how many layers
there are. All that matters is the behavior of the “last” layer before
the internet, because that’s the one that our peer has to find a way
through.
这个例子中不会出现特别有趣的现象。客户端 A 发出的数据包在通往互联网的过程中会经历两层不同的 NAT 转换。但最终效果与多层状态防火墙的情况类似:额外的 NAT 层对所有人都是透明的,无论存在多少层 NAT,我们之前的技术方案都能正常工作。真正关键的是互联网接入前"最后一层"NAT 的行为特性,因为远程对等端需要穿透的正是这层 NAT。
The big thing that breaks is our port mapping protocols. They act upon
the layer of NAT closest to the client, whereas the one we need to
influence is the one furthest away. You can still use the port mapping
protocols, but you’ll get an ip:port in the “middle” network, which
your remote peer cannot reach. Unfortunately, none of the protocols
give you enough information to find the “next NAT up” to repeat the
process there, although you could try your luck with a traceroute and
some blind requests to the next few hops.
最大的问题在于端口映射协议失效了。这些协议作用于最靠近客户端的 NAT 层,而我们需要影响的却是最远端那层。虽然仍可使用端口映射协议,但会在"中间"网络生成一个远程对端无法访问的 ip:port 地址。更棘手的是,现有协议都无法提供足够信息来定位"上一级 NAT"以便重复映射流程——尽管你可以尝试用路由追踪工具碰运气,或向后续几跳节点发送盲请求。
Breaking port mapping protocols is the reason why the internet is so
full of warnings about the evils of double-NAT, and how you should
bend over backwards to avoid them. But in fact, double-NAT is entirely
invisible to most internet-using applications, because most
applications don’t try to do this kind of explicit NAT traversal.
端口映射协议的失效正是互联网上充斥着关于双重 NAT 危害警告的原因,人们总说应该千方百计避免这种情况。但实际上,大多数互联网应用根本察觉不到双重 NAT 的存在,因为绝大多数应用并不会尝试进行这种显式的 NAT 穿透。
I’m definitely not saying that you should set up a double-NAT in
your network. Breaking the port mapping protocols will degrade
multiplayer on many video games, and will likely strip IPv6 from your
network, which robs you of some very good options for NAT-free
connectivity. But, if circumstances beyond your control force you into
a double-NAT, and you can live with the downsides, most things will
still work fine.
我绝不是建议你在网络中设置双重 NAT。破坏端口映射协议会降低许多电子游戏的联机体验,还可能剥夺你网络的 IPv6 支持——这意味着你将失去无需 NAT 连接的优质选择。但若不可抗力迫使你陷入双重 NAT,且你能接受这些缺陷,大多数功能仍可正常运行。
Which is a good thing, because you know what circumstances beyond your
control force you to double-NAT? Let’s talk carrier-grade NAT.
这倒是件好事,知道什么不可抗力会迫使你使用双重 NAT 吗?我们来聊聊运营商级 NAT。
Concerning CGNATs 关于 CGNAT
Even with NATs to stretch the supply of IPv4 addresses, we’re still
running out, and ISPs can no longer afford to give one entire public
IP address to every home on their network. To work around this, ISPs
apply SNAT recursively: your home router SNATs your devices to an
“intermediate” IP address, and further out in the ISP’s network a
second layer of NAT devices map those intermediate IPs onto a smaller
number of public IPs. This is “carrier-grade NAT”, or CGNAT for short.
即便通过 NAT 技术延展 IPv4 地址资源,我们仍面临地址枯竭的问题,互联网服务提供商已无法为每个家庭单独分配公网 IP。为此,ISP 采用递归式 SNAT:家庭路由器先将设备转换为"中间"IP,而在 ISP 网络更深处的第二层 NAT 设备会将这些中间 IP 映射到更少量的公网 IP 上。这就是"运营商级 NAT",简称 CGNAT。
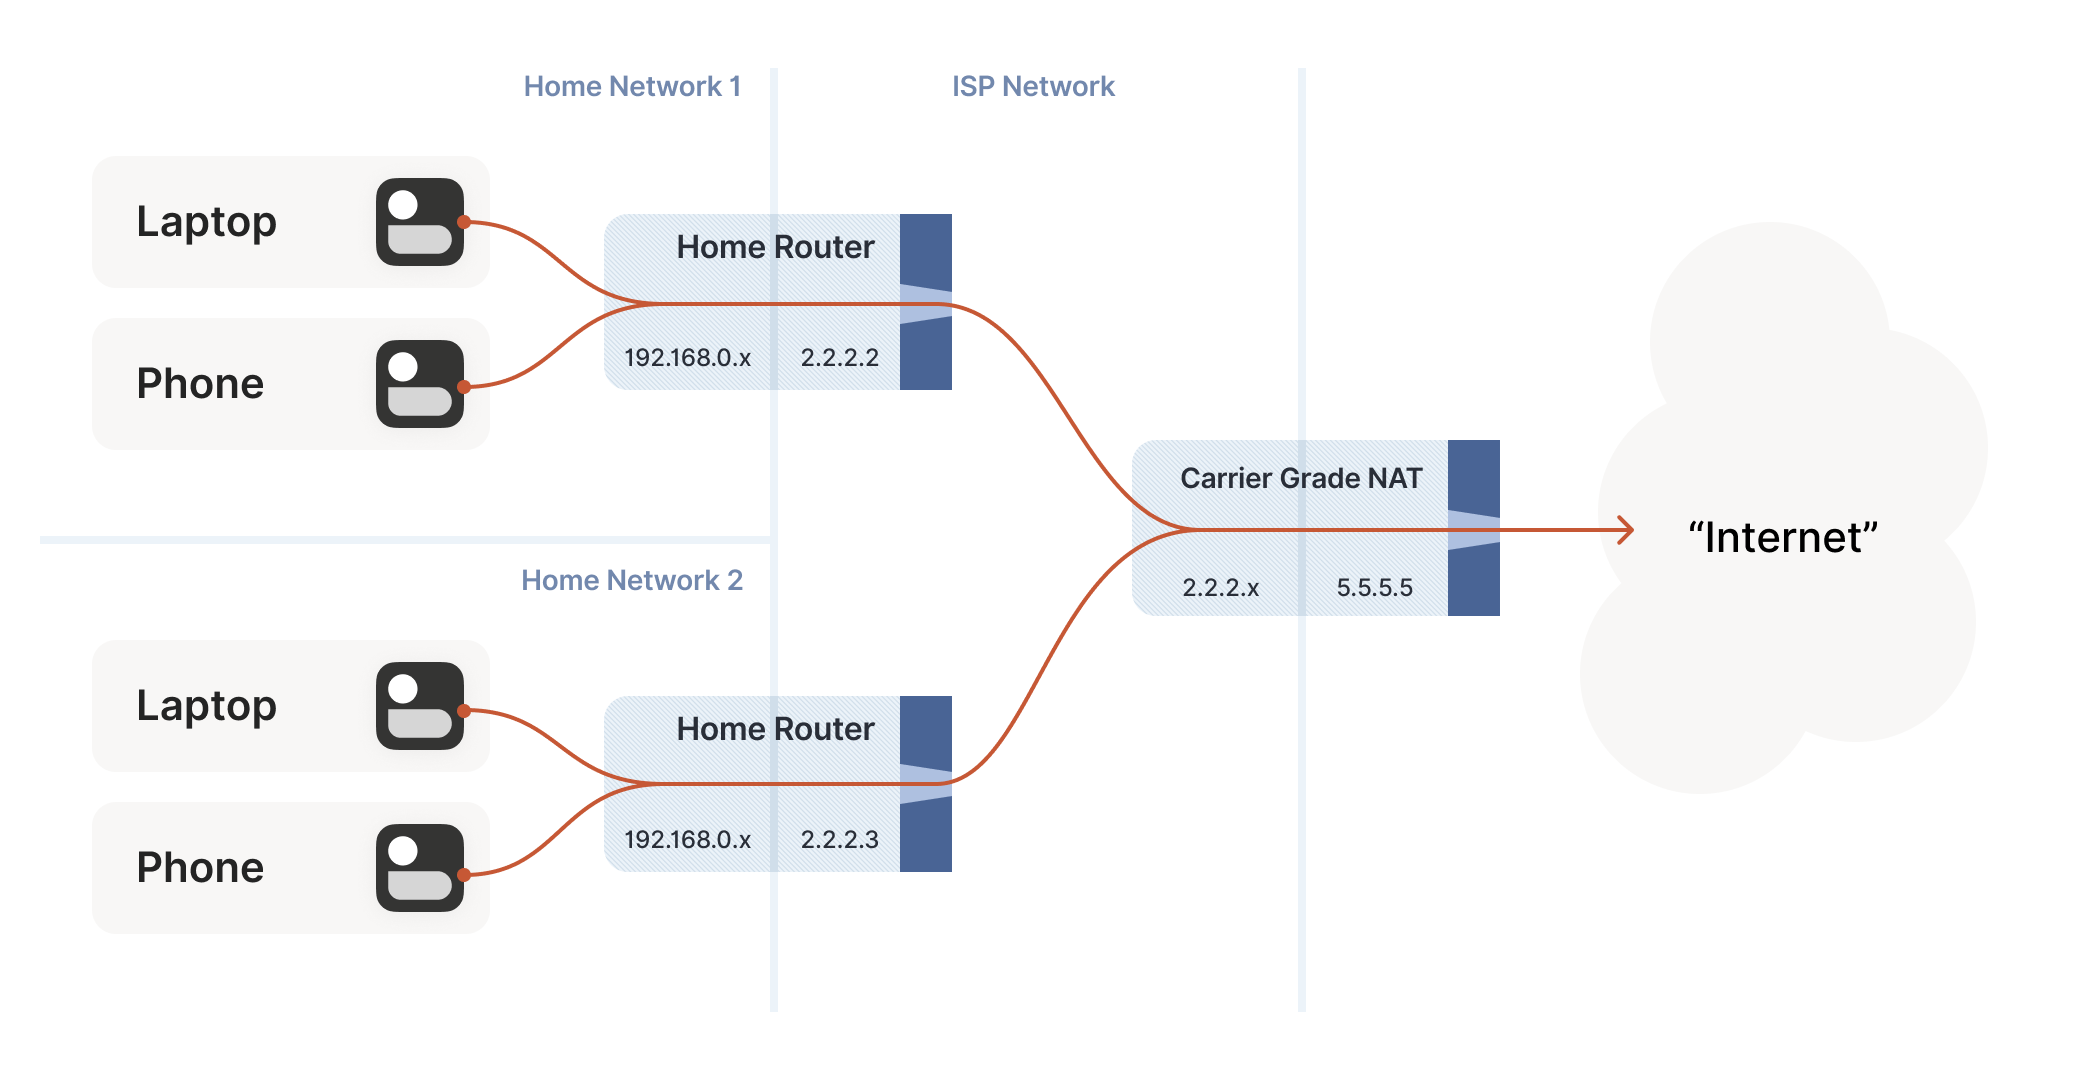

How do we connect two peers who are behind the same CGNAT, but different home NATs within?
我们如何连接位于同一 CGNAT 后方但内部不同家庭 NAT 下的两个对等节点?
Carrier-grade NAT is an important development for NAT traversal. Prior
to CGNAT, enterprising users could work around NAT traversal
difficulties by manually configuring port forwarding on their home
routers. But you can’t reconfigure the ISP’s CGNAT! Now even power
users have to wrestle with the problems NATs pose.
运营商级 NAT(CGNAT)是 NAT 穿透技术发展的重要里程碑。在 CGNAT 出现前,有经验的用户可以通过手动配置家庭路由器端口转发来绕过 NAT 穿透难题。但用户无法重新配置 ISP 部署的 CGNAT!如今即便是高级用户也不得不直面 NAT 带来的技术挑战。
The good news: this is a run of the mill double-NAT, and so as we
covered above it’s mostly okay. Some stuff won’t work as well as it
could, but things work well enough that ISPs can charge money for
it. Aside from the port mapping protocols, everything from our current
bag of tricks works fine in a CGNAT world.
好消息是:这只是常规的双层 NAT 架构,正如前文所述,其运行基本正常。某些功能可能无法达到最佳状态,但整体表现足以让 ISP 为此收费。除了端口映射协议外,我们现有的各种穿透技巧在 CGNAT 环境下都能良好运作。
We do have to overcome a new challenge, however: how do we connect two
peers who are behind the same CGNAT, but different home NATs within?
That’s how we set up peers A and B in the diagram above.
不过我们确实面临一个新挑战:如何连接位于同一 CGNAT 后方、但处于不同家庭 NAT 下的两个终端节点?这正是上图中终端 A 与 B 的连接场景。
The problem here is that STUN doesn’t work the way we’d like. We’d
like to find out our ip:port on the “middle network”, because it’s
effectively playing the role of a miniature internet to our two
peers. But STUN tells us what our ip:port is from the STUN server’s
point of view, and the STUN server is out on the internet, beyond the
CGNAT.
问题在于 STUN 的工作方式与我们期望的不同。我们希望能找出自己在"中间网络"上的 ip:port 地址,因为这个网络实际上扮演着连接双方对等节点的微型互联网角色。但 STUN 服务器位于运营商级 NAT 之外的真实互联网上,它只会从自身角度告诉我们 ip:port 地址。
If you’re thinking that port mapping protocols can help us here,
you’re right! If either peer’s home NAT supports one of the port
mapping protocols, we’re happy, because we have an ip:port that
behaves like an un-NATed server, and connecting is
trivial. Ironically, the fact that double NAT “breaks” the port
mapping protocols helps us! Of course, we still can’t count on these
protocols helping us out, doubly so because CGNAT ISPs tend to turn
them off in the equipment they put in homes in order to avoid software
getting confused by the “wrong” results they would get.
如果你认为端口映射协议能帮上忙,那确实如此!只要任意一方的家庭 NAT 支持端口映射协议,问题就迎刃而解——因为此时我们拥有一个 ip:port 地址,其行为就像未经过 NAT 转发的服务器,建立连接轻而易举。颇具讽刺意味的是,双重 NAT"破坏"端口映射协议的特性反而帮了我们!当然,我们仍不能指望这些协议总能奏效,特别是在 CGNAT 场景下——运营商往往会在家庭网关设备中禁用这些协议,以避免软件因获取"错误"结果而产生混乱。
But what if we don’t get lucky, and can’t map ports on our NATs? Let’s
go back to our STUN-based technique and see what happens. Both peers
are behind the same CGNAT, so let’s say that STUN tells us that peer A
is 2.2.2.2:1234, and peer B is 2.2.2.2:5678.
但若运气不佳,无法在 NAT 设备上映射端口呢?让我们回到基于 STUN 的技术方案看看会发生什么。假设两个对等端位于同一个 CGNAT 之后,STUN 服务器告知我们:对等端 A 的外网地址是 2.2.2.2:1234 ,对等端 B 是 2.2.2.2:5678 。
The question is: what happens when peer A sends a packet to
2.2.2.2:5678? We might hope that the following takes place in the
CGNAT box:
关键问题在于:当对等端 A 向 2.2.2.2:5678 发送数据包时会发生什么?我们或许期待 CGNAT 设备会执行以下操作:
-
Apply peer A’s NAT mapping, rewrite the packet to be from
2.2.2.2:1234and to2.2.2.2:5678.
应用对等端 A 的 NAT 映射规则,将数据包改写为从2.2.2.2:1234发往2.2.2.2:5678。 -
Notice that
2.2.2.2:5678matches peer B’s incoming NAT mapping, rewrite the packet to be from2.2.2.2:1234and to peer B’s private IP.
注意2.2.2.2:5678与对等端 B 的入站 NAT 映射相匹配,将数据包改写为来自2.2.2.2:1234并指向对等端 B 的私有 IP 地址。 -
Send the packet on to peer B, on the “internal” interface rather than off towards the internet.
通过"内部"接口将数据包继续传送给对等端 B,而不是向外发送到互联网。
This behavior of NATs is called hairpinning, and with all this
dramatic buildup you won’t be surprised to learn that hairpinning
works on some NATs and not others.
NAT 的这种行为被称为发夹式转发(hairpinning),经过以上戏剧性的铺垫后,您不会惊讶地发现:某些 NAT 支持发夹式转发,而另一些则不支持。
In fact, a great many otherwise well-behaved NAT devices don’t support
hairpinning, because they make assumptions like “a packet from my
internal network to a non-internal IP address will always flow
outwards to the internet”, and so end up dropping packets as they try
to turn around within the router. These assumptions might even be
baked into routing silicon, where it’s impossible to fix without new
hardware.
事实上,许多原本表现良好的 NAT 设备并不支持发夹式转发,因为它们预设了"从内部网络发往非内部 IP 地址的数据包始终会流向外部互联网"这样的规则,导致数据包试图在路由器内部转向时被丢弃。这些预设逻辑甚至可能固化在路由芯片中,不更换硬件就无法修复。
Hairpinning, or lack thereof, is a trait of all NATs, not just
CGNATs. In most cases, it doesn’t matter, because you’d expect two LAN
devices to talk directly to each other rather than hairpin through
their default gateway. And it’s a pity that it usually doesn’t matter,
because that’s probably why hairpinning is commonly broken.
发夹式转发(或缺乏该功能)是所有 NAT 设备的共性特征,而不仅限于 CGNAT。多数情况下这无关紧要,因为人们通常期望两个局域网设备直接通信,而非通过默认网关进行发夹式绕转。但令人遗憾的是,这种普遍存在的功能缺失恰恰源于其实际应用场景的稀少性。
But once CGNAT is involved, hairpinning becomes vital to
connectivity. Hairpinning lets you apply the same tricks that you use
for internet connectivity, without worrying about whether you’re
behind a CGNAT. If both hairpinning and port mapping protocols fail,
you’re stuck with relaying.
但一旦涉及 CGNAT,发卡弯技术就成为连接的关键。发卡弯技术让你能沿用互联网连接的那些技巧,而无需操心是否处于 CGNAT 之后。如果发卡弯技术和端口映射协议都失效,你就只能依赖中继转发了。
Ideally IPv6, NAT64 notwithstanding
理想情况下应该采用 IPv6,尽管存在 NAT64
By this point I expect some of you are shouting at your screens that
the solution to all this nonsense is IPv6. All this is happening
because we’re running out of IPv4 addresses, and we keep piling on
NATs to work around that. A much simpler fix would be to not have an IP
address shortage, and make every device in the world reachable without
NATs. Which is exactly what IPv6 gets us.
说到这里,我猜肯定有人对着屏幕大喊:解决这些破事的终极方案是 IPv6。所有这些问题都源于 IPv4 地址耗尽,我们只能不断堆叠 NAT 来应对。更简单的解决方案本该是消除 IP 地址短缺,让全球每台设备都能不经过 NAT 直接访问——而这正是 IPv6 带给我们的。
And you’re right! Sort of. It’s true that in an IPv6-only world, all
of this becomes much simpler. Not trivial, mind you, because we’re
still stuck with stateful firewalls. Your office workstation may have
a globally reachable IPv6 address, but I’ll bet there’s still a
corporate firewall enforcing “outbound connections only” between you
and the greater internet. And on-device firewalls are still there,
enforcing the same thing.
说得对!但也不全对。确实在纯 IPv6 世界里,这些问题会简单许多。不过别想得太简单,毕竟我们还得面对有状态防火墙。你的办公电脑或许拥有全局可达的 IPv6 地址,但我敢打赌企业防火墙依然会强制实行"仅允许出站连接"策略。设备本地的防火墙同样会维持这种限制。
So, we still need the firewall traversal stuff from the start of the
article, and a side channel so that peers can know what ip:port to
talk to. We’ll probably also still want fallback relays that use a
well-like protocol like HTTP, to get out of networks that block
outbound UDP. But we can get rid of STUN, the birthday paradox trick,
port mapping protocols, and all the hairpinning bumf. That’s much
nicer!
因此,我们仍然需要文章开头提到的防火墙穿透技术,以及一个辅助通道让对等方能知道该与哪个 ip:port 通信。可能还需要保留使用 HTTP 这类通用协议的备用中继服务器,以便突破封锁出站 UDP 的网络。但我们可以摒弃 STUN 协议、生日悖论技巧、端口映射协议以及所有繁琐的端口回流机制。这样就简洁多了!
The big catch is that we currently don’t have an all-IPv6 world. We
have a world that’s mostly IPv4, and about 33% IPv6. Those
34% are very unevenly distributed, so a particular set of peers could
be 100% IPv6, 0% IPv6, or anywhere in between.
目前最大的难题是我们尚未实现全 IPv6 的世界。现实情况是网络仍以 IPv4 为主,IPv6 仅占约 33%。而且这 34%的分布极不均衡——某些节点群可能完全支持 IPv6,有些则完全不支持,更多是处于两者之间的状态。
What this means, unfortunately, is that IPv6 isn’t yet the solution
to our problems. For now, it’s just an extra tool in our connectivity
toolbox. It’ll work fantastically well with some pairs of peers, and
not at all for others. If we’re aiming for “connectivity no matter
what”, we have to also do IPv4+NAT stuff.
遗憾的是,这意味着 IPv6 目前还不能彻底解决我们的连接难题。现阶段它只是网络工具箱里的一个补充工具:某些节点之间能完美通过 IPv6 互联,而另一些则完全行不通。如果我们追求"绝对连通性",就不得不继续处理 IPv4+NAT 的相关技术。
Meanwhile, the coexistence of IPv6 and IPv4 introduces yet another new
scenario we have to account for: NAT64 devices.
与此同时,IPv6 与 IPv4 的共存又带来了我们必须考虑的另一种新场景:NAT64 设备。
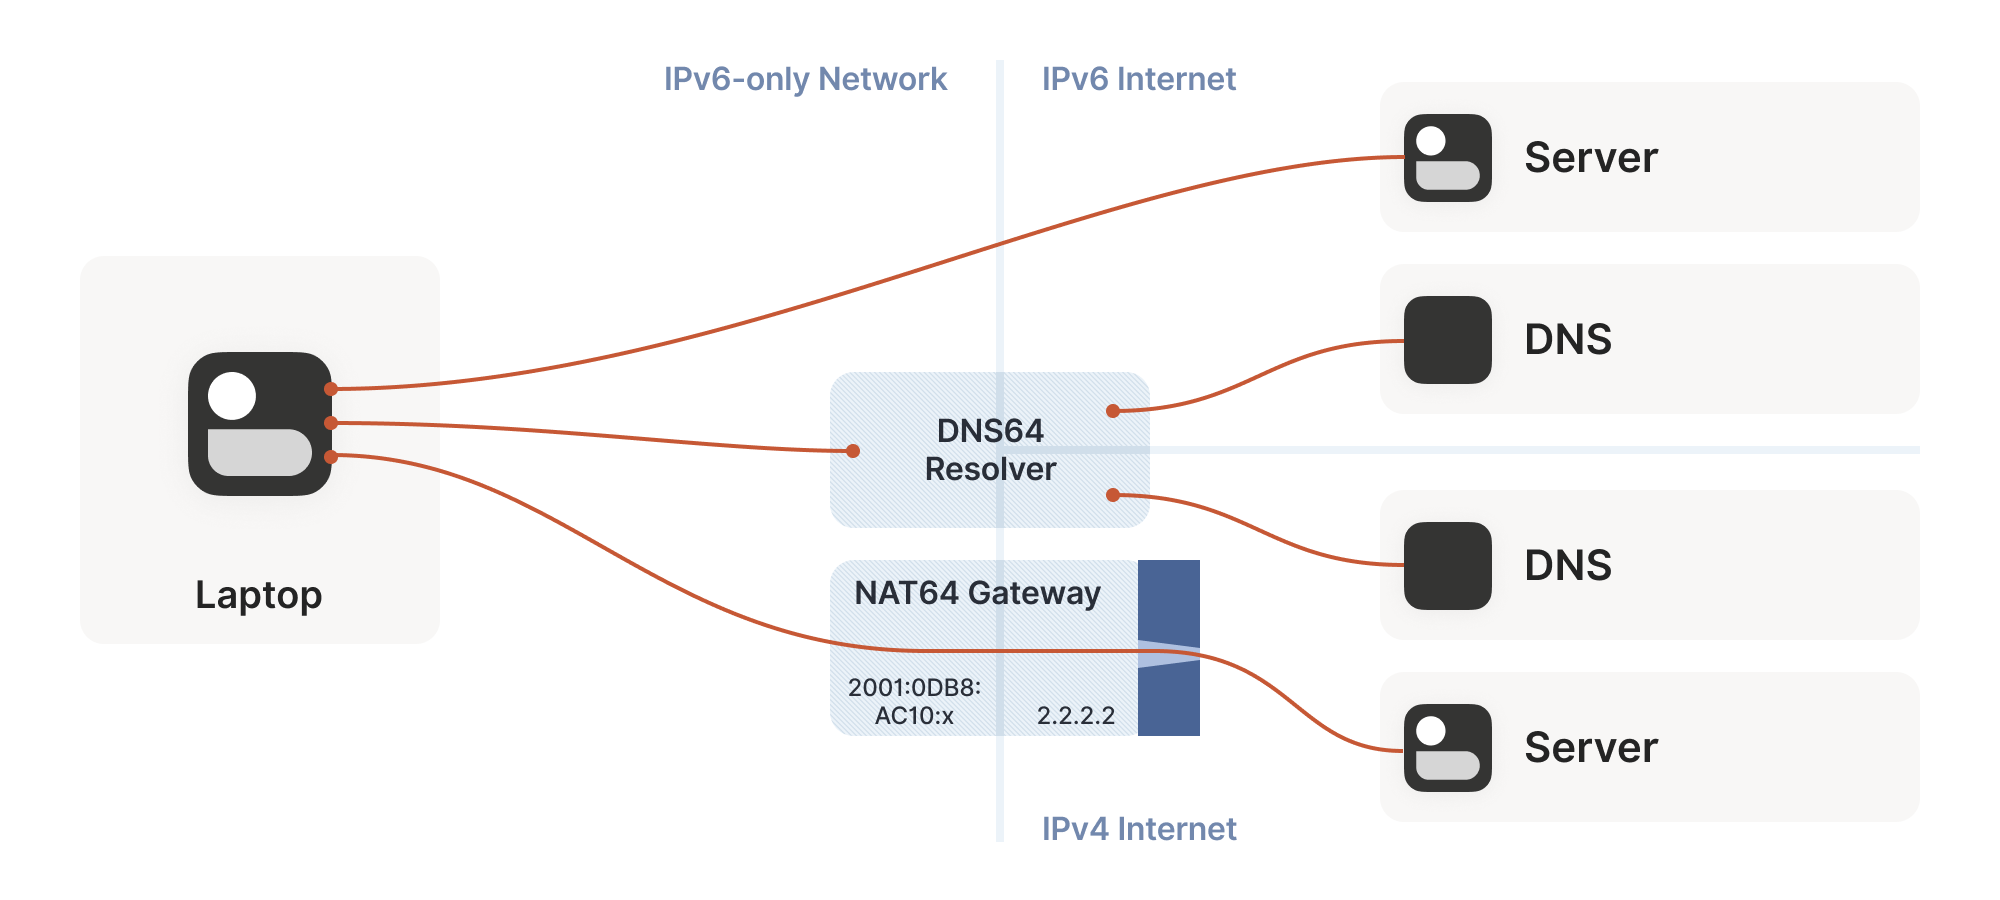
So far, the NATs we’ve looked at have been NAT44: they translate IPv4
addresses on one side to different IPv4 addresses on the other
side. NAT64, as you might guess, translates between protocols. IPv6 on
the internal side of the NAT becomes IPv4 on the external
side. Combined with DNS64 to translate IPv4 DNS answers into IPv6, you
can present an IPv6-only network to the end device, while still giving
access to the IPv4 internet.
目前我们讨论的 NAT 都属于 NAT44 类型:它们将一侧的 IPv4 地址转换为另一侧不同的 IPv4 地址。正如您可能猜到的,NAT64 则实现了协议间的转换——NAT 内部使用 IPv6,外部则转换为 IPv4。结合 DNS64 将 IPv4 的 DNS 应答转换为 IPv6,就能向终端设备呈现纯 IPv6 网络,同时仍可访问 IPv4 互联网。
(Incidentally, you can extend this naming scheme indefinitely. There
have been some experiments with NAT46; you could deploy NAT66 if you
enjoy chaos; and some RFCs use NAT444 for carrier-grade NAT.)
(顺带一提,这种命名规则可以无限延伸。已有实验性质的 NAT46 部署;若您钟情混乱,甚至可以部署 NAT66;某些 RFC 文档还使用 NAT444 来表示运营商级 NAT。)
This works fine if you only deal in DNS names. If you connect to
google.com, turning that into an IP address involves the DNS64
apparatus, which lets the NAT64 get involved without you being any the
wiser.
这种方法在仅处理 DNS 名称时效果良好。当你连接 google.com 时,将其转换为 IP 地址的过程会涉及 DNS64 机制,这使得 NAT64 能在你毫无察觉的情况下介入工作。
But we care deeply about specific IPs and ports for our NAT and
firewall traversal. What about us? If we’re lucky, our device supports
CLAT (Customer-side translator — from Customer XLAT). CLAT makes the
OS pretend that it has direct IPv4 connectivity, using NAT64 behind
the scenes to make it work out. On CLAT devices, we don’t need to do
anything special.
但我们非常关心用于 NAT 穿透和防火墙穿越的特定 IP 和端口。那我们该怎么办?如果运气好的话,我们的设备支持 CLAT(客户端转换器——源自 Customer XLAT)。CLAT 让操作系统假装自己拥有直接的 IPv4 连接能力,实际上是通过后台的 NAT64 技术来实现这一功能。在使用 CLAT 的设备上,我们无需进行任何特殊操作。
CLAT is very common on mobile devices, but very uncommon on desktops,
laptops and servers. On those, we have to explicitly do the work CLAT
would have done: detect the existence of a NAT64+DNS64 setup, and use
it appropriately.
CLAT 在移动设备上非常常见,但在台式机、笔记本电脑和服务器上却极为罕见。对于后者,我们必须明确完成 CLAT 本应执行的工作:检测是否存在 NAT64+DNS64 设置,并正确使用它。
Detecting NAT64+DNS64 is easy: send a DNS request to ipv4only.arpa.
That name resolves to known, constant IPv4 addresses, and only IPv4
addresses. If you get IPv6 addresses back, you know that a DNS64 did
some translation to steer you to a NAT64. That lets you figure out
what the NAT64 prefix is.
检测 NAT64+DNS64 非常简单:向 ipv4only.arpa. 发送 DNS 请求。该域名解析为已知的固定 IPv4 地址(且仅限 IPv4 地址)。如果返回的是 IPv6 地址,就说明 DNS64 进行了转换以引导至 NAT64。这样你就能推算出 NAT64 的前缀是什么。
From there, to talk to IPv4 addresses, send IPv6 packets to {NAT64 prefix + IPv4 address}. Similarly, if you receive traffic from
{NAT64 prefix + IPv4 address}, that’s IPv4 traffic. Now speak STUN
through the NAT64 to discover your public ip:port on the NAT64, and
you’re back to the classic NAT traversal problem — albeit with a bit
more work.
接下来要与 IPv4 地址通信时,只需向 {NAT64 prefix + IPv4 address} 发送 IPv6 数据包。同理,若收到来自 {NAT64 prefix + IPv4 address} 的流量,那就是 IPv4 流量。此时通过 NAT64 发送 STUN 协议来发现你在 NAT64 上的公共 ip:port 地址,就又回到了经典的 NAT 穿透问题——只不过需要多费些功夫。
Fortunately for us, this is a fairly esoteric corner case. Most
v6-only networks today are mobile operators, and almost all phones
support CLAT. ISPs running v6-only networks deploy CLAT on the router
they give you, and again you end up none the wiser. But if you want to
get those last few opportunities for connectivity, you’ll have to
explicitly support talking to v4-only peers from a v6-only network as
well.
幸运的是,这种情况相当罕见。目前大多数纯 IPv6 网络都是移动运营商,且几乎所有手机都支持 CLAT。运营纯 IPv6 网络的 ISP 会在提供的路由器上部署 CLAT,用户依然可以无感知使用。但若想抓住最后那些连接机会,就必须额外支持从纯 IPv6 网络与纯 IPv4 节点通信。
Integrating it all with ICE
将所有机制与 ICE 协议集成
We’re in the home stretch. We’ve covered stateful firewalls, simple
and advanced NAT tricks, IPv4 and IPv6. So, implement all the above,
and we’re done!
我们已进入最后阶段。我们讲解了有状态防火墙、基础与高级 NAT 技巧、IPv4 和 IPv6 协议。只要实现上述所有技术,大功就告成了!
Except, how do you figure out which tricks to use for a particular
peer? How do you figure out if this is a simple stateful firewall
problem, or if it’s time to bust out the birthday paradox, or if you
need to fiddle with NAT64 by hand? Or maybe the two of you are on the
same Wi-Fi network, with no firewalls and no effort required.
但问题在于:如何判断对特定通信方该采用哪种技巧?如何区分这是简单的有状态防火墙问题,还是该动用生日悖论算法,或是需要手动调整 NAT64?又或许双方其实处于同一 Wi-Fi 网络,根本无需考虑防火墙问题。
Early research into NAT traversal had you precisely characterize the
path between you and your peer, and deploy a specific set of
workarounds to defeat that exact path. But as it turned out, network
engineers and NAT box programmers have many inventive ideas, and that
stops scaling very quickly. We need something that involves a bit less
thinking on our part.
早期关于 NAT 穿透的研究要求精确分析你与对等节点之间的路径特征,并针对该特定路径部署一系列解决方案。但事实证明,网络工程师和 NAT 设备程序员总有层出不穷的创新点子,这种方法很快就难以扩展。我们需要一种能让我们少费些脑筋的方案。
Enter the Interactive Connectivity Establishment (ICE) protocol. Like
STUN and TURN, ICE has its roots in the telephony world, and so the
RFC is full of SIP and SDP and signalling sessions and dialing and so
forth. However, if you push past that, it also specifies a stunningly
elegant algorithm for figuring out the best way to get a connection.
这时就轮到交互式连接建立(ICE)协议登场了。与 STUN 和 TURN 一样,ICE 也源自电话通信领域,因此其 RFC 文档充斥着 SIP、SDP、信令会话和拨号等内容。但如果你深入探究,会发现它还规定了一种极其优雅的算法,用于确定建立连接的最佳方式。
Ready? The algorithm is: try everything at once, and pick the best
thing that works. That’s it. Isn’t that amazing?
准备好了吗?这个算法就是:同时尝试所有可能的方式,然后选择其中最优的有效方案。仅此而已。是不是很精妙?
Let’s look at this algorithm in a bit more detail. We’re going to
deviate from the ICE spec here and there, so if you’re trying to
implement an interoperable ICE client, you should go read RFC
8445 and implement that. We’ll skip all the
telephony-oriented stuff to focus on the core logic, and suggest a few
places where you have more degrees of freedom than the ICE spec
suggests.
让我们更详细地看看这个算法。我们将不完全拘泥于 ICE 规范,所以如果你要实现一个可互操作的 ICE 客户端,应该去阅读 RFC 8445 并按其实现。我们会跳过所有面向电话通信的内容,专注于核心逻辑,并指出几处比 ICE 规范允许更大自由度的地方。
To communicate with a peer, we start by gathering a list of candidate
endpoints for our local socket. A candidate is any ip:port that
our peer might, perhaps, be able to use in order to speak to us. We
don’t need to be picky at this stage, the list should include at
least:
要与对等端通信,我们首先需要为本地套接字收集候选端点列表。候选端点是指对等端可能用来与我们通信的任何 ip:port 地址。在这个阶段我们无需过于挑剔,该列表至少应包括:
-
IPv6
ip:ports -
IPv4 LAN
ip:portsIPv4 局域网ip:ports -
IPv4 WAN
ip:portsdiscovered by STUN (possibly via a NAT64 translator)
通过 STUN 发现的 IPv4 广域网ip:ports(可能经由 NAT64 转换器) -
IPv4 WAN
ip:portallocated by a port mapping protocol
通过端口映射协议分配的 IPv4 广域网ip:port -
Operator-provided endpoints (e.g. for statically configured port forwards)
运营商提供的端点(例如用于静态配置的端口转发)
Then, we swap candidate lists with our peer through the side channel,
and start sending probe packets at each others’ endpoints. Again, at
this point you don’t discriminate: if the peer provided you with 15
endpoints, you send “are you there?” probes to all 15 of them.
接着,我们通过旁路通道与对等方交换候选列表,并开始向彼此的端点发送探测数据包。同样,此时无需区分:如果对等方提供了 15 个端点,你就向所有这 15 个端点发送"你在吗?"探测请求。
These packets are pulling double duty. Their first function is to act
as the packets that open up the firewalls and pierce the NATs, like
we’ve been doing for this entire article. But the other is to act as a
health check. We’re exchanging (hopefully authenticated) “ping” and
“pong” packets, to check if a particular path works end to end.
这些数据包肩负双重使命。首要功能是作为穿透防火墙和 NAT 的通行证——正如整篇文章所阐述的那样。但另一个重要作用是充当健康检查机制。我们通过交换(最好是经过认证的)"ping"和"pong"数据包,来验证特定路径是否能够端到端畅通。
Finally, after some time has passed, we pick the “best” (according to
some heuristic) candidate path that was observed to work, and we’re
done.
经过一段时间后,我们最终会根据某种启发式标准选出观测到可用的"最佳"候选路径,整个过程就完成了。
The beauty of this algorithm is that if your heuristic is right,
you’ll always get an optimal answer. ICE has you score your candidates
ahead of time (usually: LAN > WAN > WAN+NAT), but it doesn’t have to
be that way. Starting with v0.100.0, Tailscale switched from a
hardcoded preference order to round-trip latency, which tends to
result in the same LAN > WAN > WAN+NAT ordering. But unlike static
ordering, we discover which “category” a path falls into organically,
rather than having to guess ahead of time.
这个算法的精妙之处在于,只要启发式标准正确,就总能获得最优解。ICE 协议要求预先对候选路径评分(通常规则是:局域网>广域网>广域网+NAT),但实际并非必须如此。从 v0.100.0 版本开始,Tailscale 将硬编码的优先级顺序改为基于往返延迟的动态判断,这种方式通常也会形成局域网>广域网>广域网+NAT 的排序。但与静态排序不同,我们能自然发现路径所属的"类别",而无需提前猜测。
The ICE spec structures the protocol as a “probe phase” followed by an
“okay let’s communicate” phase, but there’s no reason you need to
strictly order them. In Tailscale, we upgrade connections on the fly
as we discover better paths, and all connections start out with DERP
preselected. That means you can use the connection immediately through
the fallback path, while path discovery runs in parallel. Usually,
after a few seconds, we’ll have found a better path, and your
connection transparently upgrades to it.
ICE 规范将协议结构设计为"探测阶段"和"正式通信阶段"两个严格分离的阶段,但实际上无需严格区分。在 Tailscale 中,我们会在发现更优路径时实时升级连接,所有连接初始都预设 DERP 中转。这意味着您可以通过备用路径立即使用连接,同时路径发现过程在后台并行运行。通常几秒钟后就会发现更优路径,您的连接将无缝升级至新路径。
One thing to be wary of is asymmetric paths. ICE goes to some effort
to ensure that both peers have picked the same network path, so that
there’s definite bidirectional packet flow to keep all the NATs and
firewalls open. You don’t have to go to the same effort, but you do
have to ensure that there’s bidirectional traffic along all paths
you’re using. That can be as simple as continuing to send ping/pong
probes periodically.
需要注意的一点是非对称路径问题。ICE 协议会尽力确保通信双方选择相同的网络路径,从而维持明确的双向数据包流动,使所有 NAT 和防火墙保持开放状态。虽然您无需采取同等措施,但必须确保正在使用的所有路径上都有双向流量。简单的做法就是持续定期发送 ping/pong 探测包。
To be really robust, you also need to detect that your currently
selected path has failed (say, because maintenance caused your NAT’s
state to get dumped on the floor), and downgrade to another path. You
can do this by continuing to probe all possible paths and keep a set
of “warm” fallbacks ready to go, but downgrades are rare enough that
it’s probably more efficient to fall all the way back to your relay of
last resort, then restart path discovery.
要实现真正健壮的连接,还需要检测当前所选路径是否失效(比如因维护导致 NAT 状态被清空),并降级使用备用路径。可以通过持续探测所有可能路径并保持一组"预热"状态的备用路径来实现,但由于降级情况较为罕见,更高效的做法可能是直接回退到最后的中继节点,然后重新启动路径发现流程。
Finally, we should mention security. Throughout this article, I’ve
assumed that the “upper layer” protocol you’ll be running over this
connection brings its own security (QUIC has TLS certs, WireGuard has
its own public keys…). If that’s not the case, you absolutely need
to bring your own. Once you’re dynamically switching paths at runtime,
IP-based security becomes meaningless (not that it was worth much in
the first place), and you must have at least end-to-end
authentication.
最后,我们必须谈谈安全问题。在整篇文章中,我一直假设您将通过此连接运行的"上层"协议自带安全机制(QUIC 具备 TLS 证书,WireGuard 拥有自己的公钥...)。如果情况并非如此,您绝对需要自行配置安全措施。一旦您在运行时动态切换路径,基于 IP 的安全机制就变得毫无意义(尽管它原本的价值也不大),您至少必须确保端到端的身份验证。
If you have security for your upper layer, strictly speaking it’s okay
if your ping/pong probes are spoofable. The worst that can happen is
that an attacker can persuade you to relay your traffic through
them. In the presence of e2e security, that’s not a huge deal
(although obviously it depends on your threat model). But for good
measure, you might as well authenticate and encrypt the path discovery
packets as well. Consult your local application security engineer for
how to do that safely.
如果您的上层协议已具备安全措施,严格来说即使 ping/pong 探测数据包可被伪造也无妨。最坏的情况不过是攻击者能诱使您通过他们的节点中继流量。在具备端到端加密的情况下,这并非致命问题(当然具体取决于您的威胁模型)。但为了万无一失,您不妨也对路径探测数据包进行认证和加密。具体实施方案请咨询您所在机构的应用程序安全工程师。
Concluding our connectivity chat
关于连接性的讨论就此告一段落
At last, we’re done. If you implement all of the above, you’ll have
state of the art NAT traversal software that can get direct
connections established in the widest possible array of
situations. And you’ll have your relay network to pick up the slack
when traversal fails, as it likely will for a long tail of cases.
终于,我们完成了所有步骤。如果实现了上述所有技术,你将拥有最先进的 NAT 穿透软件,能够在最广泛的环境中建立直接连接。而当穿透失败时(这种情况在长尾案例中仍会频繁发生),你的中继网络也能及时补位。
This is all quite complicated! It’s one of those problems that’s fun
to explore, but quite fiddly to get right, especially if you start
chasing the long tail of opportunities for just that little bit more
connectivity.
整个过程相当复杂!这类问题探索起来很有趣,但要完美解决却相当棘手——尤其是当你开始追逐那长尾效应中微不足道却至关重要的连接机会时。
The good news is that, once you’ve done it, you have something of a
superpower: you get to explore the exciting and relatively
under-explored world of peer-to-peer applications. So many interesting
ideas for decentralized software fall at the first hurdle, when it
turns out that talking to each other on the internet is harder than
expected. But now you know how to get past that, so go build cool
stuff!
好消息是,一旦攻克这个难题,你就获得了某种超能力:可以探索激动人心却尚未充分开发的 P2P 应用世界。许多关于去中心化软件的绝妙构想,往往在发现互联网设备间直接通信比预期更困难时就夭折了。但现在你已掌握突破之道,快去创造酷炫的东西吧!
Here’s a parting “TL;DR” recap: For robust NAT traversal, you need
the following ingredients:
最后奉上简明版要点回顾:要实现稳健的 NAT 穿透,你需要以下要素:
-
A UDP-based protocol to augment
基于 UDP 协议的增强方案 -
Direct access to a socket in your program
程序中直接访问套接字 -
A communication side channel with your peers
与对等节点的通信旁路 -
A couple of STUN servers
若干 STUN 服务器 -
A network of fallback relays (optional, but highly recommended)
备用中继网络(可选,但强烈推荐)
Then, you need to:
接下来您需要:
-
Enumerate all the
ip:portsfor your socket on your directly connected interfaces
枚举直连接口上套接字的所有ip:ports -
Query STUN servers to discover WAN
ip:portsand the “difficulty” of your NAT, if any
查询 STUN 服务器以发现 WANip:ports及 NAT 的"穿透难度"(如存在) -
Try using the port mapping protocols to find more WAN
ip:ports
尝试使用端口映射协议发现更多广域网地址ip:ports -
Check for NAT64 and discover a WAN
ip:portthrough that as well, if applicable
检查 NAT64 转换并尝试通过该方式发现广域网地址ip:port(如适用) -
Exchange all those
ip:portswith your peer through your side channel, along with some cryptographic keys to secure everything.
通过侧信道将所有ip:ports地址与对等节点交换,同时交换加密密钥以确保通信安全 -
Begin communicating with your peer through fallback relays (optional, for quick connection establishment)
开始通过备用中继节点与对等节点建立通信(可选,用于快速建立连接) -
Probe all of your peer’s
ip:portsfor connectivity and if necessary/desired, also execute birthday attacks to get through harder NATs
探测所有对等节点的ip:ports连接性,必要时/需要时可执行生日攻击以穿透更严格的 NAT -
As you discover connectivity paths that are better than the one you’re currently using, transparently upgrade away from the previous paths.
当发现优于当前使用的连接路径时,自动无缝切换至新路径 -
If the active path stops working, downgrade as needed to maintain connectivity.
若活动路径失效,则按需降级以维持连接 -
Make sure everything is encrypted and authenticated end-to-end.
确保所有通信都经过端到端加密和身份验证
 David Anderson